Dataserver Manual
DataServer is an application that manages the running and operation of one or more tOG renderers.

Reference Manual
|
About |
Description |
|
Revision |
|
|
History |
27/10/2016; Updated from 25/11/2020 |
|
Authors |
Jason Wood; Jerry Clark |
Overview
DataServer is an application that manages the running and operation of one or more tOG renderers. It provides the following functionality :
- A centralised location to manage and control a network of tOG machines.
- Quick configuration of different sessions to allow machines to be swapped in and out, and new shows or channels to be accommodated with ease.
- Web applications to control tOG, allowing flexibility as any thin client on the network with a web browser can be configured to control tOG.
- 4Access permissions to allow control over which individuals are allowed access to which tOGs.
- Synchronization functionality to allow assets to be automatically distributed between renderers.
DataServer provides most functionality through a web interface, with only a minimum of administration setup required to initialise the server initially.
DataServer is qualified to run with the Chrome Web Browser. Other browsers may not work correctly, or with a reduced feature set.
Other Applications
DataServer can work in conjunction with TOGMediaServer and TOGRepository to provide a full asset management workflow for getting projects, data and dynamic assets onto render machines.
TOGWebControl is the primary web application that is used via DataServer to control live machines. TOGWebControlDesk is documented in its own manual.
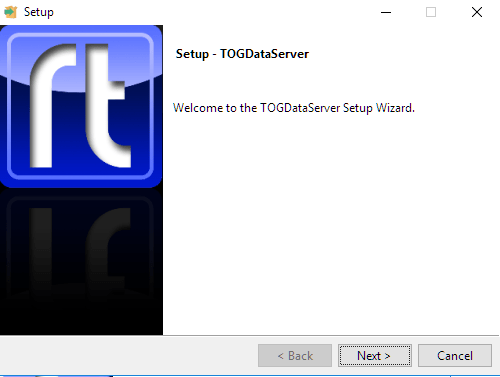
Installation
To install DataServer, download the DataServer.exe installer, and double click.
- Click Next
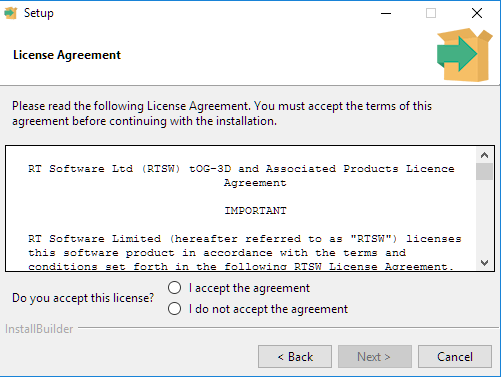
- Accept the agreement and click next
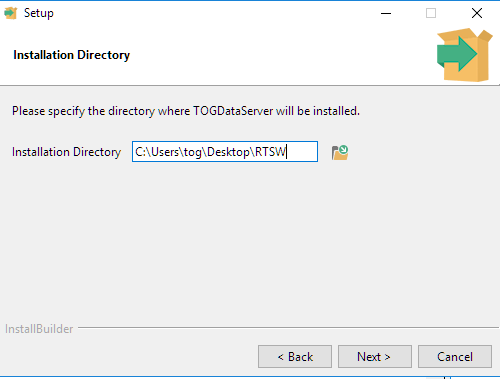
- Choose the location of the RTSW folder that you wish to install into and click next.
NOTE : The RTSW folder is the default installation folder for a number of different things :
- RTSoftware application executables, such as DataServer, TOGRepository, TOGMediaServer.
- TOG Project Files that contain the graphics you are running.
- DataServer Sessions that contain dynamic assets used by your application.
- Configuration files for different RTSoftware applications.
It is recommended that you install into a local location with plenty of disk space
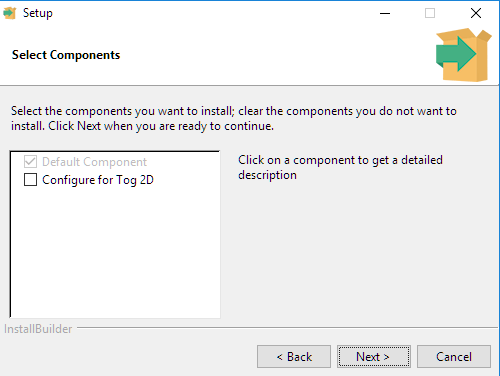
- If this data server is going to be running as part of a TOG 2D Live configuration, click Configure for Tog2D. Otherwise, leave it unchecked.
- Configure for Tog2D sets up configuration files with the following setup :
- A single user, called tog2d is created with no password.
- A renderer called tog2d_live that runs on port 8080
- A preview called tog2d_preview that runs on port 5001
- A single session is created called tog2d that uses the renderer and preview
- Configure for Tog2D sets up configuration files with the following setup :
- Click next
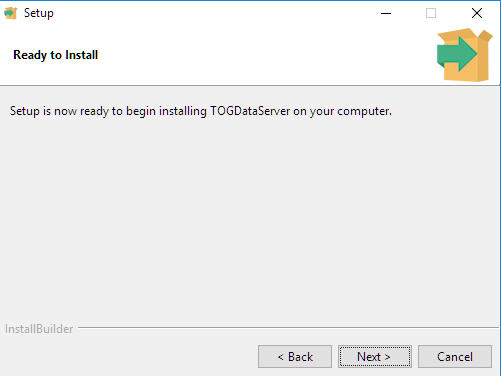
- Click next to perform the installation.
Running DataServer
DataServer installs into the RTSW folder that you specified in installation.
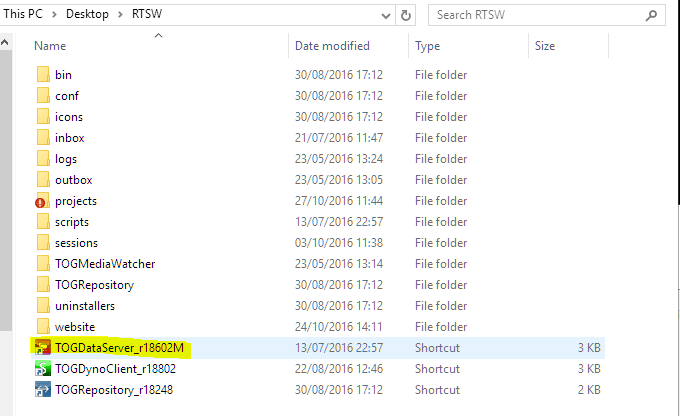
- Browse to the RTSW folder.
- Double-click the DataServer icon to run up the data server.
Basic DataServer setup
Configuring the System Administrator.
- On the menu bar at the top of the DataServer window, click on Admin->Set Admin Password
- Type in a new password.
The default Administrator username is Administrator
This can be changed in preferences. If you change the default administrator username, you must then reset the administrator password.
Configuring basic preferences
- Click on File -> Preferences in the menu
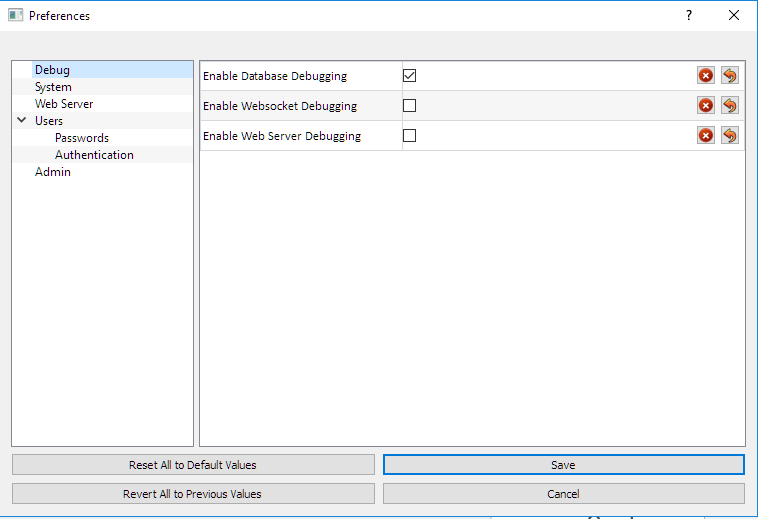
These preferences determine how DataServer runs.
After changing these preferences and clicking Save, you should restart the data server.
The following buttons are available for editing preferences
|
Reset All To Default Values |
Resets all preferences on the current page back to the factory-default settings provided by DataServer. |
|
Revert All To Previous Values |
Changes all preferences on the current page back to the values that they had when the preferences page was opened. |
|
Save |
Saves the preferences to disk and closes the dialog. |
|
Cancel |
Reverts all preferences across all pages back to their state before the preferences dialog was opened, and closes the dialog. |
|
|
Changes just this preference back to the value it had when the preference dialog was opened. |
|
|
Changes just this preference back to it’s factory set value. |
 Revert to previous value
 Reset to default value.
NOTE : The tooltips for Revert and Reset on each parameter display the value that the parameter will be changed to.
Parameter Reference
|
Debug |
Enable Database Debugging |
Enables database debugging to the console. This provides information on which database queries are performed by the data server, and whether they succeeded or failed. |
|
Enable Websocket Debugging |
Enables detailed debugging information about websocket connections. |
|
|
Enable Web Server Debugging |
Enables general debugging information about the web server. |
|
|
System |
Enable File Logging |
Enables logging of error messages to a file. The file will appear in C:/Program Files/tog/logs/ |
|
Worker Threads |
Sets how many additional threads will be created for performing asynchronous tasks on the data server. Tasks performed by the worker threads includes things such as generating image previews. The value this should be set to depends on your hardware and how many resources you wish to be consumed. |
|
|
Web Server |
Resource Path |
The path to the main website directory. |
|
Web Server Port |
The port that the dataserver will listen on for incoming http requests. Setting to 0 effectively disables the web server. |
|
|
Session Directory |
The directory that DataServer will store session directories in locally.. |
|
|
Project Directory |
The directory that DataServer expects to find tOG projects. |
|
|
Config Directory |
The directory where DataServer will save and load configuration files from. |
|
|
Users/ Passwords |
Users Must have a password |
If true, it will not be possible to set an empty password on a user |
|
Passwords must contain a lower case |
If true, passwords will be rejected if they do not contain at least one lowercase letter |
|
|
Passwords must contain uppercase |
If true, passwords will be rejected if they do not contain at least one uppercase letter. |
|
|
Passwords must contain a number |
If true, passwords will be rejected if they do not contain at least one number |
|
|
Passwords must contain punctuation |
If true, passwords will be rejected if they do not contain at least one punctuation character |
|
|
Minimum Password Length |
The minimum length of a valid password |
|
|
Maximum Password Length |
The maximum length of a valid password. |
|
|
Users/ Authentication |
Enable Authentication |
Enables authentication to be turned off. WARNING – Some applications such as TOGWebControl require authentication in order to function correctly. |
|
Automatic Login User |
Allows a user to be specified as a user that will be automatically logged in to the data server when connecting. |
|
|
Automatic Login Session |
If set, the data server will automatically connect to the session once a user logs in |
|
|
Admin |
Administrator Username |
Allows the Administrator username to be changed. NOTE: If you change the administrator user name, you must then reset the administrator password from the main page. |
Updating
Before installing a newer version of the Data Server, the old version should be removed. This is to ensure that the old web and javascript files are removed. If no uninstaller for the Data Server can be found, then use your operating system’s built in tool for removing programs. The new version of the Data server can now be installed and used.
In some circumstances you may wish to keep a functioning copy of your current DataServer setup in addition to installing a newer version. In order to do this, the new version of DataServer should be installed to a different location, leaving the old version untouched. However, a backup of the preferences file should be made as a single copy of the file will be shared between all instances of DataServer installed.
A backup can be made by copying: “Users/*userName*/AppData/roaming/RTSoftware/togdataserver.ini”
If you wish to continue to have access to the pre-patch version of the Web Control Desk, you should make a copy of the website folder. This can be found by opening the data servers preferences and looking at “Web Server > Resource Path”. By default, this will be located in the ‘website’ folder in the DataServer’s install directory.
Logging into the Data Server
Web Interface
To get to the data server web interface, Open the Chrome Web Browser and browser to the IP address and port number of the selected machine. You will see the DataServer web interface.
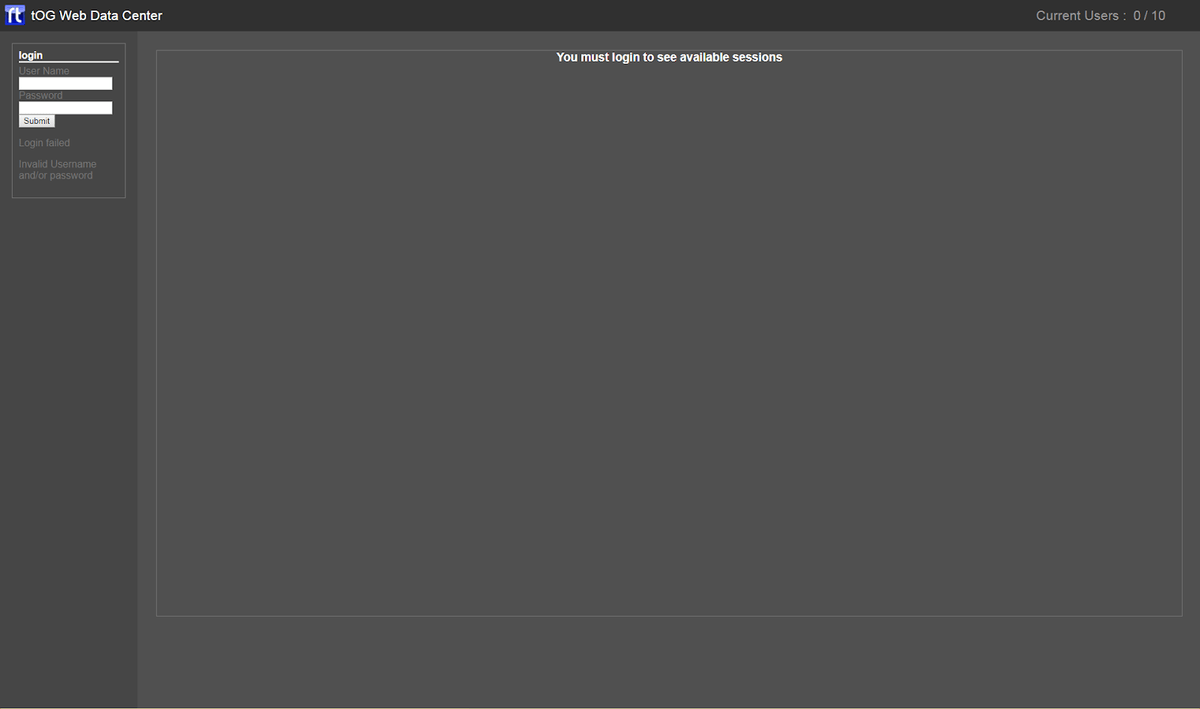
From here, you can log in as a normal user or as the Administrator User.
If this is your first time logging in, log in as the Administrator User to configure the machine.
Administrator Interface
Users, Network Nodes and Sessions
The dataserver manages the relationship between three different lists of data, that together describe how the network of tog machines is used. These are Users, Network Nodes and Sessions.
- Users are user accounts that can log into the system. Depending on how you need to operate, a user account could be associated to an individual person, e.g. Joe Bloggs, or could be associated with an operational role e.g. SportOperator
- Network Nodes describe all of the tog instances and machines that make up the network. It provides vital information about each machine, such as the Ip address and port that should be connected on, how synchronisation should work, and where files are locally stored on that machine.
- Sessions provide the use cases for the network of machines. Use cases can be different depending on your requirements. For example, a session could represent a channel (e.g. MySportsChannel), or it could represent a show (e.g. MyPremierLeagueShow). It could also be more fine-grained based on the role on a show that the web application or machine is providing. For example, SportsShow, Projector, or NewsShow, Chroma Keyer.
Users
To manage users, log into the data server as Administrator and click Manager Users.
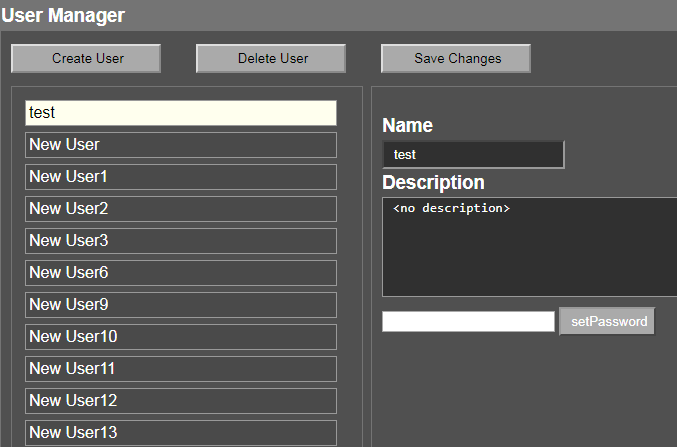
Creating a User
- Login as Administrator
- Click Manage Users
- Click Add User
- Type in the new user name.
- Type in a password for the user and click Set Password.
- Optionally provide a description of this user.
- Click Apply User
NOTE: New users are not associated with any sessions and therefore cannot interact with the system. You should add a user the to desired sessions after creating them
|
Create User |
Create a new user. You will be asked to type in the new name of the user. |
|
Delete User |
Deletes the currently selected user from the system |
|
Save Changes |
Applies changes to the currently selected user to the system. NOTE: changes to a user are not saved unless save changes is clicked. |
|
Name |
The name of the currently selected user |
|
Description |
A description of the currently selected user. This is for informational purposes only. |
|
setPassword |
Type a password into the box provided and click Set Password to set the new password. |
Network Nodes
To manage the network, login as Administrator and click on Manage Network

Creating a new Network Node
- Login as Administrator
- Click on Manage Network
- Click Create Node
- Name the network node.
- Fill in the additional required information.
- Click Apply Node.
|
Create Node |
Create a new network node. You will be asked to type in the name of the node. |
|
Delete Node |
Deletes the currently selected node from the system |
|
Save Changes |
Applies changes to the currently selected node to the system. NOTE: changes to a node are not saved unless save changes is clicked. |
|
Name |
The name of the network node. This name should be unique, and does not have any relationship to the machines host name – although you can make them the same if you so desire |
|
Description |
An optional box to allow a description of this node to be entered. |
|
IP Address |
This box should either contain the IP address or HOSTNAME of the machine that you are connecting to. |
|
Port |
This is the web port that the machine is listening on. This should be set to the same port that is configured inside of the tog instance running on the machine. NOTE: It is quite common to have multiple tog instances running on a single machine, but using different port numbers. For example, Preview instances |
|
Remote UserName |
The remote username is used when synchronizing files between the data server and the tog machine. For more details, see Synchronization |
|
Remote Password |
The remote password is used when synchronizing files between the data server and the tog machine. For more details, see Synchronization |
|
Local Session Path |
This is the location of the sessions folder on the remote machine. It is important to type this in so that the data server can correctly reference files on each node. |
|
Remote Session Path |
The Remote Session Path is used when synchronizing files between the data server and the tog machine. For more details, see Synchronization |
|
Type |
Specifies which role this tog instance is performing. Currently available roles are render and preview. NOTE: not specifying the correct role will mean that the renderer will not be available for selection on the session page |
Configuring a Network Node
A Network Node can be thought of as an instance of Live or Render running on a PC and identified via the PC IP address and the port number to use. A single PC may host several Network Nodes and each instance of Live or Render on that PC needs to be configured with a unique port number to enable communication with DataServer.
When a Network Node is assigned to a Session the node is specified to be a Render or a Preview Node (see section “Session Manager” below).
When a Network Node is assigned as a Render machine then an instance of Live must be configured and running on the given PC.
When a Network Node is assigned as a Preview machine an instance of Render must be configured and running on the given PC.
Each instance of Live or Render must also use a different initialisation (.ini) file. See section “Setting up Desktop Icons” below.
Configuring a Live Instance
Live is configured from the Preferences menu.
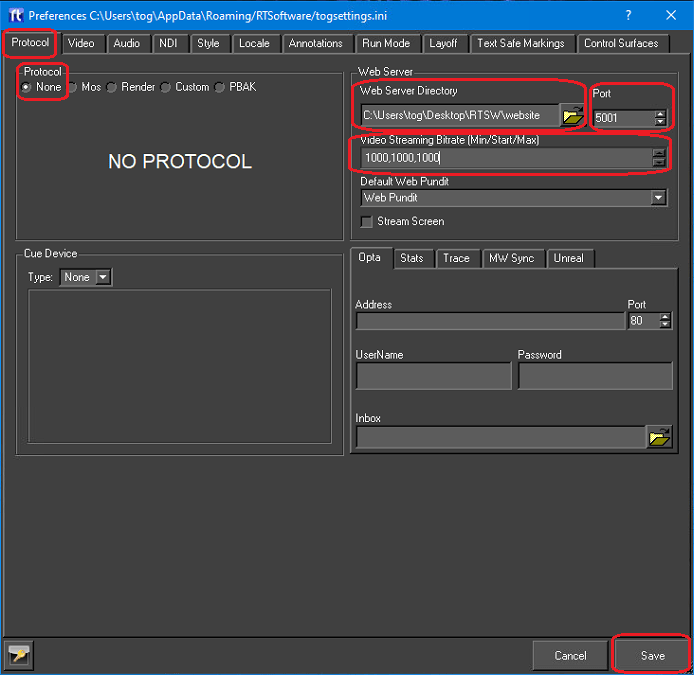
On the “Protocol” tab:
- Set Protocol to None
- Select the “Web Server Directory” folder. This can be any folder.
- Set the port number – this must match the value set in Web Control Desk
- Set the “Video Streaming Bitrate” – values of 1000,1000,1000 work well
Configuring a Preview Instance
Render is configured via the Preferences menu:
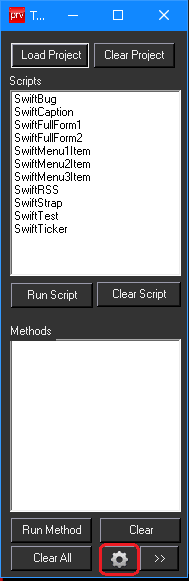
In different sections of the Preferences menu, see the two illustrations below:
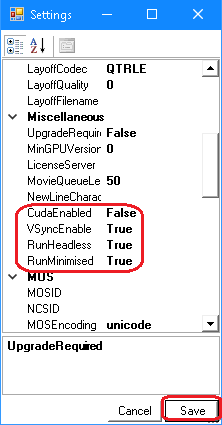
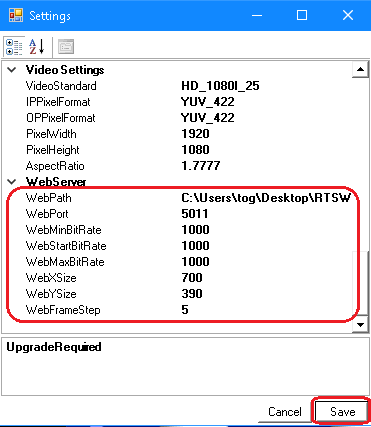
- Set “CudaEnabled”, “VSyncEnable”, “RunHeadless” and “RunMinimised” as shown and on a different part of the menu:
- Set “WebPath” to any existing folder
- Set WebPort – this must match the value set in Web Control Desk
- Set “WebMinBitRate”, “WebStartBitRate” and “WebMaxBitRate” to 1000
- Set “WebXSize” to 700 (horizontal resolution of the streamed video)
- Set “WebYSize” to 390 (vertical resolution of the streamed video)
- Set “WebFrameStep” to 5 (stream 1 frame for every 5 frames rendered)
Note: the resolution of the streamed video (the last 3 parameters) is reduced to save network/compute bandwidth. To revert to the default settings leave these fields blank.
Setting up Desktop Icons
Each instance of Live or Render is generally started from an icon on the Desktop.
On PC’s running more than one instance:
- Each instance should be assigned a unique settings or preferences file
- Separate icons should be created to start and stop all instances at onces
Session Manager
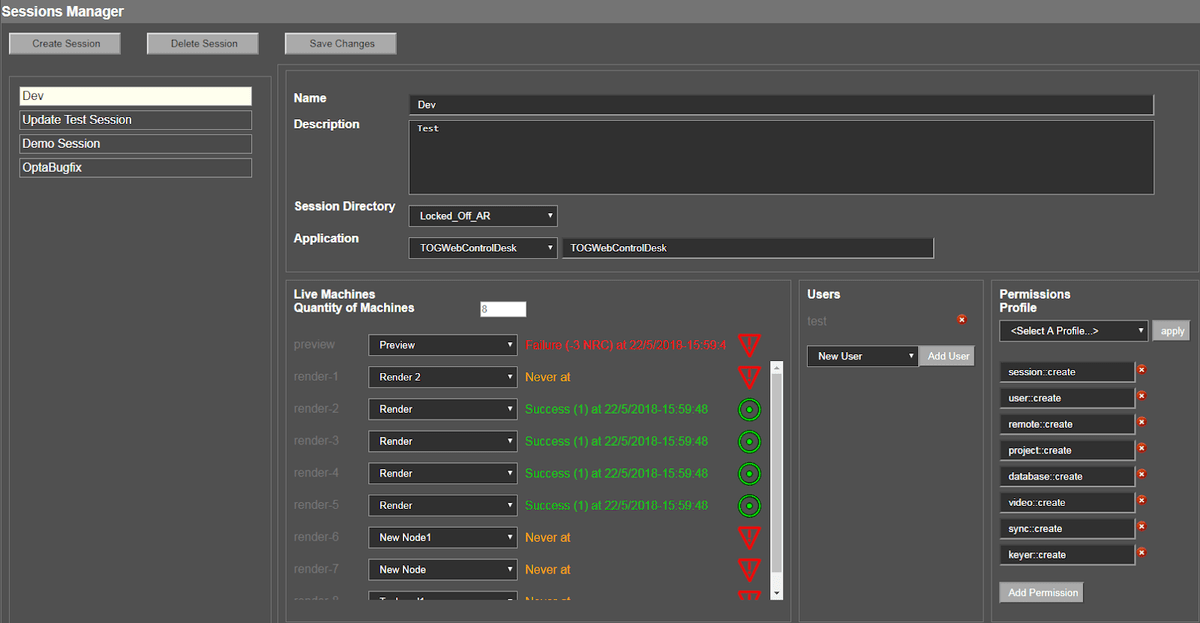
Creating a new Session
- Login as Administrator
- Click on Manage Sessions
- Click Create Session
- Name the session
- Enter an optional description of the session.
- Choose a session directory used by this session.
- Choose an application to be used by this session.
- Choose the tog machines that will be used in each role for this session.
- Choose the users who can connect to this session.
- Choose the permissions available to the application for this session.
- Click Apply Session.
|
Create Session |
Create a new session. You will be asked to type in the name of the session. |
|
Delete Session |
Deletes the currently selected session from the system |
|
Save Changes |
Applies changes to the currently selected session to the system. NOTE: changes to a session are not saved unless save changes is clicked. |
|
Name |
The name of this session. Session names are unique within the data server |
|
Description |
An optional description field of this session. This information is provided to the user on their login page to help them choose the correct session to log into. |
|
Session Directory |
This is a directory inside of the master sessions directory, that is used to store all assets required by this session. Session directories can be used by multiple sessions, and can be synchronized with those machines that need them. |
|
Application |
This allows the selection of the web application that will be loaded when the user joins this session. The drop down displays all applications available to the data server. It is also possible to select other and type in a different URL explicitly. This allows you to create sessions which simply link through to non-RTSoftware applications. Note that in this case, it is not possible for the Data Server to provide credentials to the external systems. |
|
Live Machines |
This area allows you to assign network nodes to particular roles within the application. There is one slot for a preview role. The number of render roles is usually controlled via a number input at the top of the live machine list. The live machine list will show the sync state for each machine. An abbreviated state message is shown next to each machine. At the end of the message is an icon, clicking the icon opens a box containing the full status message. |
|
Users |
This allows you to choose which users are allowed access to this session |
|
Permissions |
This allows you to select which permissions the application should have. It is normally sufficient to pick one of the predefined permission sets from the drop down box and click apply to set them. |
Session Directories
Each session requires a session directory. The session directory is used to store dynamic assets that are used by that session. These are assets that are required for correct operation of graphics and interface but are not part of the main tOG project.
For example :
- Advertisement movies that change on a regular basis
- Team Logos, Player Mugshots, and other images which are dynamically loaded within a graphic.
- Social media data files
- Configuration information.
Session directories are stored in the Sessions directory specified in the DataServer preferences.
By default, this is [user]/Desktop/RTSW/sessions
You can create a session directory in one of two ways :
- Open file explorer on the DataServer machine.
- Browse to the sessions directory.
- Right Click->new folder
- Rename the folder to be what you want it to be.
- Log in to the dataserver as Administrator
- Click Browse Session Directories
- Click Create Dir
- Select the newly created directory and click Rename
- Give the directory the name that you wish.
Either way, your session directory will now be available to select in the session manager.
Session Browser
The session browser provides a web-based file browser for managing files within a session.
As Administrator, you get to the browser by clicking Browse Session Directories. This will give you a top-level view of all session directories on the system.
As a user, you are only allowed to browse session directories for sessions that you have permission to use. You can browse individual session directories by clicking the Browse Session button on a session entry on your lobby page.
The session browser provides a familiar file browsing experience. The following options are available to you.
- To browse into a new folder, double click the folder.
- To browse out one level, double click the “..” folder entry
- To view a file in a new web browser window, double click the file.
- To download a file, click the download icon.
- To upload a file :
- drag the file onto the file or files from windows explorer onto the browser window.
- A progress bar will display whilst the files are uploaded.
- The files will be deposited in the folder that you have open.
- To Create a folder :
- Click Create Dir
- To Rename a file or folder :
- Select the file or folder
- Click Rename
- Rename the file or folder
- To select multiple files or folders.
- Hold Ctrl whilst clicking
Project Browser
The project browser is similar to the session browser. However it is read-only, and not possible to modify the contents via the data server.
- Updating and distributing project files is handled by TOG Repository.
To access the project browser, click on the Project button on a session.
Both users and Administrators will see a read-only list of all projects on the system.
Synchronization
DataServer can manage the synchronization dynamic assets across your tOG render machines.
There are two types of assets that tOG uses :
- Static Assets. These are assets that are loaded as part of the tOG project and are always available for graphics to use.
- Dynamic Assets. These are assets that are loaded on-demand by graphics as and when they need them. Examples of dynamic assets include daily news images, footballer profile pictures, movies,
Static Assets
Distribution of static assets is performed by TOG Repository. See the documentation of TOG Repository for details.
Dynamic Assets
The session directory contains dynamic assets. DataServer synchronizes session directories across machines in order to make sure that dynamic assets are available on all machines that need them.
DataServer is the Master Copy
Regardless of synchronization tools used, DataServer acts as the Master copy of session directories. All changes to assets should occur on the DataServer machine, and then synchronization is used to push these changes to other machines.
Session Directories
The smallest group of files that are synchronized by the dataserver are session directories.
Each session directory sits inside of a master Sessions Directory. This is the same on both the remote machines and on the dataserver itself.
When the data server synchronizes files with the remote machine it specifies the session directory relative to the master session directory. This means that only a single share or other point of entry to the master session directory needs to be defined on each remote machine.
Setting Up Synchronization
Generally, the following steps are taken to enable synchronization
- Choose the synchronization script that you wish to run.
- Perform whatever system administration is required on each machine to allow synchronization to occur.
- Setup the relevant remote fields on each network node so that DataServer knows how to synchronize with them.
Synchronization Script
DataServer is flexible with how synchronization actually occurs. This is acknowledging that different organisations and broadcasters have different network infrastructures, security requirements and workflows in place.
To support this, the synchronization process is performed by a Synchronization Script. This is specified in preferences on the main data server application under Synchronization->Script Path
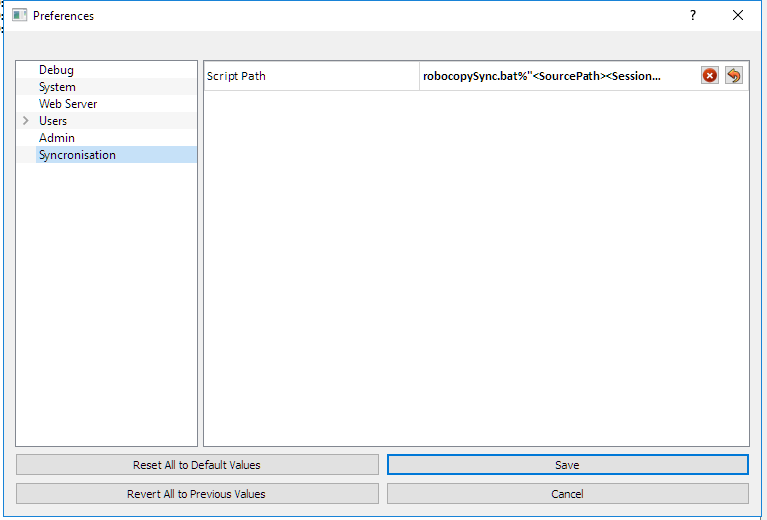
The script is stand-alone, and should perform the synchronization of a single session directory to one remote machine.
The script path line contains the name of the script that should be run, followed by any parameters that are required.
- Path to the script to be run followed by the script arguments.
- The script should exist in the RTSW/scripts folder.
- Parameters should be separated from the script path by a % sign
- The script path should NOT be enclosed in quote marks
The following variables will be substituted with the relevant information for the synchronization being performed by Data Server when it runs the script :
|
<SourcePath> |
The DataServer master session directory path. This is where all session directories are stored on the dataserver. |
|
<Session Dir> |
Individual session directory to be synced |
|
<Name> |
Name of the computer to be synced as specified in the Network Manager |
|
<IPAddress> |
IP address of the computer to be synced, as specified in the Network Manager |
|
<RemoteUsername> |
Username used to remotely access the computer being synced as specified in the Network Manager |
|
<RemotePassword> |
Password used to remotely access the computer being synced as specified in the Network Manager |
|
<RemoteSessionPath> |
Path used to remotely access the master session directory of the computer being synced as specified in the Network Manager |
The sync script should supply feedback to the data server about the outcome of the sync attempt. It does this by printing (‘echo’ in windows batch files) ‘RV#status-message#’.
- ‘status’ should be either ‘Success’ or ‘Failure’. It must be either of these values as the data server uses this to select part of the displayed message and it’s CSS styling.
- ‘message’ should briefly explain the result of the sync operation. There is currently a 100 character limit on the length of the output that the data server will read. This means that there are 88 characters available for the message. The message can’t contain the characters “ – #.
Feedback is only read after the script terminates. This means that feedback should only be sent once per batch file. Sending more than once will cause the message to be displayed incorrectly.
A couple of example feedback strings generated by the robocopy sync script:
- RV#Success-Sync Successful (0) : Files were synced#
- RV#Failure-Sync Failure (16) : ***Fatal Error During Sync***#
The robocopy script can be reviewed for more details on generating output.
System Administration to support Sync
Your script will need to be able to access the remote machines in order to copy files to them. How this occurs will depend on the script that you are using to perform the synchronization, but will likely require some work to be performed on each remote machine.
A non-exhaustive list of the kind of things that you may need to do. Check with the script to see what is required :
- Configuring the firewall to allow access
- Setting up a windows share on each machine.
- Configuring an SSH server or other application on each machine.
Configuring the network nodes to support Sync
Finally, the administrator needs to enter the correct details into each network node in the network manager in order to identify the machine.
Again, this will depend on the script and method of sync used, but will usually consist of correctly specifying the RemoteUserName, RemotePassword and RemoteSessionPath fields.
Performing a Synchronize Operation
There are a number of ways to perform a synchronization.
Synchronizations always happen at the session level – a session directory can only be synchronized to a remote machine if at least one session references both the session directory and the remote machine in question. This is to avoid unnecessary synchronization.
As Administrator
The administrator can click Sync All Sessions on the Administration Side Bar. This will force a synchronization of all session directories in all valid sessions.
As a User
As a user, each session that they are allowed to use has a Sync button. Clicking this will sync all files required by that session.
- The session directory used by the session will be synchronized with all renderers referenced by the session.
The user can also click Sync Sessions on the sidebar. This is the equivalent of clicking Sync on each session that the user has access to.
Synchronizing with Robocopy
The default synchronization script in DataServer is to use Robocopy to perform the synchronization between machines.
- Robocopy is part of Microsoft Windows
Setting up the Sync Script of Robocopy
Enter the following line into the script path.
|
robocopySync.bat%”<SourcePath><SessionDir>””<RemoteSessionPath><SessionDir>” <Name> <RemoteUsername> <RemotePassword> |
Configuring Remote Machines for Robocopy
Each remote machine needs to have a Windows Share Folder set up.
The windows share should contain the Master Session Directory path, and should be configured to be read-writable.
You should check that these paths are visible and accessible from the DataServer machine through the windows network explorer before proceeding.
Administrating Network Manager for Robocopy
Each network node should have the following information specified :
|
Remote Username |
This should be set to the username required to log into the Windows share for this remote machine. |
|
Remote Password |
This should be set to the password required to log into the windows share for this remote machine. |
|
Remote Session Path |
This should be set the the share folder path on the remote machine that points to the Master Session Folder. For example if your share folder pointed at the RTSW folder :, //REMOTE_MACHINE1/myshare/RTSW/sessions Or, if the share pointed directly at the sessions folder and the share was called mysessionsr : //REMOTE_MACHINE1/mysessions |
User Operation
Once a user logs into the the dataserver, they will see the Lobby Page.
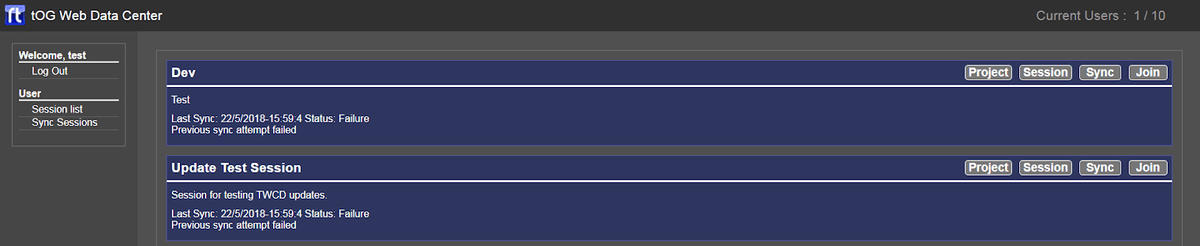
The lobby page lists all sessions available that the user has permission to join.
Each session has the following :
- The Name of the Session
- A small description of the session.
- Information about the last time that the session was synchronized. This allows the user to be sure that Dynamic Assets are on the renderers as expected. See the chapter on Synchronization for more details.
The following buttons are available to the user on a per session basis :
- Project – lets the user browse the projects available on the system. This is a read-only browser, as the projects are managed via TOG Repository
- Session – Allows the user to browse the session directory associated with this session. This file browser allows the user to add and remove files from the session folder.
- Sync – This triggers a synchronization of the session.
- Syncing a session will ensure that the copy of the session directory on each renderer used by the session matches the copy of the directory on the data server.
- Join – This will leave the data server and join the session.
- This will take the user to the correct application, and pass the details of the session across to it so that it logs into the correct machines.
