SwiftWebApi-4.6.4_v2.1
Swift,SwiftPro, SwiftLive, Tog and RT_OEM can all be controlled using standard web technologies. This makes it easy to construct interfaces to control them, that run within a web browser, and provide additional ways of controlling them from your own applications. From now on we will use the term ‘Swift’ to encapsulate all our products that can be controlled this way.

WebApi
|
DATE |
05/11/2020 |
|
PRINCIPAL AUTHOR |
J Wood; S Kirwan; S Hart |
|
VERSION |
4.6.4 |
|
UPDATE |
v2.1; |
Contents
Configuring the Web Server and Web API’s9
Configuring Swift and Swift 3D (Edit-3D)9
Configuring RT.DLL/SwiftLive/TogRender9
Web Server Directory / ResourcePath10
RTSW Protocols and Connections12
Opening and Maintaining a Connection20
Creating a web socket and connecting20
Creating an RTProtocol instance24
Sending commands to Protocols25
SelectQuery, InsertQuery, UpdateQuery, DeleteQuery31
onDatabaseReady (javascript only)34
sqlSelect, sqlInsert, sqlUpdate, sqlDelete34
OnGestureReady (javascript only)38
onPunditReady (javascript only)50
Overview
Swift,SwiftPro, SwiftLive, Tog and RT_OEM can all be controlled using standard web technologies. This makes it easy to construct interfaces to control them, that run within a web browser, and provide additional ways of controlling them from your own applications. From now on we will use the term ‘Swift’ to encapsulate all our products that can be controlled this way.
Swift contains a built in webserver. For most applications, web interfaces can be served directly from the Swift machine without requiring the setup or installation of a separate webserver or platform.
A wide variety of applications can be built to work alongside Swift . The following are examples of what we are using the web interfaces ourselves to do :
- A tablet based html5 Tactic interface, with full access to all clips, tools and basic analysis.
- Custom playout applications for specific shows, including stacks and running orders, buttons to run specific graphics, and input controls to edit the parameters of graphics.
- Applications that control multiple Swifts simultaneously from a single interface.
As well as providing a number of protocols for controlling aspects of the Render Engine, you can also configure and display a web proxy feed of the output from the Live Engine. This is provided as a webRTC feed. You will need a browser to display this unless your application understands webRTC protocols.
Step Guide to Integration
The following is the base level of integration required to load and run a graphic on an RT system.
- Configure RT application for communications – setup IPAddress and ports
- Establish a WebSocket connection
- Start Heart beating
- LoadProject
- Read Manifests to determine Graphics available and Graphic parameter details
- Load a Graphic
- Provide Data values
- Run a Method
Configuring the Web Server and Web API’s
In order to enable the web API’s, you need to configure the web server from whatever application you are using.
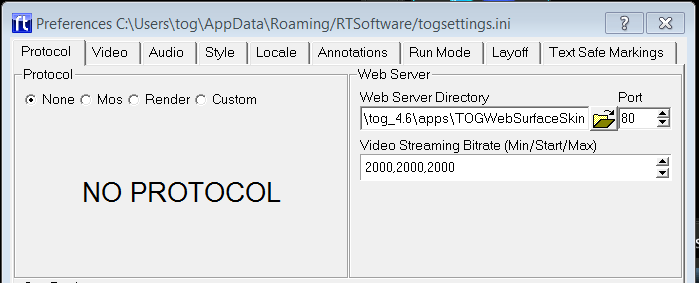
Configuring Swift and Swift 3D (Edit-3D)
Go to the Preferences page, and select the “Protocol tab”
The Web Server settings are on this page.
Configuring RT.DLL/SwiftLive/TogRender
The RT.dll configuration xml file (RTDLLSetup_ch0.xml) contains the preferences for configuring the web server. For more details on the RTDLLSetup_ch0.xml file, see the document RT_DLL_Specification_vx.x.x.pdf, that comes with the DLL. This file resides in C:Rtsw and is automatically read when the DLL Engine is instantiated
Note that in the XML file, the Web Server Directory is called the Resource Path
<WebServer>
ResourcePath =
Port = 8080
MinBitRate = 10000
StartBitRate = 10000
MaxBitRate = 10000
</WebServer>
Configuration Settings
NOTE: When you change Web Server settings, you must restart Swift for the changes to take effect.
Web Server Directory / ResourcePath
The Web Server Directory defines the root directory for the Swift web server. Any files in this directory or it’s subdirectories will be served up by Swift when requested via a HTTP request (for example, from a web browser)
NOTE: This string must not be empty in order to activate the web server. It does not have to point to a valid directory, however.
Port
The port determines which port the web server listens on.
NOTE: Setting the port to 0 disables the web server and the web APIs
Video Streaming Bitrate
This specifies the bit rate of the web proxy output from the live engine as a webRTC feed. Video streaming will adapt to the network constraints to provide the best experience possible. The bitrate will start at the Starting bitrate (the middle of the three values), and based on the performance of the network, the bitrate may grow up to but no more than the Maximum value, or shrink to no less than the Minimum bitrate. The bitrates are in kilobits/second.
Example : the values 500, 1000, 2000 means that the video bitrate will start at 1000Kb/s but can grow to 2000Kb/s or shrink to 500Kb/s
Guideline Bitrate Settings
The following are guideline values for several use cases :
|
Use Case |
Min/Start/Max values |
|
Streaming to a Tablet device over Wifi |
1000,2000,3000 |
|
Streaming to a PC using wired network |
5000,10000,15000 |
|
Streaming to a device across the internet |
500, 1000, 2000 |
Testing the Web Server
Create a simple index.html file and place it at the root of the Web Server Directory. For example, if you have set your web server directory is C:/WebServerDirectory, create a file called C:/WebServerDirectory/index.html
An example index.html file would look as follows :
<html>
<head>
<title>Test Page</title>
</head>
<body>
<h1>The Web Server is working correctly</h1>
</body>
</html>
Run Swift, and open a web browser. Go to the page via the ip address of the machine, and the port that Swift is set up to use.
Example, if the IP address of the Swift machine is 192.168.100.155 and the port is 5555, then browse to http://192.168.100.155:5555/index.html
If everything is working correctly, you should see the contents of the index.html page in the browser (e.g. “The Web Server is working correctly”)
NOTE: Port 80 is the default HTTP port used by web browsers, if you select port 80, you do not need to add the :80 at the end of the web address
NOTE: If you have trouble connecting, a common problem is to check that Swift is allowed through the firewall settings.
RTSW Protocols and Connections
Serving web pages makes it easy to connect a web browser to Swift, but the RTSW protocols are what allow you to do anything interesting.
The RTSW connection and protocols are based on websockets, using JSON as the data format to transmit messages.
Protocols are provided as a javascript API for ease for creating web pages.
The following describes how to create and establish a connection using JavaScript.
It is also possible to establish and maintain the websocket connection yourself directly if you wish to implement the API in another language (C++ or CSharp, for example). See “Direct WebSocket Connection” further down for more information.
Using the Javascript API
The provided javascript api makes it easy to create html5/css/js web applications that integrate with Swift.
The following example shows how to establish a connection to Swift, and set up the Remote Control protocol, which is called RTRemoteControl
<script type=”text/JavaScript” src=”js/rtsw/rtsw.js”></script>
<script type=”text/JavaScript” src=”js/rtsw/rtremotecontrol.js”></script>
<script type=”text/JavaScript”>
var rtConnection;
var rtRemoteControl;
function OpenConnection()
{
// create a connection to Swift. With no parameters,
// it assumes that Swift is running on the same IP
// and PORT that this web page was served from.
rtConnection = new RTConnection();
rtConnection.onOpen = function() {
trace(“Connection opened”);
// Create a clip control protocol plugin via
// the rtConnection we have established.
rtRemoteControl = new RTRemoteControl(rtConnection,
“remoteControl”);
}
rtConnection.onClose = function() {
trace(“Connection Closed, try again…”);
// If the connection closes, attempt to reopen it.
OpenConnection();
}
}
</script>
Include Files
In order to establish a connection using javascript, you should first include the correct .js files for the protocols that you wish to use.
The javascript api implementation is provided in a directory called rtsw. Copy this file into a suitable location in your web project.
You should always include rtsw/rtsw.js first, as this contains code that is used by all other protocols. The other files can be included in any order.
NOTE: The available protocols are detailed later on.
Creating the RTConnection
The next thing that you need to do is to create an RTConnection. This connection class wraps up the connection to Swift and maintains the connection. RTConnection is defined in rtsw/rtsw.js
RTConnection can be created with either 0 or 3 parameters.
new RTConnection() will create a connection that connects to the same IP address and port that the web page was loaded from. In the case where Swift serves the webpage, this will always be the correct IP address.
The other version looks like this :
rtConnection = new RTConnection(URL, heartbeatFrequency, heartbeatTimeout);
The URL is the websocket for Swift. This is just the IP address and port, using the protocol ws://
For example :
ws://192.168.100.155:555
The heartbeat Frequency and the heartbeat timeout are described later on, but define how often the connection will check with Swift that it is still alive. The default values are 5 and 2
The advantage of being able to specify the url and heartbeats is that it gives you greater flexibility in how you create your webpage. For example, using the second form, we could create a single webpage that connects to multiple Swifts, like this :
rtConnectionTog1 = new RTConnection(“ws://192.168.100.101:5555”, 5, 2);
rtConnectionTog2 = new RTConnection(“ws://192.168.100.153:5555”, 5, 2);
RTConnection Callbacks
RTConnection, (and most RT protocols) provide a number of callbacks that get called when events happen. By overriding these callbacks, you can implement functionality.
RTConnection contains three callbacks that you can override, onOpen, onClose, and onError.
onOpen() is called when the connection has been established. You cannot create protocols until the connection is open, so this is the correct place to establish any protocols that you wish to use.
onClose() is called when the connection is terminated, either intentionally or due to network failure. By overriding this method, you can alert the user that the connection has closed, or re-try the connection. The example above tries to restore the connection when it has failed by calling the OpenConnection() function again.
onError() provides errors that occur on the web socket connection, although it is of limited use except for debugging.
Creating a protocol
Once you have established a connection, you can create your protocol inside of the connection.onOpen() function.
To create a new protocol, you use the following :
rtProtocol = new RT<protocolName>(<rtConnectionInstance>, <protocolInstanceName>);
Example:
rtRemoteControl = new RTRemoteControl(rtConnection, “remoteControlID”);
The rtConnectionInstance is the connection object that we created earlier.
The protocolInstanceName is a unique name for this instance of the protocol.
When you create a protocol, instanced data will be stored against that protocol inside of Swift. This means that it is possible, and quite often beneficial, to create multiple protocols of the same type.
For example, the RTPundit protocol allows you to use an instance of a pundit. If you create two RTPundit protocols, you have two instances of a pundit that can be manipulated separately from each other.
In order to tell the two protocols apart, you give them a unique identifier – the protocolInstanceName.
Identifiers only need to be unique against a given RTConnection – for example, the following is perfectly fine, although it is recommended to avoid doing it as it can cause confusion :
rtConnection1 = new RTConnection();
rtConnection2 = new RTConnection();
// fine, MyProtocol does not exist on rtConnection1
protocol1 = new RTClipControl(rtConnection1, “MyProtocol”);
// Also fine, MyProtocol is unique on rtConnection2, no clash with rtConnection1
protocol2 = new RTClipControl(rtConnection2, “MyProtocol”);
Using a protocol
Once a protocol has been established, you can call it in the same way that you would any other java object.
Example: (see the protocol descriptions for details on what each method does)
// set up the callback that receives updates from Swift about the contents of the clip page.
rtClipControl.onClipPageUpdate = function(json) {
// get the first clip id out of the json, and activate (load) it.
var buttonId = json[‘buttons’][0][‘id’];
rtClipControl.activateClip(buttonId);
}
// Request the clip page from Swift. (Swift will respond via the onClipPageUpdate callback)
rtClipControl.getClipPage();
Direct Websocket Connection
The javascript classes wrap up the communication protocol to Swift and should be used if you are building a web application, but it is also possible to implement the communication in your own application by sending the raw JSON commands expected.
The web api works over standard websockets. This section does not go into details on what a websocket is, it is expected that you already know this. For more information, a quick google search will show up numerous tutorials and examples. Possible websocket implementations are:
c#
https://docs.microsoft.com/en-us/aspnet/core/fundamentals/websockets?view=aspnetcore-3.1
C++
https://docs.microsoft.com/en-us/windows/win32/websock/web-socket-protocol-component-api-portal
Alternatively you can use external libraries such as:
Libwebsockets
QTWebSockets
https://doc.qt.io/qt-5/qtwebsockets-index.html
JSON commands
All commands in RTConnection and RTProtocols are transmitted using the standard JSON data format. The format of these is identical to that of Web connections above
Every Web api command takes the following form :
{
“command”:”<command>”
“protocolId”:”<protocolInstanceName>”
“parameters”:
{
… any command specific parameters go here
}
}
Where:
command is the name of the command being sent e.g. “ActivateClip”
protocolId is the Instance Name of this protocol. This is how Swift distinguishes where to send the command.
parameters contain any data specific to this command. Each command is detailed in the reference at the end of this document.
Responses from Swift will contain the following :
{
“response”: “<command>”
“protocolId”:”<protocolInstanceName>”
}
These commands should be sent as Unicode utf8 strings over the web socket connection you have created and wait for the response back as another unicode utf8 string
Some Swift responses are not tied directly to a command sent to Swift. These will have “command” rather than “response” in the message that gets sent. The correct message for each protocol is documented in the protocol section.
NOTE: Messages that are without protocol (for example, heartbeat related) will not contain a protocolId. If a message does not require parameters, the parameter block may be omitted.
Opening and Maintaining a Connection
In order to establish a connection, the following operations should be performed in order.
- Open a websocket to the Swift instance.
- Setup heartbeating, send pings, and manage pongs/timeouts..
- Create an instance of each RTProtocol that you wish to use, giving each a unique name.
- Send commands to the relevant protocol objects.
Creating a web socket and connecting
First, open a websocket connection to Swift using your websocket library of choice, passing in the url, and port of the Swift instance. If you have to set the option to specify a subprotocol, set it to “rtsw.co.uk”.
The details of creating a websocket will depend on the library that you use. However, once established, the websocket will allow you to send data to it, and receive data from it.
Websockets are guaranteed like TCP, that data that you send will arrive in the order that it was sent.
Additionally, data is sent as “messages”. Depending on how low level your library is, you may receive an entire message in a single callback, or you may receive it as multiple chunks of data, with the last chunk marked as the end of the message. Either way, in Swift, each command forms a single message, and each response will be returned as a single message.
Swift websocket messages are always text based rather than binary.
In javascript, a websocket is created as follows :
In Javascript, this is done as follows :
myWebSocket = new WebSocket(url, ‘rtsw.co.uk’);
where url is a websocket url e.g. ws://192.168.100.155:5555
NOTE: The actual format of this command will depend on whatever websocket library you use.
NOTE: The websocket protocol is always “rtsw.co.uk”, regardless of which Swift protocols you wish to use. The websocket protocol is not the same as an RTProtocol.
Heartbeating
After establishing a connection, you should send a setHeartBeat command.
Without sending this command, Swift will rely on standard websocket timeouts, which depending on network conditions, can take several minutes to determine that a connection is no longer available.
Once this command is sent, Swift will expect to receive ping commands within a set period of time from the client, or will assume that the connection has terminated and forcibly close it. For every ping command received, Swift will respond with a pong command.
The setHeartBeat command defines the frequency that these commands are expected. Shorter times will drop the connection more quickly if something goes wrong.
This looks like this :
{
“command” : “setHeartBeat”,
“parameters”:
{
“frequency”: frequency,
“timeout”: timeout
}
}
Where:
- frequency – how often Swift expects to see the ping command in secs.
- timeout – how long after a ping command the client will wait for a pong before closing the connection in secs.
The Frequency and Timeout parameters tell Swift how often, in seconds, it should expect to receive a heartbeat, and how long it has to respond. Default values are a frequency of 5 seconds, and a timeout of 2 seconds.
It is the responsibility of the client to heartbeat Swift within the timeframes that are specified here. If you do not, Swift will assume that the connection has died and close it.
For example this is how you would configure Heartbeating in JavaScript:
var data = “{
“serverId”:document.URL,
“clientId”:window.location.hostname,
“serialNumber”:1,
“command”:”setHeartBeat”,
“parameters”:
{
“frequency”: 5,
“timeout”: 2
}
}”;
myWebSocket.send(data);
Once the Heartbeat command is created you will need to actually perform and respond to heartbeats. It is recommended that this is done asynchronously to main command flow.
To Heartbeat Swift, send a “Ping” Command
{
“command” : ping,
}
Swift will reply, normally instantly. However, if Swift has not replied within the timeout period, you should assume that the network connection has been lost and close the connection.
The Tog reply to a ping is a “pong”
{
“response” : pong,
}
Swift will only send a “pong” if it has received a “ping” – so active heartbeating is only in the direction of the client to the server.
For example
var data = “{
“command” : ping,
}”;
myWebSocket.send(data);
Creating an RTProtocol instance
To create a new RTProtocol, send the following Message :
{
“command”:”addProtocol”,
“protocol”: protocol,
“protocolId”: protocolId
}
protocolId is the “Instance Name” of this new protocolId – this id must be unique on this web socket connection, as it will be used to reference this protocol from now on.
“protocol” chooses which protocol we are creating.
For example this is how you would create a Remote protocol object in JavaScript:
var data = “{
“serverId”:document.URL,
“clientId”:window.location.hostname,
“serialNumber”:1,
“command”: “addProtocol”,
“protocol”: “remote.rtsw.co.uk”,
“protocolId”: “remoteProtocolId”
}”;
myWebSocket.send(data);
Tog will respond with the following message :
{
“response”:”addProtocol”,
“protocol”: “remote.rtsw.co.uk”,
“protocolId”: “remoteProtocolId”
}
Where protocol and protocolId will be the same values that you passed to Swift. Once you get this message, you can use the protocol. For example, an RTRemote protocol has the protocol name “remote.rtsw.co.uk”
Sending commands to Protocols
Once you have created your protocol object – you can now send relevant commands to it.
For example, to send a command to load a project the Javascript code might be as follows:
var projectName = “C:/RTSW/projects/SwiftVanilla/SwiftVanilla.prj”;
var data = “{
“serverId”:document.URL,
“clientId”:window.location.hostname,
“serialNumber”:1,
“protocolId”:”remoteProtocolId”,
“command”:”LoadProject”,
“parameters”:
{
“projectName”:” + projectName + “
}
}”;
myWebSocket.send(data);
RTProtocol Reference
Each RT Protocol is described as follows :
- Summary – A description of what this protocol class does, and overview on how to use it.
- Javascript File – When using the javascript API, this is the file that implements the protocol.
- Protocol Name – When working directly with Websockets, this is the protocol name that should be specified when creating a new protocol instance with the addProtocol message, described above.
Each message that can be sent across the protocol is described in turn. Each message contains :
- Description – A description of what this message is used for.
- Javascript – When using the javascript API, this provides the code used to send the message.
- JSON – This provides the JSON message that is sent across the websocket in order to send the message.
- Response – This says which response you can expect to receive from a given message. Note that responses are asynchronous and you are not guaranteed that the response you receive is from the message that you just sent. Additionally, Swift may send messages to update status that did not originate from any message.
Each response is finally detailed. Since a number of responses can come from multiple messages, they are detailed separately to avoid duplication.
- Description – When you receive this response, and what should you do with it.
- Javascript – how to receive this response when using the javascript API.
- JSON – the JSON that you will receive over the websocket when this response is sent.
RTClipControl
|
Summary |
Provides access to the Clip View inside of Swift Allows browsing and loading of clips. |
|
Javascript File |
rtsw/rtclipcontrol.js |
|
Protocol Name |
clipcontrol.rtsw.co.uk |
Messages
GetClipPage
|
Description |
Requests that Swift resends the current clip page information. |
|
Javascript |
protocol.getClipPage(); |
|
JSON |
{ “command”:”GetClipPage” “protocolId”:”<protocolInstanceName>” } |
|
Response |
UpdateClipPage will be called, which will contain the clip page information. |
ClipPageBack
|
Description |
Tells Swift to go “back”one page. |
|
Javascript |
protocol.clipPageBack() |
|
JSON |
{ “command”:”ClipPageBack” “protocolId”:”<protocolInstanceName>” } |
|
Response |
UpdateClipPage will be called with the new page information |
ActivateClip
|
Description |
Activates the clip entry. If this is a clip or a stack, the clip will be loaded into Swift. If the entry is a directory, Swift will navigate to the new page. A list of valid clipIds can be got via UpdateClipPage |
|
Javascript |
protocol.activateClip(clipId) |
|
JSON |
{ “command”:”ActivateClip”, “protocolId”:”<protocolInstanceName>” “parameters”: { “id”: ix } } |
|
Response |
If the selected entry causes a page change, UpdateClipPage |
SetClipListMode
|
Description |
Changes the clip list mode. The Swift clip list currently has two modes :
|
|
Javascript |
protocol.setClipListMode(mode) |
|
JSON |
{ “command”:”SetClipListMode”, “protocolId”:”<protocolInstanceName>” “parameters”: { “id”: ix } } |
|
Response |
UpdateClipPage |
Responses/Callbacks
UpdateClipPage
|
Description |
Swift sends UpdateClipPage whenever the currently selected page has changed. This could be triggered via one of the messages in this protocol, but can also be triggered from inside of Swift if the clip page is changed via the Swift sports interface, by changing the currently selected clip plugin, for example. Each button in the returned JSON contains the following 5 values :
$(‘#myImage).css(“background-image”, “url(data:image/png;base64,”+ json[‘buttons’][ix][‘base64Image’]+”)”); |
|
Javascript |
onClipPageUpdate(json) |
|
JSON |
{ “response” :”UpdateClipPage”, “protocolId”:”<protocolInstanceName>” “buttons”: [ { “id”:<buttonId>, “text”,<buttonText>, “icon”,<iconString>, “type”,<buttonType>, “base64Image”:<base64Image> }, { … another button … } ] } |
RTDatabase
|
Summary |
Allows the running of SQL queries on the databases that Swift has access to. |
|
Javascript File |
rtdatabase.js |
|
Protocol Name |
Database.rtsw.co.uk |
Messages
SelectQuery, InsertQuery, UpdateQuery, DeleteQuery
|
Description |
Ask Swift to perform a query against the database. The result of the query will be returned via a response. All queries work in the same way. By passing the operation that you are performing (Select, Insert, Update, etc.) Swift has better opportunity to handle the query more efficiently. You need to give Swift the following information : togDatabaseName – the name used in Swift to reference the database. Although this is usually the same name that the database has in the database server, it can be different. Check Project settings if you are unsure. databaseStatement – the database query that you wish to call. For example,“SELECT * FROM table” For the javascript api, you also pass a callback function. This function will be called once the database request has been processed. When using the JSON directly, you must pass a query identifier. This will be passed back in the response so that you know which database query goes with which response. It is up to the sender of the JSON to pick query ID”s that make sense. |
|
Javascript |
When calling from javascript, use the following command. (See the response for the format of the callback function json message.) protocol.selectQuery(<togDatabaseName>, <databaseStatement>, <callbackFunction>); protocol.insertQuery(<togDatabaseName>, <databaseStatement>, <callbackFunction>); protocol.updateQuery(<togDatabaseName>, <databaseStatement>, <callbackFunction>); protocol.deleteQuery(<togDatabaseName>, <databaseStatement>, <callbackFunction>); Example : protocol.selectQuery(“myDatabase”, “SELECT Name FROM AddressBook”, function(json) { alert(“The first result from the query was “ + json[“response”][0]); |
|
JSON |
The four messages differ only in the command – sqlSelect, sqlInsert, sqlUpdate, sqlDelete { “command”:”sqlSelect”, “protocolId”:”<protocolInstanceName>” “parameters” : { “Query”: <databaseStatement>, “databaseName”: <togDatabaseName>, “queryId”: <queryId> } } |
|
Response |
The response will be sqlSelect, sqlInsert, sqlUpdate or sqlDelete, matching the command that you used. |
MultipleQuery
|
Description |
Perform multiple queries in a single message. Each query will be performed sequentially. This is useful if you need to perform several queries, as it means that you can receive all of the results in a single response. |
|
Javascript |
protocol.multipleQuery(<togDatabaseName>, <statementList>, <callbackFunction>); The callback is of the form function(json) { } See the response for the form of JSON returned to the callback function. |
|
JSON |
{ “command”:”sqlMultipleQueries”, “protocolId”:”<protocolInstanceName>” “parameters” : { “Queries”:[“<statement1>”, “<statement2>”, “<statement3>”, …, “<statementN >”], “databaseName”: “<togDatabaseName>”, “queryId”: “<queryId>” } } |
|
Response |
sqlMultipleQueries |
Responses/Callbacks
onDatabaseReady (javascript only)
|
Description |
This callback is called in javascript once the protocol is established. You should wait for this method before using the protocol. |
|
Javascript |
onDatabaseReady = function() {} |
sqlSelect, sqlInsert, sqlUpdate, sqlDelete
|
Description |
These responses will be received when the respective commands are sent to request database queries. When called using javascript, this json is passed to the callback function Note that the results of the database query is passed as a linear list – if your database query has 3 columns, the first three entries will contain the first row, the next 3 entries the second row, and so on. |
|
JSON |
{ “responseType”:”sqlSelect”, “protocolId”:”<protocolInstanceName>” “queryId”:”<queryId>”, “sql_statement”:<databaseStatement>, “Success”: <true or false, depending on if the query was successful>, “response”:[“result1”, “result2”, “result3”, “result4”, …. “lastResult”] } |
sqlMultipleQueries
|
Description |
This response occurs when you send a MultipleQuery command to Swift. Note that if multiple select statements are performed inside the query, the results are concatenated together into a single string. This is likely to change in a future release. |
|
JSON |
{ “responseType”:”sqlMultipleQueries”, “protocolId”:”<protocolInstanceName>” “queryId”:”<queryId>”, “sql_statements”:[“<databaseStatement1>”, “<databaseStatement2>”, …], “Success”: <true or false, depending on if the query was successful>, “Response”: [“result1”, “result2”, “result3”, “result4”, …. “lastResult”] } |
RTGesture
|
Summary |
Allows mouse and touch gestures to be sent to Swift remotely. These gestures will interact with sports and touch enabled graphics in the same way as if the user had clicked with the mouse, or used a touch screen. This protocol, in conjunction with the video streaming protocol, allows for web and tablet control of Swift graphics. Mouse events are sent as a combination of mouseDown,mouseMove and mouseUp messages. The mouseDown message is sent to say that the user has started an interaction with the screen – i.e. pressed down a mouse button, or touched the screen. The mouseMove message is sent whilst the user is interacting with the screen to show where the mouse has been dragged to. The mouseUp message is sent when the user stops interacting with the screen – either releases the mouse button, or takes their finger off the touch screen. To perform a click gesture, send mouseDown followed directly by a mouseUp, with the same xpos/ypos for both. To perform a drag gesture, send mouseDown, followed by mouseMoves, followed by a mouseUp. There is a tolerance setting inside of Swift that determines how sensitive it is to clicks versus drags. This is on the Preferences->runMode tab, and is called Touch->Click Tolerance. For web interfaces, this can typically be set very low (2-3 pixels) However, you may need to set it higher than this if you are using the web interface in conjunction with a large touch screen. |
|
Javascript File |
rtsw/rtgesture.js |
|
Protocol Name |
gesture.rtsw.co.uk |
Messages
Setup (javascript only)
|
Description |
This is a javascript method that simplifies the setup of gestures on a web interface. To call this method, create a <video> tag with a unique class name or id, and call setup with this tag. It will automatically set up the correct methods and callbacks so that touch gestures are handled correctly on the video window and sent to Swift. |
|
JSON |
Place a video tag somewhere in your html <video id=”myVideoId”/> And call protocol.setup(“#myVideoId”) |
|
Response |
No response |
MouseDown
|
Description |
Sends a “mouse down” command to Swift. xpos and ypos should be in the range of 1920×1080, regardless of the size of the web site or the selected video resolution of Swift. |
|
Javascript |
protocol.mouseDown(xpos, ypos) |
|
JSON |
{ “command”:”MouseDown”, “protocolId”:”<protocolInstanceName>” “parameters”: { “x”:<xpos>, “y”:<ypos> } } |
|
Response |
No response. |
MouseMove
|
Description |
Sends a “mouse move” command to Swift. xpos and ypos should be in the range of 1920×1080, regardless of the size of the web site or the selected video resolution of Swift. |
|
Javascript |
protocol.mouseMove(xpos, ypos) |
|
JSON |
{ “command”:”MouseMove”, “protocolId”:”<protocolInstanceName>” “parameters”: { “x”:<xpos>, “y”:<ypos> } } |
|
Response |
No response. |
MouseUp
|
Description |
Sends a “mouse up” command to Swift. xpos and ypos should be in the range of 1920×1080, regardless of the size of the web site or the selected video resolution of Swift. |
|
Javascript |
protocol.mouseUp(xpos, ypos) |
|
JSON |
{ “command”:”MouseUp”, “protocolId”:”<protocolInstanceName>” “parameters”: { “x”:<xpos>, “y”:<ypos> } } |
|
Response |
No response. |
Responses/Callbacks
OnGestureReady (javascript only)
|
Description |
This is a javascript callback that is called once the web socket has been correctly established. Once this has been called, you can start sending mouse down/move/up messages to Swift. |
|
Javascript |
protocol.onGestureReady = function() { // now ready to send mouse events. } |
RTMirror
|
Summary |
The mirror protocol allows Swift graphics and web pages to communicate with each other. When a message is sent on the mirror protocol, it will be received by all clients connected to the mirror protocol, including the sender. The format of the message is left for the user to define – it is sent to Swift as a string, so it does not necessarily have to be a JSON string. In order to send a message to the mirror protocol from a Swift graphic, in user code write the following : self.wsMirrorWrite(<message>) |
|
Javascript File |
rtsw/rtmirror.js |
|
Protocol Name |
mirror.rtsw.co.uk |
Messages
SendMessage
|
Description |
Use this to send a message to the mirror protocol. |
|
Javascript |
protocol.sendMessage(“<myMessage>”) |
|
JSON |
{ “command”:”Mirror”, “protocolId”:”<protocolInstanceName>” “parameters”: { “Message”:<message>, } } |
|
Response |
OnMessage will be called with the same message in response. |
Responses/Callbacks
OnMessage
|
Description |
The response to a SendMessage is identical in every way to the original message. |
|
Javascript |
protocol.onMessage = function(message) { } |
|
JSON |
{ “response”:”Mirror”, “protocolId”:”<protocolInstanceName>” “parameters”: { “Message”:<message>, } } |
RTProject
|
Summary |
The project protocol extends the basic file serving functions of http. These extensions are aimed at file and folders that make up the project that is currently loaded into the Swift server. |
|
Javascript File |
rtsw/rtproject.js |
|
Protocol Name |
project.rtsw.co.uk |
Messages
GetDirectoryListing
|
Description |
Use this to send retrieve a list of the contents of a directory. Only those files or sub-directories that match a filter are included. There are special folders that map to asset folders in the currently loaded project. These include STACKS, SCRIPTS, FONTS, IMAGES, SHADERS and GEOMETRIES. Other folders are located relative to the root website folder. |
|
Javascript |
protocol.GetDirectoryListing (directoryName,fileNameFilter) |
|
JSON |
{ “command”:”GetDirectoryListing”, “protocolId”:”<protocolInstanceName>” “parameters”: { “directoryName”:<directoryName>, “fileNameFilter”:<fileNameFilter>, } } |
|
Response |
{ “response”: “command” “data”: “fileName”: “directoryName”: } |
GetFile
|
Description |
Use this to retrieve the contents of a file. There are special filenames that map to asset files in the currently loaded project. These include PRJ, TCF and MANIFEST. With other files the extension is used to locate the full file name in the project folder if the full path is not present – for example, files ending in .stk are saved to the Stacks folder in the project. Other files are located relative to the root website folder. The special fileName Screen will return the current gl screen as a base 64 encoded string. |
|
Javascript |
protocol.GetFile (fileName) |
|
JSON |
{ “command”:”GetFile”, “protocolId”:”<protocolInstanceName>” “parameters”: { “fileName”:<fileName>, } } |
|
Response |
{ “response”: “command” “data”: “fileName”: “directoryName”: } |
PutFile
|
Description |
Use this to send the contents of a file to Swift. In some cases, the extension of the file is used to locate the full file name in the project folder if the full path is not present – for example, files ending in .stk are saved to the Stacks folder in the project. Other files are located relative to the root website folder. |
|
Javascript |
Protocol.PutFile (fileName) |
|
JSON |
{ “command”:”PutFile”, “protocolId”:”<protocolInstanceName>” “parameters”: { “fileName”:<fileName>, } } |
|
Response |
{ “response”: “command” “data”: “fileName”: “directoryName”: } |
DeleteFile
|
Description |
Use this to delete a file from the project currently loaded into Swift. The file is located relative to the root website folder. |
|
Javascript |
Protocol.DeleteFile (fileName) |
|
JSON |
{ “command”:”DeleteFile”, “protocolId”:”<protocolInstanceName>” “parameters”: { “fileName”:<fileName>, } } |
|
Response |
{ “response”: “command” “data”: “fileName”: “directoryName”: } |
RTPundit
|
Summary |
The pundit protocol provides access to a “pundit” as used in Swift Sports. There are methods to select a pundit, get the contents of the current page and to activate (press) buttons. To setup a pundit, you need to set the size of a button. This determines the size of the icon images that Swift will send that are associated with each button. Secondly, you need to pick which pundit you are going to use – the name of a pundit matches the name used inside of Swift. For example, “Operator Analysis” You should call protocol.setButtonSize() before calling protocol.setPundit(), as setPundit() will make Swift send a page update across. If you put these in the opposite order, the first page will have default (and likely incorrect) image sizes. It is possible to call setPundit() without specifying a pundit name. In this case, Swift will use the Default Web Pundit, which can be selected by the user as part of the preferences of the web server. See the Protocol Tab in the Design and Edit manual. When selecting a pundit, you also choose a directory. This directory serves the same purpose as the “Pundit Skin” directory on a touch screen – Swift will use this directory when rendering the icons used to draw the interface. The icon directory is relative to the web server directory Each instance of the pundit protocol references a separate instance of a pundit – this means that you can have multiple web interfaces set up to look at different pundit screens simultaneously. Some of the special button actions have separate callable commands. For example, animateOff, clear, undo, move. This is because it is often quite useful to call these outside of a pundit page due to the layout of the page. They work the same as if you had activated a pundit button directly. The state of a pundit is received from Swift using two main responses – UpdatePundit and UpdateButtons. Update Pundit will be called when you need to update all buttons on the pundit interface, for example, a new pundit has been selected, or the current page has changed. UpdateButtons will be called when smaller changes have been made that only affect part of the page – for example, when a new graphic has been selected and is now active. The difference is that UpdatePundit will contain information on all buttons in the current page. UpdateButton will only contain information on the buttons that have changed since the last update. Commonly, UpdateButton will only contain two buttons – the previously selected button, and the newly selected button. |
|
Javascript File |
rtsw/rtpundit.js |
|
Protocol Name |
pundit.rtsw.co.uk |
Messages
SetButtonSize
|
Description |
Sets the size of a button. This determines the size of icons that are sent from Swift on a page update. |
|
Javascript |
protocol.setButtonSize(<width>, <height>) |
|
JSON |
{ “command”:”SetButtonSize”, “protocolId”:”<protocolInstanceName>” “parameters”: { “width”:<width>, “height”:<height> } } |
|
Response |
No Response – however, all following OnPunditUpdate’s will use the new button size. |
SetPundit
|
Description |
Chooses the pundit that will be used by this pundit protocol. The pundit must exist within Swift . The punditName is the name of the pundit (for example, “Operator Analysis”). If no name is specified, then Swift will use the Default Web Pundit, which is setup as part of the Swift Web Server preferences. See the Protocol Tab in the Design And Edit manual. The iconDirectory is a directory that Swift will use when constructing icons for this pundit. This works in the same way as a pundit Skin. Images in the iconDirectory will override images in the loaded Swift Sports and Custom projects. NOTE: In most setups, the iconDirectory will be the same as the web server directory – simply set the iconDirectory to “.” |
|
Javascript |
protocol.setPundit(<punditName>, <iconDirectory>) |
|
JSON |
{ “command”:”SetPundit”, “protocolId”:”<protocolInstanceName>” “parameters”: { “name”:name, “iconDirectory”:iconDirectory } } |
|
Response |
OnPunditUpdate with the starting page for the specified pundit. |
ActivateGraphic
|
Description |
Causes the specified “button” on the pundit interface to be clicked. The result of this will be vary on the button. For example, a graphic button will action the graphic, a page button will swap which page the pundit is looking at, an “undo” button will undo the last graphic in the stack. The correct buttonIx”s to use can be found in the OnPunditUpdate method. |
|
Javascript |
protocol.activateGraphic(<buttonIx>) |
|
JSON |
{ “command”:”ActivateGraphic”, “parameters”: { “id”: <buttonIx> } } |
|
Response |
For most button types, an OnPunditUpdate will be transmitted with the new state of the buttons. |
AnimateOff
|
Description |
Calls the special button action, Animate Off, without requiring a pundit button Ix. |
|
Javascript |
protocol.animateOff() |
|
JSON |
{ “command”:”AnimateOff”, “parameters”: { } } |
|
Response |
OnPunditUpdate |
ClearStack
|
Description |
Calls the special button action, Clear, without requiring a pundit button Ix. This action clears all graphics and clears the stack, without calling the graphics takeOff() methods |
|
Javascript |
protocol.clearStack() |
|
JSON |
{ “command”:”ClearStack”, “parameters”: { } } |
|
Response |
OnPunditUpdate |
Undo
|
Description |
Calls the special button action, Undo, without requiring a pundit button Ix. Causes the last graphic to be “undone” i.e. deleted from the stack. |
|
Javascript |
protocol.undo() |
|
JSON |
{ “command”:”Undo “, “parameters”: { } } |
|
Response |
OnPunditUpdate |
Move
|
Description |
Calls the special button action, Move, without requiring a pundit button Ix. Sets Swift Sports into “move” mode. Move mode cancels repeatable graphics (such as arrows), allowing draggable graphics to be moved without adding additional graphics. |
|
Javascript |
protocol.move() |
|
JSON |
{ “command”:”Move”, “parameters”: { } } |
|
Response |
OnPunditUpdate |
Responses/Callbacks
onPunditReady (javascript only)
|
Description |
This javascript-only callback is called when the protocol has been established. Start setting up the pundit inside of here. |
|
javascript |
protocol.onPunditReady = function() { // setup the pundit e.g. // protocol.setButtonSize(64, 64); // protocol.setPundit(‘Web Pundit’, ‘.’) } |
OnPunditUpdate
|
Description |
This is called whenever a large change occurs to the pundit. This could be because setPundit() has been called, or a new page has been selected. For small changes to the page, see OnButtonUpdate. Whenever you receive an OnPunditUpdate, you should update the state of all of your pundit buttons. The following data is associated with each button :
$(‘#myImage).css(“background-image”, “url(data:image/png;base64,”+ json[‘buttons’][ix][‘base64Image’]+”)”); |
|
Javascript |
protocol.onPunditUpdate = function(json) { // parse the json, setup the pundit buttons. } |
|
JSON |
{ “command”:”UpdatePundit”, “buttons”: [ { “id”:<buttonId>, “text”,<buttonText>, “icon”,<iconString>, “base64Image”:<base64Image> }, { … another button … } ] } |
OnButtonUpdate
|
Description |
Called when a small change occurs to the page. For example – a button has been activated that changes the state of the pundit. Whenever you receive an OnButtonUpdate, you should update the state of the pundit buttons contained in the message. The following data is associated with each button :
$(“#myImage).css(“background-image”, “url(data:image/png;base64,”+ json[“buttons”][ix][“base64Image”]+”)”); |
|
Javascript |
protocol.onButtonUpdate = function(json) { // parse the json, setup the pundit buttons. } |
|
JSON |
{ “command”:”UpdateButtons”, “buttons”: [ { “id”:<buttonId>, “text”,<buttonText>, “icon”,<iconString>, “base64Image”:<base64Image> }, { … another button … } ] } |
RTRemote
|
Summary |
This protocol provides commands for control of Swift – playing the graphics and methods in the currently loaded project. It is based on the Swift MOS remote control protocol. RT Remote supports Transactions. A transaction is a sequence of remote protocol commands that should be run on the target Swift as an atomic unit – without running commands from other control clients. The StartTransaction message starts a transaction – subsequent messages are accumulated and not sent to Swift. The EndTransaction message sends the accumulated list of messages to Swift. |
|
Javascript File |
rtsw/rtremote.js |
|
Protocol Name |
remote.rtsw.co.uk |
Messages
StartTransaction
|
Description |
Begins a transaction. Commands will be buffered until an endTransaction is received, and then actioned in one go. |
|
Javascript |
protocol.StartTransaction () |
|
JSON |
{ “command”:”StartTransaction”, “parameters”: { } } |
|
Response |
No Response |
EndTransaction
|
Description |
Ends a transaction. Commands that have been buffered up since the previous startTransaction and actioned in one go. |
|
Javascript |
protocol.EndTransaction () |
|
JSON |
{ “command”:”EndTransaction”, “parameters”: { } } |
|
Response |
No Response |
LoadProject
|
Description |
Send a message to load the specified project. |
|
Javascript |
protocol.LoadProject (projectName) |
|
JSON |
{ “command”:”LoadProject”, “parameters”: { “projectName”:<projectName> } } |
|
Response |
No Response |
PlayGraphic
|
Description |
Send a message to play the specified graphic. |
|
Javascript |
protocol.PlayGraphic (graphicName) |
|
JSON |
{ “command”:”PlayGraphic”, “parameters”: { “graphicName”:<graphicName> } } |
|
Response |
PlayMethod
|
Description |
Send a message to play the specified method. |
|
Javascript |
protocol.PlayMethod (methodName) |
|
JSON |
{ “command”:”PlayMethod”, “parameters”: { “methodName”:<methodName>, “parameter1Name”:<parameter1Value>, } } |
|
Response |
No Response |
UpdateFields
|
Description |
Send a message to update the specified field of the specified node in the scenegraph. Note: the nodeName can be specified as <parentNodeName>::<nodeName>. To find a node for a particular graphic you can use the object node for the graphic as the parent node. For example, SwiftCaption_OBJ::titleText_TRFM would update the node titleText_TRFM in the SwiftCaption graphic. Note: the nodeName/fieldName/value triple can be repeated to update multiple node afields with a single command on a single frame. |
|
Javascript |
protocol.UpdateField (nodeName,fieldname,value) |
|
JSON |
{ “command”:”UpdateField”, “parameters”: { “nodeName”:<nodeName>, “fieldName”:<fieldName>, “value”:<value> } } |
|
Response |
No Response |
UpdateTicker
|
Description |
Send a message to add a slug to the specified ticker node with the supplied contents. |
|
Javascript |
protocol.UpdateTicker (tickerNodeName,slugName,slugContents) |
|
JSON |
{ “command”:”UpdateTicker”, “parameters”: { “tickerNodeName”:<tickerNodeName>, “slugName”:<slugName>, “slugContents”:< slugContents > } } |
|
Response |
No Response |
Clear
|
Description |
Send a message to clear out the scenegraph. |
|
Javascript |
protocol.Clear () |
|
JSON |
{ “command”:”Clear”, “parameters”: { } } |
|
Response |
No Response |
GetStatus
|
Description |
Send a message to get information about the current project, graphic, method and scenegraph nodes. Note: the type/filter couple can be repeated to get information about multiple items.. |
|
Javascript |
protocol.GetStatus(type,filter) |
|
JSON |
{ “command”:GetStatus, “parameters”: { “type”:<type>, “filter”:<filter> } } |
|
Response |
The status contains the requested information. If the type is “Project” and the filter is “Current”, the status will either be empty if there is no project loaded or it will contain: currProject.name=<full path name of the .prj file>. If the type is “Script” and the filter is “Current”, the status will either be empty if there is no graphic loaded or it will contain: currScript.name=<full path name of the .rb file>. If the type is “Method” and the filter is “Current”, the status will either be empty if no method has been run or it will contain: currMethod.name=<method name>. If the type is “Node”, the status will contain a semi-colon separated list of the following: <nodeName>.<afieldName> = <afieldValue>. The filter for project, script and method types is always “Current”. For node it can have two forms: <parent node name>|<reg expr for name>|<node type>|<afield name>. For example, “rootNode||ObjectNode|Name” will return the names of all the object nodes in the scene. |
RTStack
|
Summary |
Provides commands for stack manipulation. Currently this is limited to operations required for Tactic analysis stacks, but will be extended in later releases to include full stack manipulation. In the current release, you can restart, replay and insert a pause into a stack using the stack protocol. This provides enough functionality to produce a basic replay analysis system in a web page. |
|
Javascript File |
rtsw/rtstack.js |
|
Protocol Name |
stack.rtsw.co.uk |
Messages
RestartStack
|
Description |
Restart a Swift sports stack, ready to replay for analysis. |
|
Javascript |
protocol.restartStack() |
|
JSON |
{ “command”:”RestartStack”, “parameters”: { } } |
|
Response |
No Response |
ReplayStack
|
Description |
Replays the current Swift sports stack – this means the stack will play until the the next pause point or the end of the clip, whichever comes first. NOTE: It is common to use replayStack in place of Play when implementing VT Controls, as this gives the ability to play both with and without an analysis stack. |
|
Javascript |
protocol.replayStack() |
|
JSON |
{ “command”:”ReplayStack”, “parameters”: { } } |
|
Response |
No Response |
InsertPause
|
Description |
Inserts a pause point into the stack on the current timecode. The stack will pause at this point when replaying the stack. |
|
Javascript |
protocol.insertPause() |
|
JSON |
{ “command”:”InsertPause”, “parameters”: { } } |
|
Response |
No Response |
RTVideoStream
|
Summary |
The video streaming protocol allows video to be streamed from Swift to a <video> tag in a html web page. The video is streamed with low latency, meaning that interaction is possible without lag. The underlying protocol used is an open standard, but is quite complex to implement into a non-web application. However, it is completely wrapped up inside of the javascript protocol, so you do not need to know the details of how it works in order to use video streaming. If you wish to implement video streaming into a non-web application using the web socket interface, please contact RTSoftware support for advice. When creating the video stream protocol, as well as the normal rtswProtocol an protocolId arguments, you also pass in a videoId. This is the id of a <video> tag in the html file that you are using. For example, <video id=”myVideoId”/> videoProtocol = new RTVideoStream(rtswProtocol, “videoStream1”, “#myVideoId”) The protocol will then do the rest of the work to establish the video connection to Swift, and start streaming video. If you want to close the stream, call videoProtocol.close() You will need to open a new protocol to start streaming again. |
|
Javascript File |
rtsw/rtvideostream.js |
|
Protocol Name |
video.rtsw.co.uk |
Messages
Close
|
Description |
Stops streaming of video. |
|
Javascript |
protocol.close() |
|
JSON |
For non-web applications, please contact RTSoftware Support. |
|
Response |
No response |
RTVTControl
|
Summary |
The VT Control allows standard transport controls on File-based clips or any VT device that Swift is currently controlling (EVS,GrassValley K2, etc) See individual commands for parameters, as some use different scale factors to others, or work slightly differently than you may expect. |
|
Javascript File |
rtsw/rtvtcontrol.js |
|
Protocol Name |
vtcontrol.rtsw.co.uk |
Messages
Play
|
Description |
Cause the VT to play at normal speed. |
|
Javascript |
protocol.play() |
|
JSON |
{ “command”:”Play”, } |
|
Response |
None |
Pause
|
Description |
Cause the VT to pause |
|
Javascript |
protocol.pause() |
|
JSON |
{ “command”:”Pause”, } |
|
Response |
None |
Rewind
|
Description |
Cause the VT to rewind |
|
Javascript |
protocol.rewind () |
|
JSON |
{ “command”:”Rewind”, } |
|
Response |
None |
FastForward
|
Description |
Cause the VT to fast-forward |
|
Javascript |
protocol.fastForward () |
|
JSON |
{ “command”:”Forward”, } |
|
Response |
None |
Jog
|
Description |
Cause the VT to Jog. The speed value is an offset for how far forwards or backwards the jog occurs. It may vary from device to device, but values in the range of +/-50 is a good starting point. |
|
Javascript |
protocol.jog (<speed>) |
|
JSON |
{ “command”:”Jog”, “parameters”: { “jog”:<speed> } } |
|
Response |
None |
Shuttle
|
Description |
Cause the VT to Shuttle. The speed value is an offset for how far forwards or backwards the shuttle occurs. It is an exponential scale, but roughly speaking, a value of +/-250 will give 10 times speed, a value of 0 gives normal play speed. |
|
Javascript |
protocol.shuttle (<speed>) |
|
JSON |
{ “command”:”Shuttle”, “parameters”: { “shuttle”:<speed> } } |
|
Response |
None |
SlowMo
|
Description |
Make the VT play forwards in slow motion |
|
Javascript |
protocol.slowMo (<speed>) |
|
JSON |
{ “command”:”SlowMo”, “parameters”: { “speed”:<speed> } } |
|
Response |
None |
Step
|
Description |
Steps the VT Control forwards or backwards. This does not use a “speed” control like jog and shuttle, as different devices differ quite significantly on what they are capable of. Instead, it supports 4 “modes” :
The exact meaning of these varies from device to device. However, generally, “Slow” will step forwards or backwards by a single frame. “Fast” will step forwards or backwards by 4 or 5 frames. |
|
Javascript |
protocol.step (<mode>) |
|
JSON |
{ “command”:”Step”, “parameters”: { “mode”:<mode> } } |
|
Response |
None |
Responses/Callbacks
OnReady (javascript only)
|
Description |
Javascript only, called when the protocol has been established. |
|
Javascript |
protocol.onReady = function() { } |
