AJA Driver Install Manual
AJA Driver
Installation
| DATE | 6/12/2022 |
| PRINCIPAL AUTHOR | Steve Hart/Peter Eszlari/Jerry Clark |
| VERSION | 1.2 |
Installation
The Installation for the AJA driver is fairly straight forward on a new machine. If you are re-installing or updating then refer to the uninstall section below before attempting a reinstall/update.
Locate the appropriate driver from the RTSoftware FTP release site. Always use the version that is available with your currently installed version of Swift/Tactic.
DO NOT INSTALL AN AJA DRIVER FROM THE AJA WEB SITE UNLESS EXPLICITLY DIRECTED TO BY RTSW SUPPORT
These are located at
https://ftp.rtsw.co.uk
You will need an authorised login to access this site. If you do not have one then please contact support@rtsw.co.uk.
Windows Install
Once logged on, navigate to the appropriate release location.
For Swift:
Downloads/Releases/4.6.5/4.6.5_r30014/Windows-X86_64
The AJA driver install will have the following form:
Ajadriver-16.2.0-windows-installer.exe
For Tactic:
Downloads/Releases/6.0.0/6.0.0_r30236/Windows-X86_64
The AJA driver install will have the following form
Ajadriver-16.0.0-windows-installer.exe
Download the executable to a suitable location on your machine and run it.
You will be presented with a set of dialogs as follows
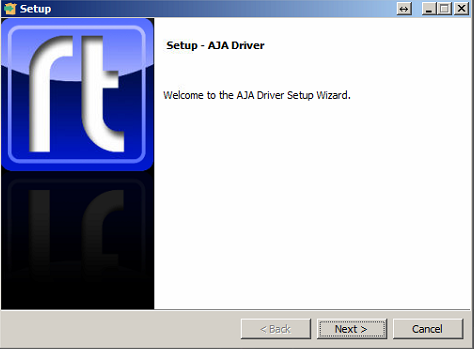
- Press Next….
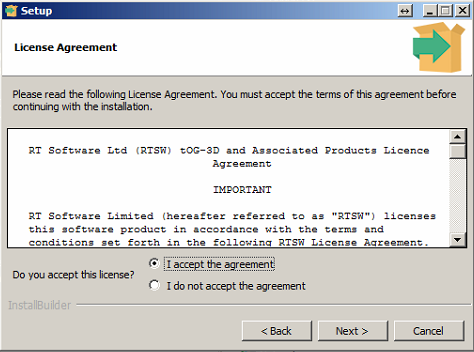
- Accept the agreement and press Next…
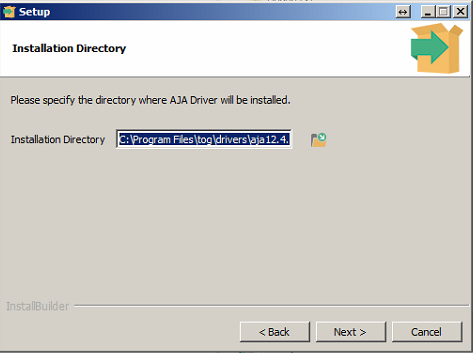
- Unless you have been instructed, press Next to accept the default install directory…
- Press Next again to start the install….
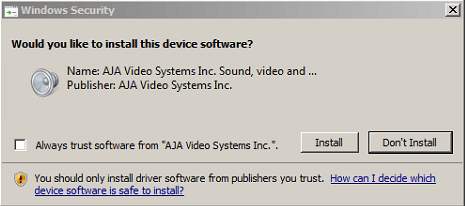
- When you see this….
- Press Install. You will see one of these for each AJA board you have installed…
- Press Finish to complete the installation.
- See ‘Checking install’ to check your driver is installed and can see your AJA board.
Windows 7 Security Update
If you are installing on a fairly old version of Windows 7 you may encounter an issue where the driver seems to install but neither Cables (below) or Swift/Tactic will recognise this. You will be notified of this by an error when you install regarding driver not signed or certificate rejected.
The driver may appear in the device manager list but it will have a small yellow triangle over the top of it.

If this occurs you must either do a complete windows update or, alternatively, you can install the specific Windows 7 update.
KB3033929
This is available at
https://www.microsoft.com/en-gb/download/details.aspx?id=46148
Linux Install
AJA Cards are not yet qualified for Swift/Tactic under Linux.
Checking Install
Windows
To check that the driver is installed you can do 2 things:
- Check that the device manager has listed it. Open the Device Manager. Look for an entry as shown below:
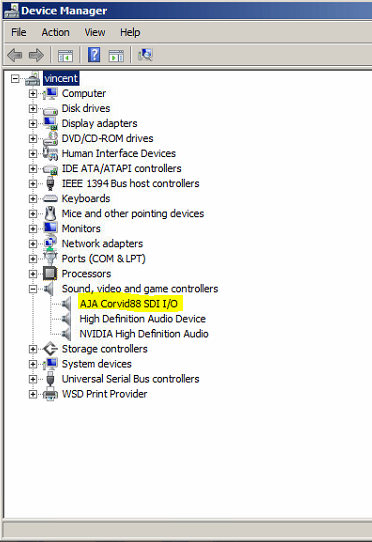
2) Check the ‘Cables’ program. Locate the cables.exe program. This should be located in
- Swift: C:Program Filestogdriversaja16.2.0bin
- Tactic: C:Program Filestogdriversaja16.0.0bin
When you run this you will see something like the following:
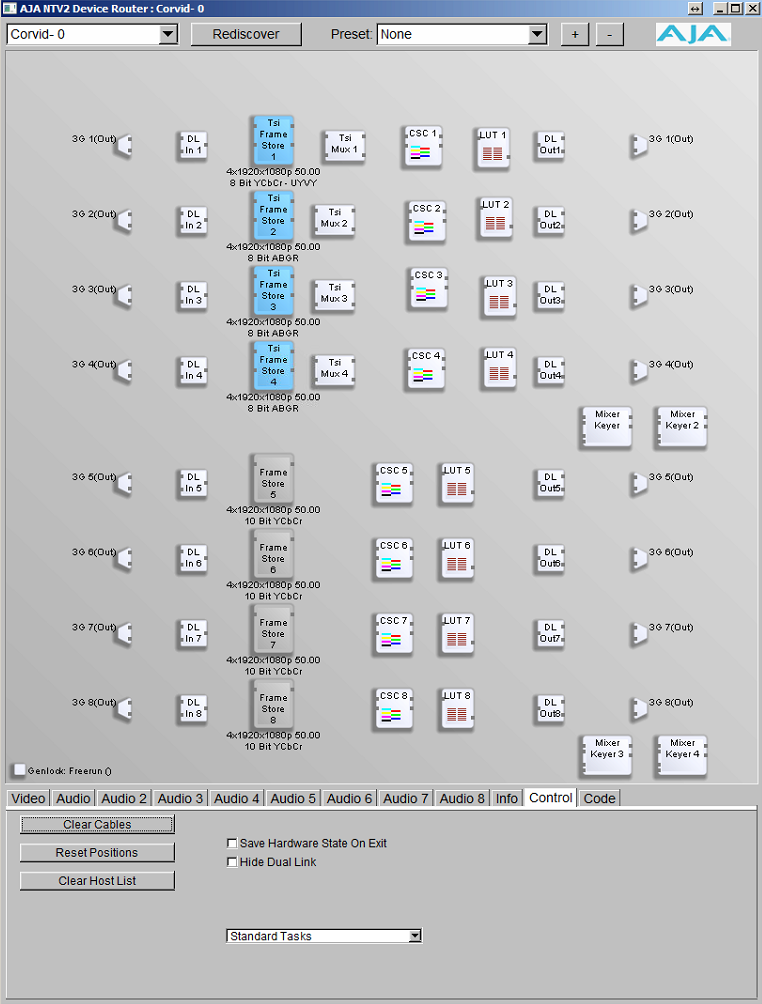
Note that the layout routing may differ. Don’t worry about that. Check that the correct board is shown at the top. If you do not see this then press the Rediscover button. If you do not see this refer to the troubleshooting section below
Linux
AJA Cards are not yet qualified for Swift/Tactic under Linux.
Card configuration
Video formats supported by AJA in Swift
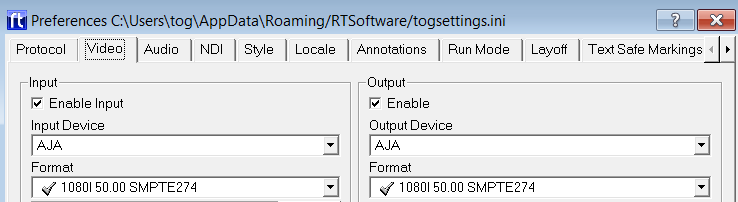
Depending on each AJA video card’s capabilities the following video formats are supported by Swift. These can be set for the Input and Output stage separately via the Video tab of the Swift Preferences window.
Swift Preferences – Video tab
- PAL
- PAL Widescreen
- NTSC
- NTSC Widescreen
- 720P 50.00 SMPTE296
- 720P 50.00 SMPTE296
- 720P 59.94 SMPTE296
- 1080I 50.00 SMPTE274
- 1080I 59.94 SMPTE274
- 1080P 25.00 SMPTE274
- 1080P 50.00 SMPTE274 (3G)
- 1080P 29.97 SMPTE274
- 1080P 59.94 SMPTE274 (3G)
- 1080P 2K 50.00
- 1080P 2K 59.94
- 2160P 4K 25.00
- 2160P 4K 29.97
- 2160P 4K 50
- 2160P 4K 5994
Video formats supported by AJA in Tactic
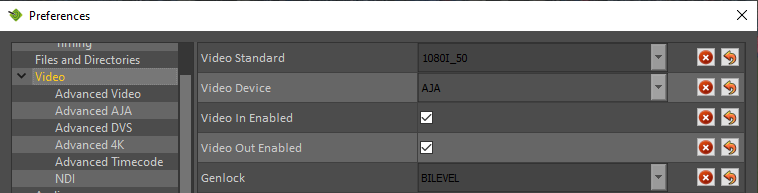
Depending on each AJA video card’s capabilities the following video formats are supported by Tactic.
Tactic Preferences – Video menu:
|
|
AJA i/o in Swift & Tactic
Swift/Tactic support multiple inputs and outputs depending on the chosen AJA card’s capabilities and configuration settings.
Some AJA hardware have dedicated inputs and outputs while others have so called bidirectional connections where each SDI socket can be assigned to function either as an input or an output so the whole i/o layout depends on a given configuration. Swift/Tactic finds the installed AJA device automatically and knowing it’s capabilities it will do this configuration based on basic user settings. In this case the given i/o layout can change completely between different settings, depending on how many inputs are selected or if there is a KEY output assigned.
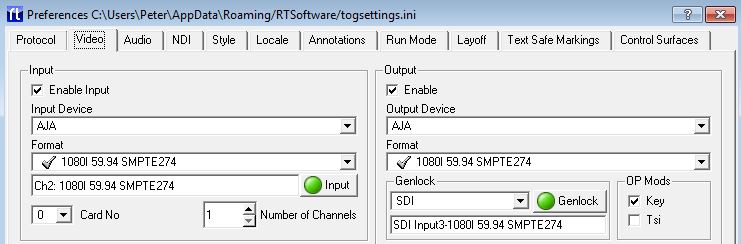
Configuring AJA i/o in Swift/Tactic
In the Swift Preferences window there is an input and an output section on the Video tab. These include an enable option, a list of the supported video devices, number of input channels and key output enabled.
Swift Preferences – Video tab
In the Tactic the number of input channels and the video card to use can be specified in the Advanced Aja menu:
Tactic Preferences – Advanced AJA

Further options and video output timings are available on Advanced Video menu:
Tactic Preferences – Advanced Video

Example AJA configuration in Swift
Number of input channels
This depends on the installed AJA hardware’s capabilities. The Aja Corvid-88 has the highest number, 8 SDI sockets assignable as inputs. In this setting there will not be any SDI sockets available for outputs. Consequently to have both HD Fill and Key outputs the maximum number of inputs will be 6 on this card. This logic is consistent across all bi-directional cards.
The maximum i/o capabilities of Swift on a single Corvid-88 card are these:
| Configuration 1 | Configuration 2 | Configuration 3 | |
| SD/HD/3G | 8 IN | Fill OUT + 7 IN | Fill + Key OUT +
6 IN |
| 4K | 2 IN | Fill OUT + 1 IN | Fill + Key OUT |
A number of AJA cards have dedicated i/o sockets whose function will not be changed by Swift. These can be observed on the tables below for each card.
Multiple AJA cards
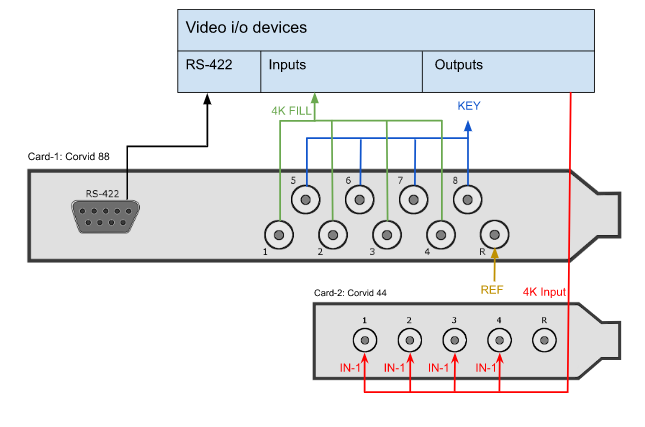
It is possible to install and use multiple AJA cards in conjunction to achieve more inputs and outputs up to a maximum of 8 in/1 out(fil or fill+key) for SD/HD and 2in/1out (fil or fill+key) for 4k. A typical application of this would be in 4K format where the 4 sockets per channel configuration limits the i/o options.
Swift will configure the two cards’ i/o automatically based on user settings in the Swift Preferences window i.e: how many inputs are set and whether there is KEY output selected.
The order of the cards in respect of the numbering order of the PCI sockets on the motherboard will determine the order of i/o.
| Card combinations | Number of SDI sockets | 4K FILL + 4K INPUTS | 4K FILL + KEY +
4K INPUTS |
| Corvid 88 + Corvid 88 | 8 + 8 = 16 | Card-1: FILL + IN-1
Card-2: IN-2 + IN-3 |
Card-1: FILL + KEY
Card-2: IN-1 + IN-2 |
| Corvid 88 + Corvid 44 | 8 + 4 = 12 | Card-1: FILL + IN-1
Card-2: IN-2 |
Card-1: FILL + KEY
Card-2: IN-1 |
| Corvid 44 + Corvid 88 | 4 + 8 = 12 | Card-1: FILL
Card-2: IN-1 + IN-2 |
Card-1: FILL
Card-2: KEY + IN-1 |
| Corvid 44 + Corvid 44 | 4 + 4 = 8 | Card-1: FILL
Card-2: IN |
Card-1: FILL
Card-2: KEY |
A setup example will be shown for this at the Corvid 88 section below.
Supported Cards
The following sections detail the current AJA card configurations supported. Note that you can extend capabilities using multiple cards as explained above
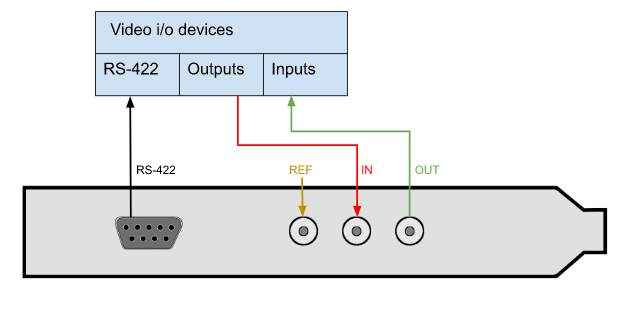
Kona-1 & Corvid-1 & 3G & 3G-LP
- SDI I/O: 1IN / 1 OUT, 3G – Non-bidirectional
- SDI Reference input: HD/SD Genlock, Reference Video or LTC Input (selectable via jumper)
- RS422 – dedicated connection for serial control (not available on Corvid 3G-LP)
Corvid 3G one IN one OUT
| SDI I/O – 2x 3G Non-bidirectional | Single HD/SD |
| IN | IN-1 |
| OUT | FILL |
Corvid 22 (now not supported)
- SDI I/O: pre-configured by Swift/Tactic to 1-IN + 2-OUT (Fill+Key)
- Dedicated outputs can be used as fill/key
- SDI Reference input
- RS422 – accessible via breakout cable
- Break-out cable:
• LTC IN 1/2
• LTC OUT 1/2
• RS422 Channel ½
See Appendix-A for a detailed diagram of the 102953 breakout cable.
Corvid 22 with KEY output
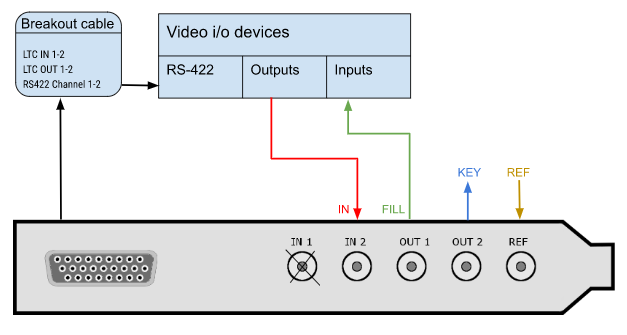
| SDI I/O – 4x 3G Non-bidirectional | HD/SD FILL+KEY | HD/SD No-KEY |
| IN-1 | Not used | Not used |
| IN-2 | IN-1 | IN-1 |
| OUT-1 | FILL | FILL |
| OUT-2 | KEY | Not used |
Corvid 24 (discontinued)
- SDI I/O: 4x SD/HD/3G bidirectional
- Preconfigured outputs can be used as fill/key
- SDI Reference input
- RS422 – accessible via breakout cable
- Input bypass relays/Watchdog
- Break-out cable:
• LTC IN 1/2
• LTC OUT 1/2
• RS422 Channel 1/2
See Appendix-A for a detailed diagram of the 102953 breakout cable.
Corvid 24 with KEY output
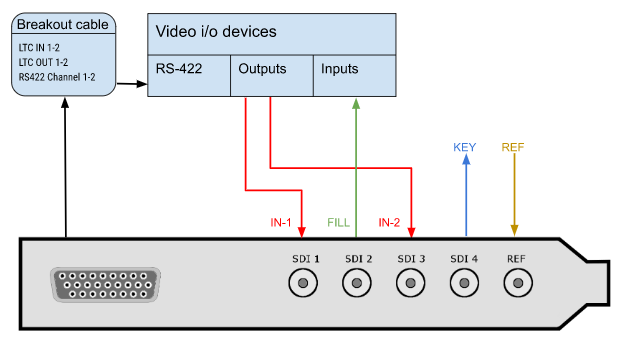
| SDI I/O – 4x 3G bidirectional | HD/SD FILL+KEY
One Input |
HD/SD FILL+KEY
Two Inputs |
HD/SD No-KEY
Two Inputs |
| SDI-1 | IN-1 | IN-1 | IN-1 |
| SDI-2 | FILL | FILL | FILL |
| SDI-3 | Not used | IN-2 | IN-2 |
| SDI-4 | KEY | KEY | Not used |
Input bypass relays / Watchdog
The Corvid-24 has bypass relays on each SDI connector that can operate under software control or hardware control (using the built-in “watchdog” timer). If Watchdog is enabled in Swift, it will enable the bypass if the system becomes unresponsive or loses power.
However, by default the relays are enabled only if the card is powered down.
Please note – if the jumpers are enabled on the card then Watchdog MUST also be enabled in Swift.
Configuring Swift for Watchdog
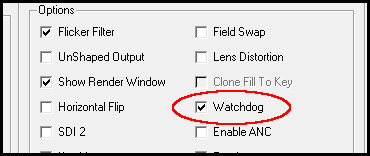
The Watchdog enable option is found in Swift Preferences at the Options section of the Video tab. Swift needs to be restarted after saving these settings.
Swift Preferences Video tab – Watchdog enabled
Configuring the hardware
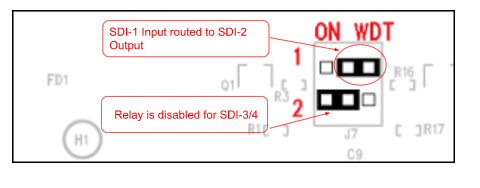
The Corvid-24 has to be configured for Watchdog operation via jumpers found on the hardware component. Two jumpers on the upper left corner of the Corvid-24 card enable or disable control of the bypass relays. The top jumper controls the bypass route between connectors SDI-1 and 2. When the jumper is set at the rightmost position the input signal delivered to SDI-1 will output through SDI-2. The same way, the bottom jumper controls the bypass between SDI-3 and 4.
When a jumper is in the leftmost position, the corresponding bypass relays are disabled, therefore this is the same routing as AJA boards without relays.
Corvid-24 hardware jumper settings
Corvid 44
- SDI I/O: 4x 3G bidirectional OR single 4K OUT
- Preconfigured outputs can be used as fill/key
- SDI Reference input
- Can be used in conjunction with another Corvid 44 or a Corvid 88 to achieve more inputs and outputs or 4K inputs. See the Corvid 88 diagrams.
Corvid 44 with KEY output
| SDI I/O | HD/SD No-KEY | HD/SD FILL+KEY | Single 4K OUT |
| SDI-1 | FILL | FILL | 4K FILL – cable1 |
| SDI-2 | IN 1 | KEY | 4K FILL – cable2 |
| SDI-3 | IN 2 | IN 1 | 4K FILL – cable3 |
| SDI-4 | IN 3 | IN 2 | 4K FILL – cable4 |
Corvid 88
- SDI I/O: 8x 3G bidirectional OR single 4K IN+OUT
- Preconfigured outputs can be used as fill/key
- SDI Reference input
- RS422 – dedicated connection for serial control
- Can be used in conjunction with another Corvid 44 or a Corvid 88 to achieve more inputs and outputs or 4K inputs.
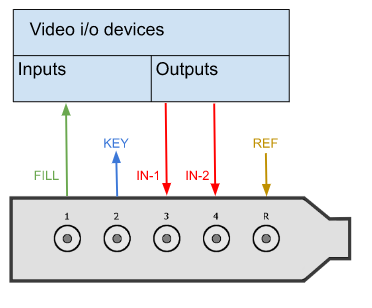
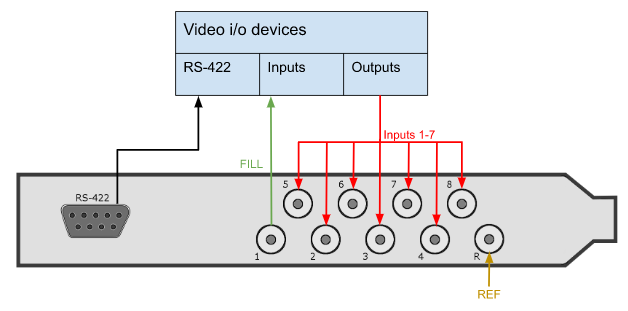
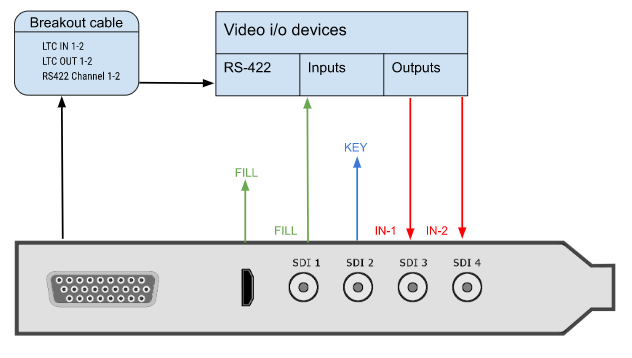
Corvid 88 in HD with KEY output
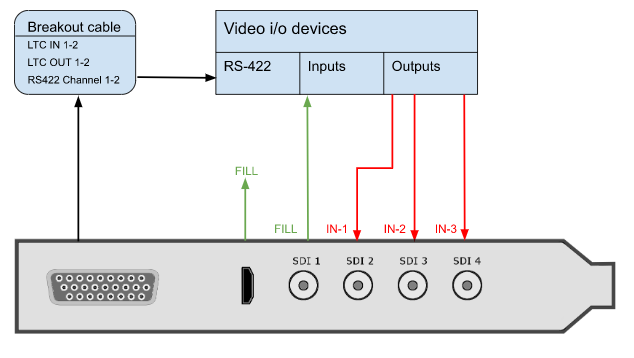
Corvid 88 in HD with FILL output only
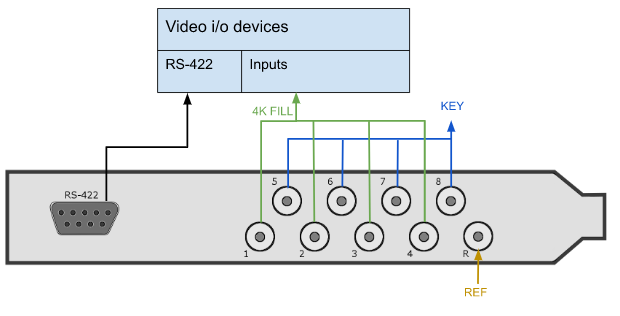
Corvid 88 in 4K with KEY output
Corvid 88 in 4K with FILL output
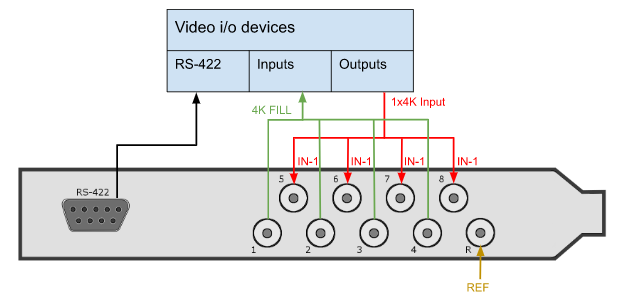
| SDI I/O | HD/SD No-KEY | HD/SD FILL+KEY | 4K FILL
4K Input |
4K FILL+KEY |
| SDI-1 | FILL | FILL | FILL-cable1 | FILL – cable1 |
| SDI-2 | IN 1 | KEY | FILL-cable2 | FILL – cable2 |
| SDI-3 | IN 2 | IN 1 | FILL-cable3 | FILL – cable3 |
| SDI-4 | IN 3 | IN 2 | FILL-cable4 | FILL – cable4 |
| SDI-5 | IN 4 | IN 3 | IN 1 – cable1 | KEY – cable1 |
| SDI-6 | IN 5 | IN 4 | IN 1 – cable2 | KEY – cable2 |
| SDI-7 | IN 6 | IN 5 | IN 1 – cable3 | KEY – cable3 |
| SDI-8 | IN 7 | IN 6 | IN 1 – cable4 | KEY – cable4 |
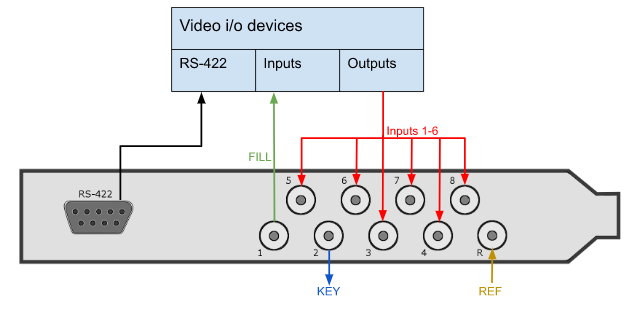
Corvid 88 with a Corvid 44 in 4K with FILL + KEY output
Kona-4
- SDI I/O: 4x 3G bidirectional OR single 4K OUT
- Preconfigured outputs can be used as fill/key
- RS422 – accessible via breakout cable
- HDMI OUT
- Break-out cable:
• LTC IN 1/2
• LTC OUT 1/2
• RS422 Channel ½
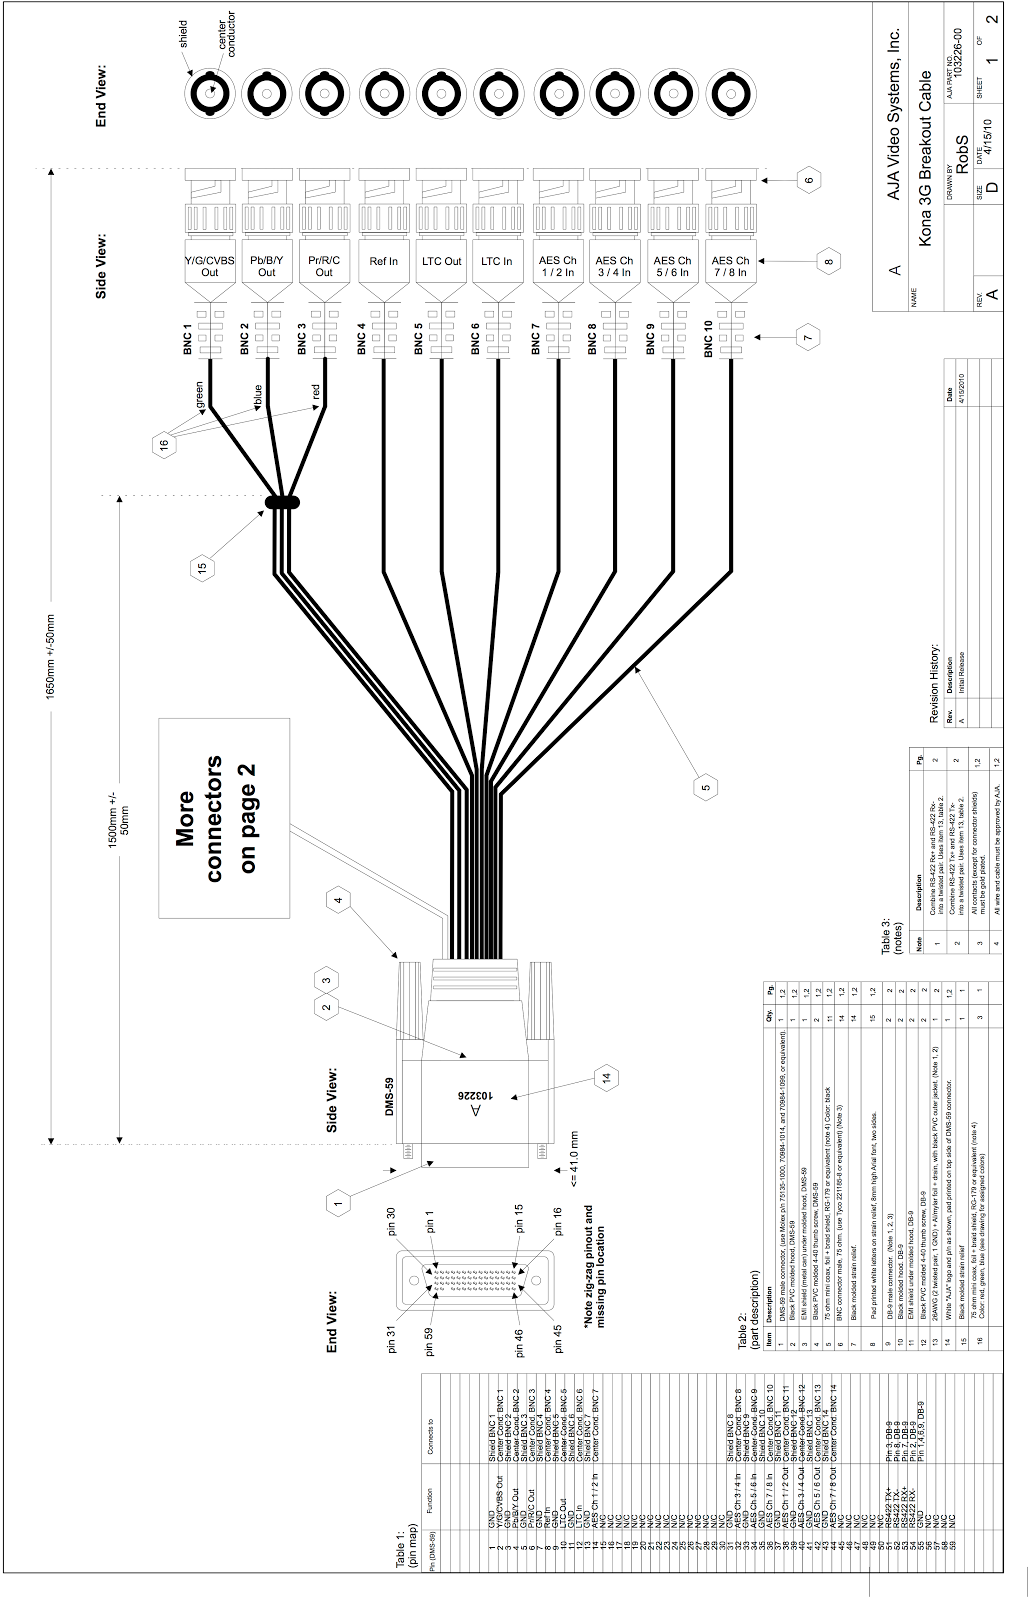
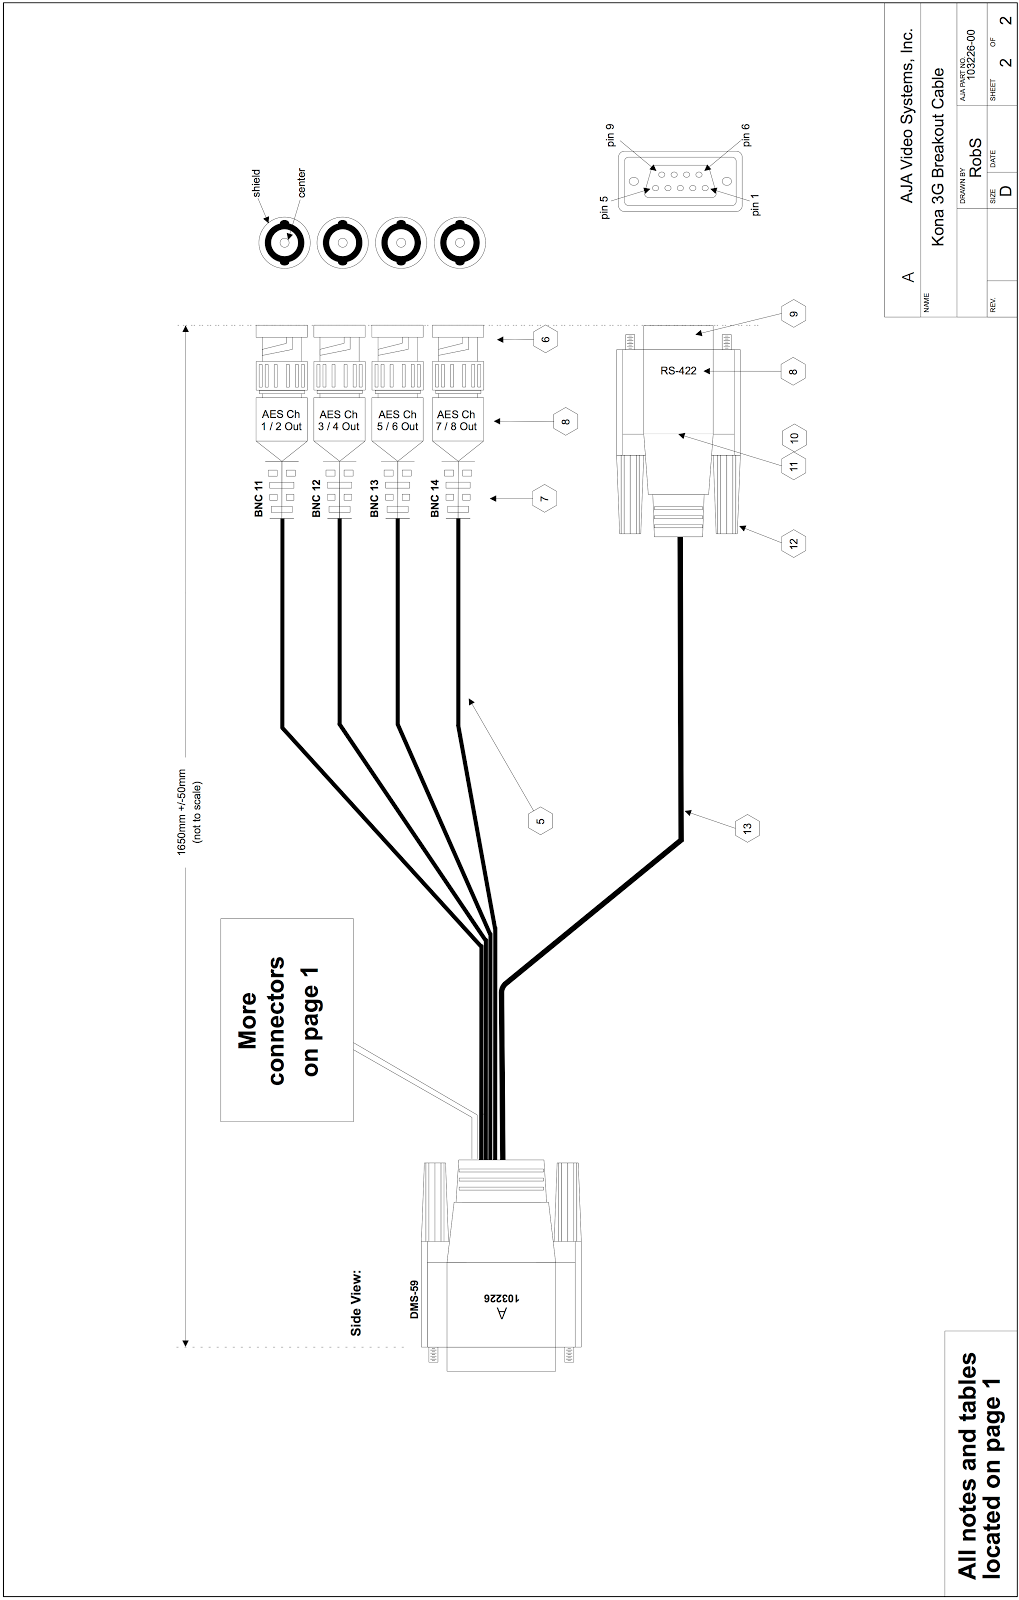
See Appendix-A for a detailed diagram of the 103226 breakout cable.
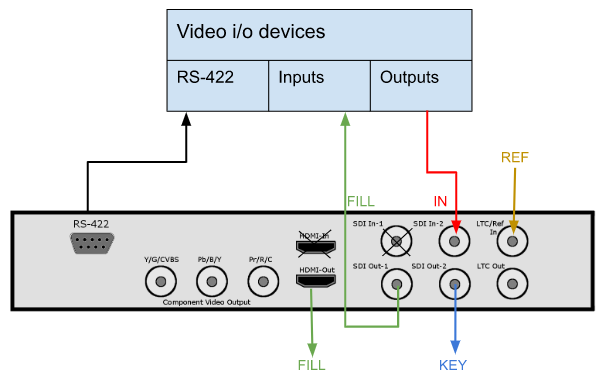
Kona-4 with KEY output
Kona-4 with FILL output only
| SDI I/O – 4x 3G bidirectional | HD/SD FILL+KEY
Two Inputs |
HD/SD No-KEY
Two Inputs |
Single 4K OUT |
| SDI-1 | FILL | FILL | 4K FILL – cable1 |
| SDI-2 | KEY | IN-1 | 4K FILL – cable2 |
| SDI-3 | IN-1 | IN-2 | 4K FILL – cable3 |
| SDI-4 | IN-2 | Not used | 4K FILL – cable4 |
io-XT
- SDI I/O: pre-configured by Swift/Tactic to 1-IN + 2-OUT (Fill+Key)
- Dedicated outputs can be used as fill/key
- SDI Reference input
- RS422 – dedicated connection for serial control
- HDMI OUT
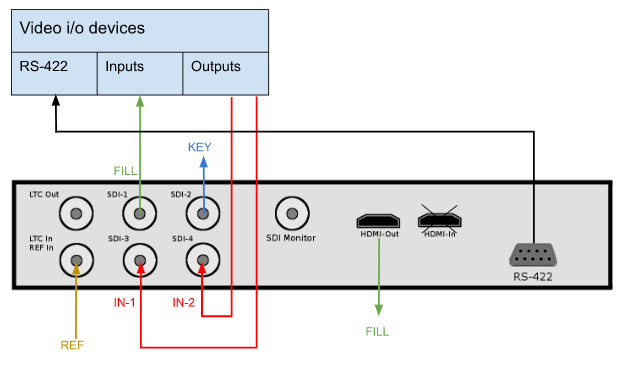
io-XT with KEY output
| SDI I/O – 4x 3G Non-bidirectional | HD/SD FILL+KEY | HD/SD No-KEY |
| IN-1 | Not used | Not used |
| IN-2 | IN-1 | IN-1 |
| OUT-1 | FILL | FILL |
| OUT-2 | KEY | Not used |
io-4K
- SDI I/O: 4x 3G bidirectional OR single 4K OUT
- Preconfigured outputs can be used as fill/key
- RS422 – dedicated connection for serial control
- HDMI OUT
io-4K with KEY output
| SDI I/O | Single HD/SD | HD/SD No-KEY | HD/SD FILL+KEY | Single 4K OUT |
| SDI-1 | FILL | FILL | FILL | 4K FILL – cable1 |
| SDI-2 | IN 1 | IN 1 | KEY | 4K FILL – cable2 |
| SDI-3 | Not used | IN 2 | IN 1 | 4K FILL – cable3 |
| SDI-4 | Not used | IN 3 | IN 2 | 4K FILL – cable4 |
io-4K with 1x 4K fill output

Uninstalling drivers
Windows
To uninstall the AJA Driver open up the Control Panel.
Locate the 2 AJA entries and uninstall both.

Note that only 1 AJA driver can be resident on the machine at any one time. If you see more than 2 AJA Drivers then uninstall all of them. The entries are identified by either ‘RT Software’ or ‘NTV2 Drivers’
Locate the directory
C:Program Filestogdrivers
Remove any entries starting with ‘aja’
Linux
AJA Cards are not yet qualified for Swift/Tactic under Linux.
Updating Firmware
Updating AJA firmware should only be carried out by a competent engineer who has a full understanding of the process.
A FIRMWARE UPGRADE FAILURE CAN RESULT IN AN INOPERABLE BOARD REQUIRING FACTORY RESET. DO NOT ATTEMPT THIS IN A TX ENVIRONMENT UNLESS YOU HAVE SPARES
Checking your current firmware version
Refer to Section 2 to run up the Cables program. Once this is running locate the ‘Info’ tab.
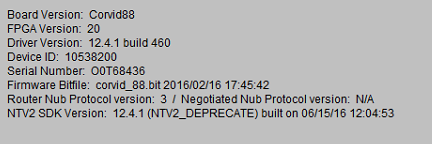
The firmware version is the ‘Firmware Bitfile’ and will consist of a Board name and a time/date stamp.
Windows.
You will have received a firmware bundle zip from RTSoftware. Unzip this in an appropriate location. Inside you will see 2 files:
pciburner.exe
This is the firmware burner.
corvid_88_2-16-16.bit
This is the updated bitfile.
Check the date of this bitfile with that reported in section 4.1. If this one is the same date or older then do NOT upgrade.
If it is newer then run up the pciburner.exe program
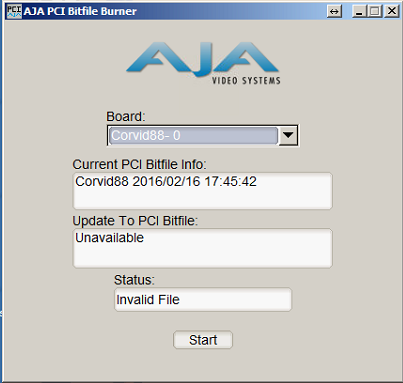
This should identify your board. If you have more than one board then you will need to repeat this process for each board you have.
YOU MUST COLD BOOT BETWEEN EACH UPDATE.
Again, check the Current PCI Bitfile is older that the one supplied.
Now, drag the update bitfile onto the textfield below ‘Update to PCI Bitfile’.
If this works then you should be able to press Start.
ONCE THE UPDATE STARTS DO NOT INTERRUPT IT UNTIL PROMPTED TO COLD BOOT THE MACHINE.
To Cold Boot you must power the machine down entirely. THIS IS VITAL. Wait 10 seconds and power the machine back up.
Repeat the process above to check that you firmware upgrade has worked and that the new firmware reported in ‘cables’ matches the one sent.
Troubleshooting
- Cables does not show the card or device manager does not show the card
Check that the driver is installed. Locate Control Panel. Select Uninstall program. You should see 2 entries as follows:
If these are not present then try re-installing the driver. If only one is present then uninstall and reinstall the drivers.
- Problems with Swift/Tactic video in or out.
If you experience issues with video in or out when running Swift/Tactic. First check the video preferences. Make sure that you have:
- Selected the correct Card for both out and in (If you are using i.p)
- That you have selected the correct sync type.
- That you see green LED on both video in and sync (Press the refresh button to make sure they are up to date.
- That you do not have Stereo selected.
- That the correct number of inputs are selected.
Check both the video input and video output at the machine by connecting a scope or monitor directly to the cables going in or out of the PC.
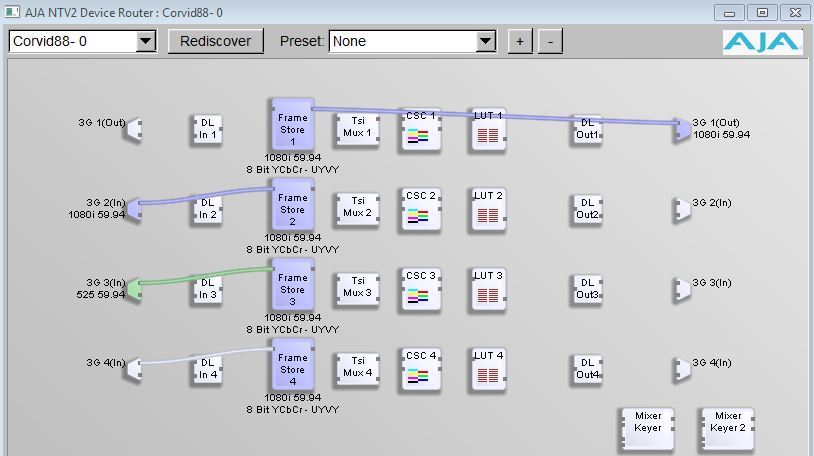
Validating i/o setup and signals via the AJA Cables application
The Cables application shows the current state of the i/o configuration and the signals that are present at its inputs. Observing this makes it easy to determine how the SDI sockets are configured i.e.: which serves as input, fill or key. Beside text it uses color codes for the virtual cables that represent different signal formats.
A white cable means that there is an input configured on that SDI socket but there is no signal present.
A colored cable indicates that there is an incoming signal in one of the following formats:

These color codes are also used for the input, output , framestore and other widgets.
| Framestore widget indicates to what standard that input is configured |
 |
| Input widget indicates the type of signal that is present on each SDI sockets |
 |
| Output widgets on the right hand side indicate which SDI socket is configured as Fill/Key outputs |
 |
EXAMPLES
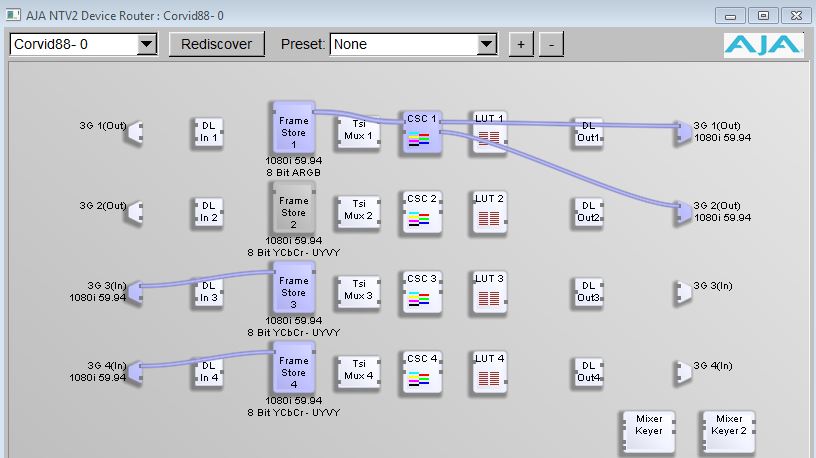
2 inputs and Fill + Key outputs
In the following example SDI 1 and 2 are Fill and Key respectively. Fill and Key signals are split by a Color Space Converter widget, CSC1.
SDI 3-4 are configured as inputs and have valid HD signal present.
2 inputs and Fill output
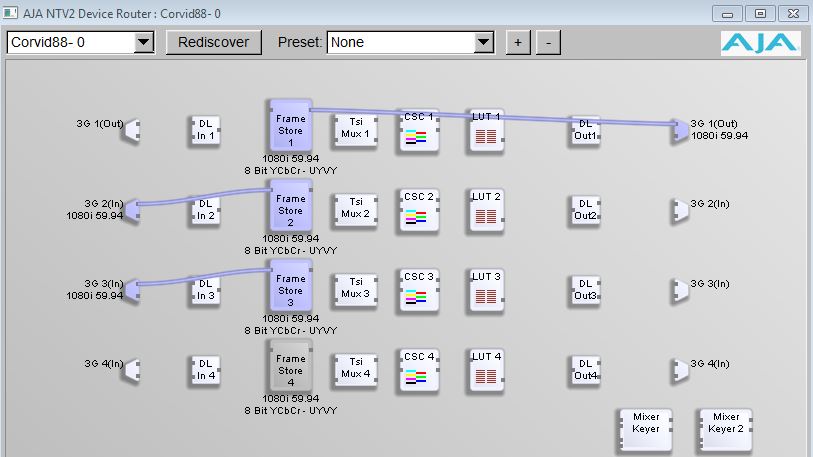
3 inputs configured with a Fill output only.
Output-1: SDI-1: Fill output
Input-1: SDI-2: HD signal format
Input-2: SDI-3: SD signal format, which is wrong in this setup
Input-3: SDI-4: no signal
Selecting the video tab at the bottom section of the page also gives information about connections and signals present on the SDI sockets.

NOTE: Do not change the cable connections on the Cables application while Swift/Tactic is running.
Reporting Issues
When reporting issues please complete the following checks and provide the details requested. Create a folder ‘AJA ISSUE” on the desktop to collect information into.
Make sure Swift/Tactic is running and experiencing the issue.
Preferences
Open the Swift/Tactic Preferences and locate the video tab. Use windows snip tool to snap shot this into the AJA ISSUE folder
AjA Log
Locate the ‘supportlog.exe’ utility located in
C:Program FilestogdriversajaXX.XX.XX.XXbin
Copy this to the desktop.
Run it – it will produce a file of the form
AJAWatcherSupport_0_1471089444.log
Collect this into the AJA ISSUE folder.
AjA Cables
Run up the cables program as detailed in Section 2.0. Use the Windows Snip tool to snapshot an image and save into the AJA ISSUE folder.
AjA Watcher
In the same location as the ‘cables.exe’ program you should also see a program marked ‘watcher.exe’. Run this up and select the ‘AutoCirculate’ tab.
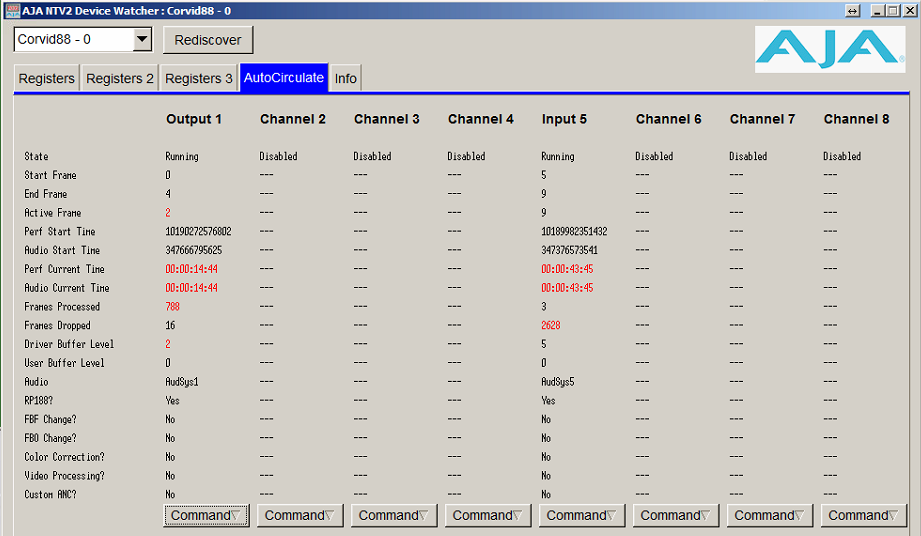
Use the snip tool to take 2 snapshots approximately 10 seconds apart. Save these into the AJA ISSUE folder.
AjA Internal buffers
While Swift/Tactic is running, press CTRL+ALT+F12. This will save a series of images into the User home directory, usually:
C:Userstog
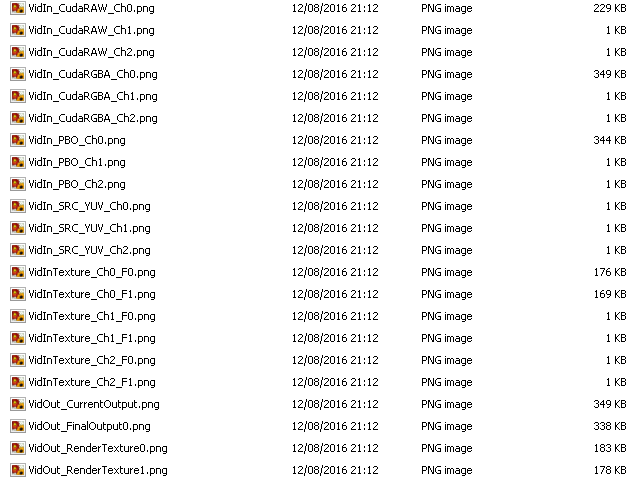
The names and numbers may vary depending on Swift/Tactic version and video configuration. There is also a possibility, depending on version, that this may not work or may hang/crash the program. Do not worry, just restart as normal and collect what images you see. Copy these into the AJA ISSUE folder.
AjA Send report
Zip up the AJA ISSUE folder and email this to support@rtsw.co.uk along with as detailed an explanation as possible.
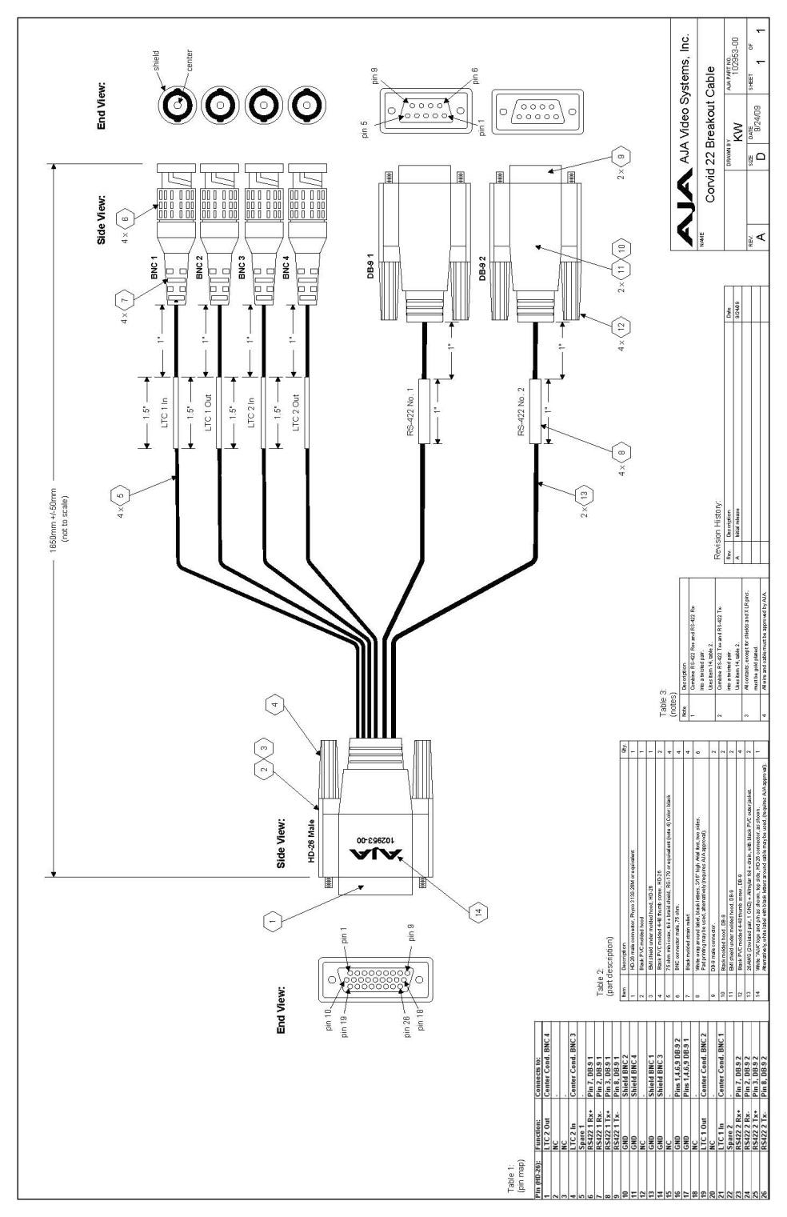
Appendix – A
Breakout cables
Detailed diagram of the 102953 breakout cable for Corvid22 & Corvid24.
Detailed diagram of the 103226 breakout cable for the KONA™ 3G & KONA™ 4 (Part 1)
Detailed diagram of the 103226 breakout cable for the KONA™ 3G and KONA™ 4 (part 2).
Appendix – B
Example use cases
Below is detailed example uses for various cards. Note that cases should be evaluated on an individual basis.
| Overlay Graphics
1in/1out No Key SD/HD Only Embedded Audio |
Corvid |
| Overlay Graphics
1in/1out No Key SD/HD HD-3G Embedded Audio |
Corvid 3G |
| Overlay Graphics
1in/1out Fill+Key SD/HD/3G Only Embedded Audio |
Corvid 22 |
| Overlay Graphics
2in/1out Fill+Key SD/HD/3G Only Video Pass Thru Failsafe |
Corvid 24 |
| Overlay Graphics
3in/1out Fill+Key SD/HD/3G Only Video Pass Thru Failsafe |
Corvid 44 |
| Overlay Graphics
3+in/1out Fill+Key SD/HD/3G Only Video Pass Thru Failsafe |
Corvid 88 |
| Sports 1in/1out
SD/HD 1 Channel RecordToDisk |
Corvid |
| Sports 2in/1out
RS422 (Sony 9pin) LTC in 2 Channel RecordToDisk |
Corvid 24
(This is our DVS replacement) |
| Sports 3in /1out
3Channel recordToDisk |
Corvid 44 |
| Sports 4in/1out
4 channel Record to Disk |
Corvid 88 |
| Stitch 2xHD | Corvid 88 |
| Stitch 2x4k | 2x Corvid 88
Or 1x Corvid 88 1x Corvid 44 |
Laptop Support
| Overlay Graphics
1in/1out Fill+Key SD/HD/3G Only Embedded Audio |
Laptop + ThunderBolt ⅔
IoXT |
| Overlay Graphics
2in/1out Fill+Key SD/HD/3G Only Video Pass Thru Failsafe |
Laptop + ThunderBolt ⅔
Io4k |
| Sports
1 in/1 out LTC RS422 Sony HDMI |
Laptop + ThunderBolt ⅔
IoXT |
| Sports
Laptop + ThunderBolt ⅔ 3 in/1 out LTC RS422 Sony HDMI |
Laptop + ThunderBolt ⅔
Io4k |

