MariaDB Database ReplicationClark
MariaDB Database Replication
| DATE | 28/02/2017 |
| PRINCIPAL AUTHOR | Sean Kirwan |
| SECONDARY AUTHORS | Jerry Clark |
| VERSION | 1.1 |
| DATE | 28/01/2023 |
Overview
The SABC MediaWatcher servers each run a MariaDB SQL database. The 2 servers are configured to be in a Microsoft Active Directory-Detached cluster meaning that one machine acts as the “main” server and the other as the “backup” server. The cluster IP address is used to access the MariaDB database and initially the “main” machine will serve requests. If the “main” server goes off-line the “backup” server will take over and start serving requests received on the cluster IP address.
Each server runs its own MariaDB SQL database and to ensure that the 2 copies are kept in-sync they are configured in a MASTER-MASTER relationship to keep them identical to each other. This is know as 2-way Replication.
This document describes the initial configuration of the “main” and “backup” servers on a new installation and also the restoration process should one of the databases get corrupted/lost following a hardware failure.
Configuring a New Installation
Follow the instructions in this section following a clean install of MariaDB on both the main and backup servers.
All external database queries are received via the cluster IP address. To ensure that none are received during the configuration the Cluster should be disabled until the configuration is complete.
MariaDB Configuration File
Each server requires a different MariaDB configuration/initialisation file. The full path name for this file is:
- “C:Program FilesMariaDB 10.6datamy.ini”
On the “main” server the file my.ini should look like this:
| [mysqld] datadir=C:/Program Files/MariaDB 10.6/data port=3306 innodb_buffer_pool_size=8157M character-set-server=utf8 #bind-address = <master.1.ip.address> server-id=1 report_host=master1 gtid_domain_id=1 gtid_strict_mode=On log_bin=C:/Program Files/MariaDB 10.6/data/mysql-bin-m1.log” relay_log=C:/Program Files/MariaDB 10.6/data/relay-bin relay_log_index=C:/Program Files/MariaDB 10.6/data/relay-bin.index log-slave-updates=1 auto_increment_increment=2 auto_increment_offset=1 [client] port=3306 plugin-dir=C:/Program Files/MariaDB 10.6/lib/plugin |
On the “backup” server the file my.ini should look like this:
| [mysqld] datadir=C:/Program Files/MariaDB 10.6/data port=3306 innodb_buffer_pool_size=8157M character-set-server=utf8 #bind-address = <master.1.ip.address> server-id=2 report_host=master2 gtid_domain_id=2 gtid_strict_mode=On log_bin=C:/Program Files/MariaDB 10.6/data/mysql-bin-m2.log” relay_log=C:/Program Files/MariaDB 10.6/data/relay-bin relay_log_index=C:/Program Files/MariaDB 10.6/data/relay-bin.index log-slave-updates=1 auto_increment_increment=2 auto_increment_offset=2 [client] port=3306 plugin-dir=C:/Program Files/MariaDB 10.6/lib/plugin |
Ensure that both the “main” and “backup” servers have the correct MariaDB initialisation file and then restart the MariaDB service from the Windows Services manager.
Following a restart of both services we need to configure each server to allow it to be updated by the other server (2-way Replication).
Setup 2-way Replication
We now need to run a series of commands on the Main and Backup machines to setup 2-way replication of the mysql databases.
Firstly disable the Cluster so that no database transactions will be received.
The following mysql instructions should be executed strictly in the order shown and on the correct server. You will need to know the IP addresses of the Main and Backup servers.
On the “Main” machine:
Start the mysql client (mysql -u root) and run the following commands:
| CREATE USER ‘replicator’@’%’ IDENTIFIED BY ‘rep_pass’; GRANT REPLICATION SLAVE ON *.* TO ‘replicator’@’%’; FLUSH PRIVILEGES; SHOW MASTER STATUS; |
The last command will output a table similar to this:
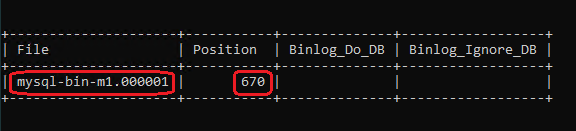
Make a note of the high-lighted fields – you will need them in the next section.
On the “Backup” machine:
Start the mysql client (mysql -u root) and run the following commands:
| CREATE USER ‘replicator’@’%’ IDENTIFIED BY ‘rep_pass’; GRANT REPLICATION SLAVE ON *.* TO ‘replicator’@’%’; FLUSH PRIVILEGES; SLAVE STOP; CHANGE MASTER TO MASTER_HOST = ‘10.235.71.123’, <- Main server IP address MASTER_USER = ‘replicator’, MASTER_PASSWORD = ‘rep_pass’, MASTER_LOG_FILE = ‘mysql-bin-m1.000001’, <- NOTE parameter from above MASTER_LOG_POS = 670; <- NOTE parameter from above SLAVE START; SHOW MASTER STATUS; |
Again the last command will output a table similar to this:
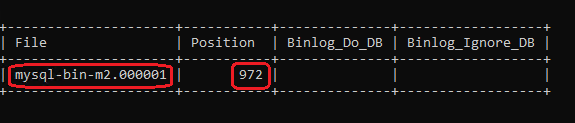
Make a note of the high-lighted fields – you will need them in the next section.
On the “Main” machine:
Start the mysql client (mysql -u root) and run the following commands:
| SLAVE STOP; CHANGE MASTER TO MASTER_HOST = ‘10.235.71.66’, <- Backup server IP address MASTER_USER = ‘replicator’, MASTER_PASSWORD = ‘rep_pass’, MASTER_LOG_FILE = ‘mysql-bin-m2.000001’, <- NOTE parameter from above MASTER_LOG_POS = 972; <- NOTE parameter from above SLAVE START; |
Test the setup
The Main and Backup databases should now be identical.
To test that its all working:
- On the Main server create a new database
- On the Backup server check that the new database exists and then delete it
- On the Main server check that the database has been deleted
Assuming all is well the Cluster can now be re-enabled to allow database transactions to proceed.
Recovering from Database Loss
If one of the MariaDB servers loses power or network connectivity the MariaDB replication should recover once power/connectivity is restored.
If a fault corrupts or destroys the MariaDB databases on one server then they need to be recovered from the surviving server.
Pre-Recovery
Rebuild the “failed” server and check that MariaDB is using the correct configuration file (see section MariaDB Configuration File above).
If the Cluster is enabled then it should disabled so that no database transactions occur during the recovery procedure.
The following mysql instructions should be executed strictly in the order shown and on the correct server. You will need to know the IP addresses of the “Failed” and “Surviving” servers.
On the Surviving Server
The first step is to dump the existing databases into a text file.
This is done using the following command executed in a Windows CMD window:
| mysqldump -u root -all-databases -system=users -insert-ignore > mysqldump.txt |
This will backup everything into a file called “mysqldump.txt”. This file should be transferred onto the “Failed” server.
Next start the mysql client (mysql -u root) and run the following commands:
| SLAVE STOP; SHOW MASTER STATUS; |
The last command will output a table similar to this:

Make a note of the high-lighted fields – you will need them in the next section.
On the Failed Server
Open a CMD WIndow and cd into the folder containing the file “mysqldump.txt” that was created on and transferred from the “Surviving” server.
Execute the following command:
| mysql -u root < mysqldump.txt |
Now the databases should be the same on both machines and we just need to setup 2-way replication again.
Start the mysql client (mysql -u root) and run the following commands:
| FLUSH PRIVILEGES; SLAVE STOP; CHANGE MASTER TO MASTER_HOST = ‘10.235.71.66’, <- Surviving server IP address MASTER_USER = ‘replicator’, MASTER_PASSWORD = ‘rep_pass’, MASTER_LOG_FILE = ‘mysql-bin-m2.000004’, <- NOTE parameter from above MASTER_LOG_POS = 629586431; <- NOTE parameter from above SLAVE START; SHOW MASTER STATUS; |
Again the last command will output a table similar to this:

Make a note of the high-lighted fields – you will need them in the next section.
On the Surviving Server
Start the mysql client (mysql -u root) and run the following commands:
| SLAVE STOP; CHANGE MASTER TO MASTER_HOST = ‘10.235.71.123’, <- Failed server IP address MASTER_USER = ‘replicator’, MASTER_PASSWORD = ‘rep_pass’, MASTER_LOG_FILE = ‘mysql-bin-m1.000004’, <- NOTE parameter from above MASTER_LOG_POS = 646484176; <- NOTE parameter from above SLAVE START; |
Test the setup
The Failed and Surviving databases should now be identical. To test that its all working:
- On the Failed server create a new database
- On the Surviving server check that the new database exists and then delete it
- On the Failed server check that the database has been deleted
Assuming all is well the Cluster can now be re-enabled to allow database transactions to proceed.

