PBR Workflows – Advanced Shaders
This document is intended for VR / AR artists. These tutorials will help artists to generate relevant assets for use with one of the advanced FX shaders and instruct artists how to apply those shaders within Edit-3d.

PBR Workflows
Advanced Shaders
|
DATE |
05/06/2015 |
|
PRINCIPAL AUTHOR |
S Hickey; |
|
SECONDARY AUTHORS |
Darrell James |
|
VERSION |
|
|
UPDATE |
|
|
MISC |
Docs style applied Dec 2020 |
Overview
This document is intended for VR / AR artists. These tutorials will help artists to generate relevant assets for use with one of the advanced FX shaders and instruct artists how to apply those shaders within Edit-3d.
It is intended for artists who are already familiar with Edit-3d. For more information about any of the topics covered here, please email support@rtsw.co.uk.
Generic technical guidelines
The following diagram illustrates the general guidelines Edit-3d designers can use when implementing PBR-based fx nodes:
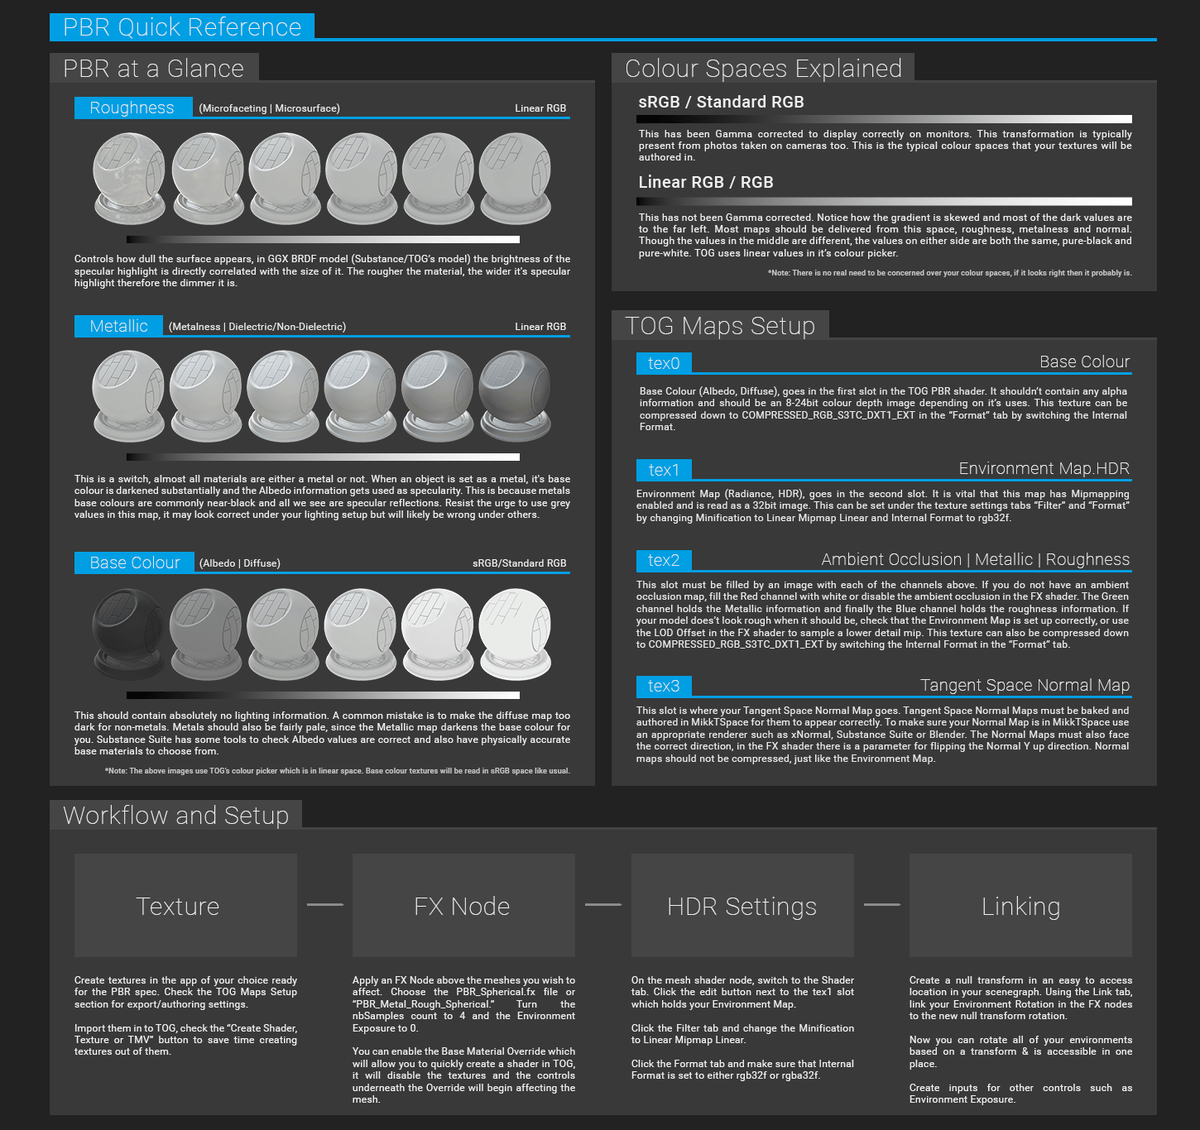
Shader Requirements
Fresnel Reflection (FR) Requirements
The fresnel reflection (FR) shader is a fast reflection shader that approximates reflections on an object loosely based on real world physics. To implement this shader you will need:
- The fx file: FresnelShaderSphere.fx (this should be placed in the GMData/CGPrograms/ folder of your project).
- An 8bit (or 16bit) per channel spherical environment map.
- A UV unwrapped 3D object with the following maps:
- Diffuse.
- Specularity.
- Tangent Space Normal.
Physically Based Rendering (PBR) Requirements
The physically based rendering (PBR) shader is a robust shader that mimics physical lighting based on material properties. PBR requires an extensive set of maps. These are normally generated by third applications such as Quixel Suite or Substance Painter. It is beyond the scope of this document to teach how to create PBR maps.
However, once your PBR shader artists have created the appropriate maps, you can implement them within Edit-3d Edit. To implement this shader you will need:
- The fx file: PBR_Spherical.fx (this should be placed in the GMData/CGPrograms/ folder of your project).
- A 32bit per channel, HDR, spherical environment map (.hdr file extension).
- A UV unwrapped 3D object with the following maps:
- Albedo.
- Combined ambient occlusion (ao), roughness and metallic map. This is explained in more detail below.
- Tangent Space Normal.
Generating Environment Map
8bit Environment Map (for FR)
To generate a single exposure, real world spherical environment map, we recommend using the Ricoh Theta.
- Use the device to capture a spherical map.
- Resize the image to an aspect ratio of 2:1 (e.g., 2048px x 1024 px).
- Use curves in Photoshop to brighten the highlights and severely darken the shadows and midtones.
- If you’re going to use the Fresnel Reflection shader, consider blurring the environment (you may also want to create a blurred environment if you’re creating a skybox). In Photoshop.
- Unlock and duplicate the background.
- Offset the new layer by 50% horizontally.
- Convert the new layer to a smart object.
- Convert the old layer to a smart object.
- Apply a gaussian blur to both layers (around 20 pixels).
- Select the top layer and offset it back 50% horizontally.
- You’ll see a bad seam. Drag a selection around it and feather it by 60 pixels or so.
- Invert the selection a and apply it as a mask on the top layer.
- You can play with the gaussian blur strength now, since both your layers are smart objects.
- Flatten the image when you’re done.
- Consider adding detail back into the blurred environment with an overlay.
Virtual 8bit Environment Map
If you are generating your environment map for a virtual set, you will need to generate the map using your 3D software package. This is often achieved by:
- Creating a spherical camera and rendering your scene.
- Render an image with a 2:1 ratio, e.g., 2048px x 1024px.
- Creating a sphere with 100% reflection and “baking” the reflection to a file.
- Bake the texture to an image with a 2:1 ratio, e.g., 2048px x 1024px.
Teaching how to create a spherical environment map specifically from a 3D package is beyond the scope of this tutorial.
32bit Environment Map (for PBR)
This only applies to Edit-3d 4.6.2 or later. If you are using an earlier version, you must use the 8bit method outlined above as HDR images are not fully supported until 4.6.2.
To generate a multiple exposure, real world spherical environment map, we recommend using the Ricoh Theta. You’ll need to create a HDR from 3 exposures.
- First take three exposures (-2, 0, +2) of the environment with a 360 degree camera.
- Next, take the -2 and +2 exposures and use Photoshop’s Image -> Adjustments -> Exposure to create a -4 and a +4 exposure.
- Within Photoshop, go to File -> Automate -> Merge to HDR Pro …
- Browse for your multiple exposures (including your new -4 / +4 ones) and hit OK.
- In the resulting dialog, change to exposure value mode (EV).
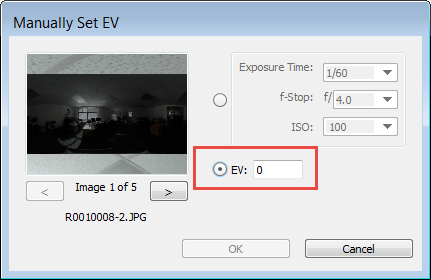
- Set the EV of each image according to the exposure value of the shot (cycle through exposures using the left and right arrows).
- Hit OK.
- Make sure the Mode is set to 32 bit.
- Remove the tick from “Complete Toning in Adobe Camera Raw.”
- Hit OK. Save the image as a Radiance file (hdr).
Virtual HDR Environment Map
Generating a 32bit VR environment map is much the same as an 8bit (see Virtual 8bit Environment Map above for suggestions). However, when you generate the image, you will need to output a Radiance file (*.hdr).
Cinema 4D
Rendering Geometry into the HDR
If you need to mix your geometry with a real world environment (when implementing AR), you can generate your HDR environment map within Cinema 4D. Here is a workflow for bringing virtual elements into a HDR:
http://lesterbanks.com/2012/09/create-hdris-from-your-own-cinema-4d-scenes/
- Add HDR image based lighting to your scene (add a Sky with a Luminance material with your HDR image).
- Create a sphere (which acts as as the 360 degree camera).
- Create a fully reflective material and assign it to the sphere.
- Add a Compositing tag to the sphere and uncheck cast shadows.
- Add a Bake Texture tag to the sphere. Set it to only use Reflection in the Options tab.
- In the tag settings, change Height to 2048 and the Width to 1024.
- Change the format to Radiance (HDR).
- Choose a filename for the output.
- Go to options, click Bake.
Now you have a new HDR map which merges your scene geometry into the original HDR.
Applying FR in Edit-3d
Time to apply a Fresnel Reflection shader.
- Name your images nicely before import. Be clear. Make sure they’re unique—try using a simple naming format like “graphic_mesh_map.ext”, e.g., “Formation_Plinth_Normal.png.”
- If you don’t have a specular map for some reason, create a png that’s pure white and call it “Generic_White.png”.
- If you don’t have a normal map, create a PNG that’s 128,128,255 and call it “Generic_Normal_Blank.png”.
- Import your diffuse, specular and normal maps.
- Import your environment map too!
- Add an Effect node above your object.
- Choose the FresnelShader from the dropdown within the Effect node.
- In the shader for the object, go to the ShaderNode tab and assign the diffuse shader that you just imported.
- Now go to the Shader tab:
- For Texture 0, it should already be pointing to your diffuse texture.
- For Texture 1, choose your specular texture in the dropdown.
- For Texture 2, choose your environment texture in the dropdown
- For Texture 3, choose your normal texture in the dropdown.
FR Settings
You can adjust the settings in the effect node:
- Fresnel Falloff controls how much of the surface reflects the environment. Set it to zero if you want chrome (yuck). Or around 1.5 for a snooker ball. Or around 3.0 for anything else.
- Fresnel Strength controls the intensity of the reflection. How bright do you want the reflections? Keep it at 1.0 most of the time.
- Normal Strength control the intensity of the normal map. You ought to make changes to the normal map outside of Edit-3d. But if you’re in a pickle, try adjusting it up to 2.0 or 3.0 to ramp up the bumpiness. Or scale it down to 0.0 for a totally smooth surface.
- Ambient Environment adds a bit of diffuse colour to the object, based on the colours in the environment. You can leave it off in most situations. Set it to around 0.2 if you have a very dark object that needs brightening up in the blacks.
- Env Rotation allows you to rotate the environment map to match the real environment around it. You ought to link this to a separate transform node, so you can affect multiple environments from one source.
Skybox
It can sometimes help to include a Skybox to see how your shader looks in relation to the environment.
- Import the blurred environment map.
- Create a sphere, scale it to 100,100,100. Assign the blurred environment map shader. Push it to the top of the Scene Graph, so it’s behind everything else in the scene.
- In the shader State tab, turn off Lighting and Backface Culling.
Troubleshooting 1
The reflections are too strong
- First, try blurring the environment map.
- Second, try darkening the shadows and midtones of the environment map and just leaving the highlights.
- Third, consider adjusting your spec map to dim the reflections in specific areas of the mesh.
The mesh looks black (or wrong)
If you are using an imported mesh (from an FBX), it’s possible that the mesh is missing some important information called tangents and bitangents (or binormals). These are normally defined during export but sometimes the exporting software doesn’t export them properly. However, there is a way to compute the tangents and bitangents within Edit-3d Edit.
- Click on the geometry in the scene graph.
- Click Compute TBN Matrix.
- Click on the Save icon in the Geometry pane.
- Enter the name of the mesh with the suffix “_TBN”, e.g., if the mesh was called Cube, save it as “Cube_TBN”.
- Save the project and close it.
- Reopen the project and the graphic.
- If this hasn’t fixed your problem, please email support@rtsw.co.uk with details of your problem (a screenshot, the project files and details of your version of Edit-3d).
Applying PBR in Edit-3d
A step by step guide to exporting and importing for physically based rendering (PBR).
Preparing the Images
Normally this process is handled by your PBR image creation software (Quixel Suite or Substance Painter). However, for artists without access to that software, here is how to prepare the images for Edit-3d:
- Name your images nicely before import. Be clear. Make sure they’re unique—try using a simple naming format like “Graphic_Mesh_Map.ext”, e.g., “Formation_Plinth_Normal.png.”
- If you don’t have a normal map, create a PNG that’s 128,128,255 and call it “Generic_Normal_Blank.png”.
- Combine your ambient occlusion (ao), roughness and metallic maps Edit-3dether:
- Create a new image. Call it “Graphic_Mesh_AOMetalRough”, e.g., “Formation_Plinth_AOMetalRough”.
- Go to the Channels window.
- Select the “Red” channel.
- Open your AO image, select all, copy it and paste it into the Red channel of your new image.
- Select the “Green” channel.
- Open your Metal image, select all, copy it and paste it into the Green channel of your new image.
- Select the “Blue” channel.
- Open your Roughness image, select all, copy it and paste it into the Blue channel of your new image.
- Select the RGB channel.
- Save the image.
Applying PBR in Edit-3d
- Import the images:
- Albedo (PNG)
- Environment (HDR)
- AO_Metal_Rough(PNG)
- Normal (PNG)
- In the Images tab, tick …
- Create Shader For Each Image Or TMV
- Shader Prefix (enter an appropriate prefix … this helps organise your shaders later).
- Hit Import.
- Add an FX node to the scene graph, above the model(s) that you wish to affect.
- Choose the PBR_Metal_Rough_Spherical from the dropdown list in the FX node.
- In the shader for the geometry, populate the texture slots as follows:
- tex0 – Albedo colour map.
- tex1 – HDR spherical Environment map.
- tex2 – AO_Metal_Roughness map.
- tex3 – Normal map.
- In tex1, HDR slot, click the edit texture button. Under the Filter tab change the Filter – Minification to Linear Mipmap Linear for the roughness to work correctly.
- While still editing tex1, go to the Format tab and check that Internal Format is set to rgb32f or rgba32f.
- If your mesh looks black, see Troubleshooting: The mesh looks black (or otherwise weird) in the FR section above.
PBR Settings
You can adjust the settings in the effect node:
- nbSamples [4-64] Should always be set to 4.
- Env Exposure [-10, 10] Controls the exposure of the environment lighting. To match Substance viewports, this value should either be 0 or near 0.
- Env Rotation Allows you to rotate the environment map to match the real environment around it.
- Lod Offset [0, 5] Controls the mip mapping of the Environment map in order to get rougher materials. This is helpful when using large HDR maps e.g. 2048^2 and larger.
- Use Ambient Occlusion [0,1] 0 disables the ambient occlusion, useful when working with Base Material Override, 1 enables it.
- Normal Strength[0, 5] Multiplies the strength of the normal map so you can increase or decrease its intensity, 1 is default, 0 removes the normal map.
- Base Material Override[0,1] When set to 1 enables the settings underneath to override the textures in the shader.
- Base Colour Allows you to change the colour of the entire mesh when the Base Material Override is set to 1.
- Metallic[0,1] Allows you to change the metallic property of the whole mesh. Although this value can be any number in between 0 and 1 it’s important to remember that it’s incredibly rare that a material is. Most materials are either metal, or non-metal, therefore it’s normal for this map to either be completely black or white.
- Roughness[0,1] Allows you to control the roughness of the whole mesh. 0 is glossy and 1 is rough.
Note: You can link the Env Rotation and Env Rotation to a null to control it scene-wide.
Substance Painter Export
If you are using Substance Painter, you can export the images as follows:
- In the TextureSet settings, click the + button beside Channels and add a new user0 Channel.
- Change the format to L8.
- Create a fill layer.
- Turn off all channels in the fill except for the User0 channel.
- In the Textures tab in the shelf, find the AO map. Drag this into the new fill layer’s user0 channel.
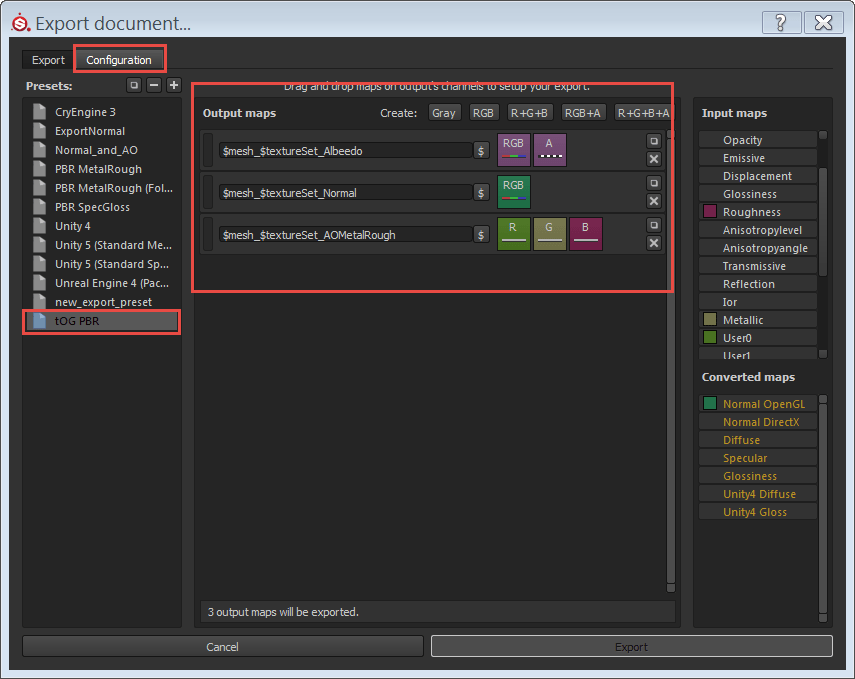
- Use Export all Channels from the File menu. Go to the configuration tab.
- Create a new configuration by hitting the + button in the configuration tab (see the image below).
- It will be called “new_export_Preset” in the Preset list on the left. Rename this now to “Edit-3d PBR”.
- Create an RGBA output (click RGB+A) and drag the BaseColor (on the right) into it the RGB. Select RGB Channels.
- Drag the BaseColor into the A and select A channel.
- Rename it from “RGB Alpha” to $mesh_$textureSet_Albedo.
- Now add an RGB output (click RGB) and drag the Normal OpenGL (on the right) into it the RGB. Select RGB Channels.
- Rename it from “RGB” to $mesh_$textureSet_Normal.
- Lastly add an RGB output (click R+G+B) and drag the User0 (on the right) into it the R. Select Gray Channel.
- Drag the Roughness (on the right) into it the G. Select Gray Channel.
- Drag the Metallic (on the right) into it the B. Select Gray Channel.
- Rename it from “R+G+B” to $mesh_$textureSet_AOMetalRough.
- Go back into the Export tab and change the output path to a suitable location.
- Also change the output format to png (16 bits max).
- Change the Config to your new “Edit-3d PBR”.
- Set the output size to 2048 x 2048 (or higher, if desired).
- Hit Export.
Extra
Custom Nodes in Substance Designer
Substance Designer allows you to set up a custom output which is useful for Edit-3d. I’ve made a Edit-3d node and start up template that allows you to quickly sort the textures into the correct channels. To Install, get the SubstanceLib folder from \bsaexchangeDarrell:
- Open Tools -> Preferences and switch to the Projects Tab
- Scroll down to “Substance Templates” and add the /SubstanceLib/Templates path
- Scroll down to “Library” and add the /SubstanceLib/CustomNodes path
Now when you create a new graph you will be given the choice to select the Edit-3d template. Inside of this template will be a custom node that will handle your channel shuffling for Edit-3d’s ao/metallic/roughness. There is also a series of output nodes in a frame titled “Preview” which is for the artists benefit to see the effects of their work in Designer while they’re working, these should not get exported.
More on Tangents and Bitangents
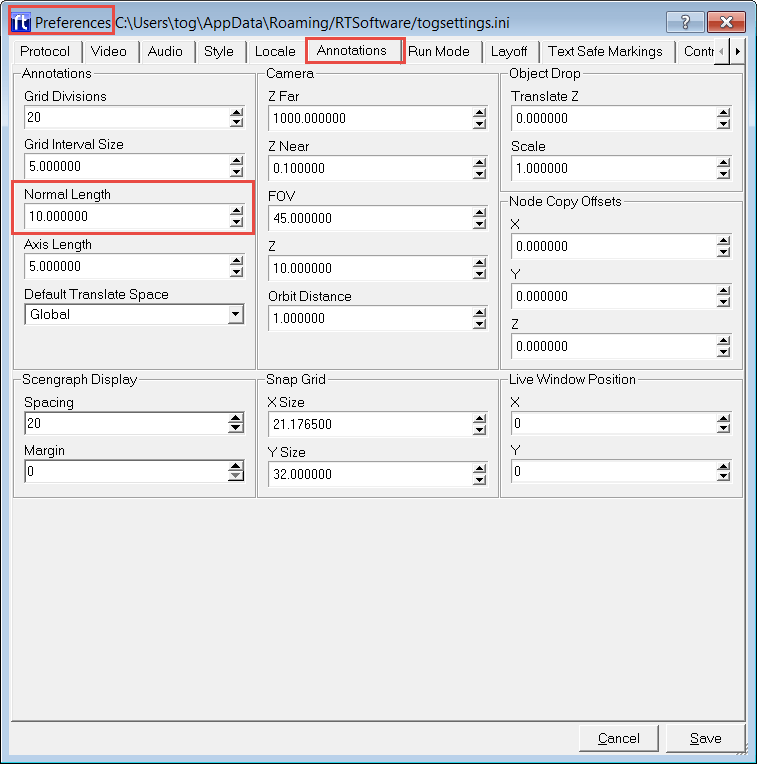
In Edit-3d Edit 4.6.2, it is possible to check for binormals and tangents in the viewer.
- In the Preferences -> Annotation tab. Set the Normal Length to something like 10.
- Enable normal/bitangent/tangent in the viewer (on the left, see image below) and look for red, green and blue lines.
If you don’t see green or blue lines, your model is missing important information (tangents and bitangents). This will limit the type of shader you can apply to your model.
N.B. At the time of writing, Cinema does not export bitangents and tangents.

If you don’t have tangents and bitangents, we’ll need to manually generate these within Edit-3d:
- Click on the geometry in the scene graph.
- Click Compute TBN Matrix.
- Click on the Save icon in the Geometry pane.
- Enter the name of the mesh with the suffix “_TBN”, e.g., if the mesh was called Cube, save it as “Cube_TBN”.
- Save the project and close it.
- Reopen the project and the graphic.
- If this hasn’t fixed your problem, please email support@rtsw.co.uk with details of your problem (a screenshot, the project files and details of your version of Edit-3d).
Troubleshooting 2
Links, Animations and Env Rotation in the PBR shader aren’t working.
Occasionally while working on a project the PBR shader will seem to get stuck. This can happen if you change a value that already has an animation applied for instance. This can simply be fixed by reloading the graphic, using the reload script button at the top of the interface, it is safe to save.
