GAP for Football & Rugby Pitches
GAP - For Football and Rugby

GAP
For Football and Rugby
|
DATE |
07/08/2020 |
|
PRINCIPAL AUTHOR |
J Clark |
|
SECONDARY AUTHORS |
|
|
VERSION |
V 1.0 |
|
UPDATE |
|
|
MISC |
Docs style applied Dec 2020 |
Overview
To achieve drift-free AR graphics on a football/rugby pitch the position of the real camera in relation to the pitch needs to be accurately known.
Tog has an in-built, simple procedure to calculate the camera position quickly and accurately using the known dimensions of the pitch. This procedure is referred to as “GAP” and this document describes how to carry out a 6-point GAP procedure to determine the camera position.
Background
All football and rugby pitches have at the least 3 things in common:
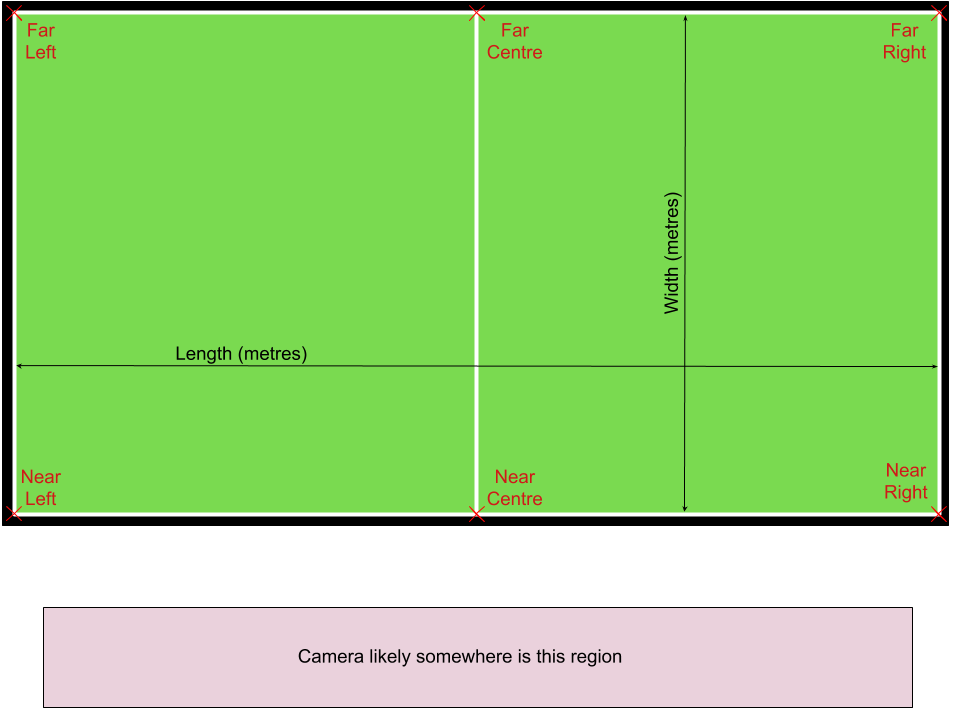
- All pitches are rectangular, of known width and length and the perimeter is marked with a white line. The corners are well defined, they will be referred to as “Near Left”, “Near Right”, “Far Left” and “Far Right”.
- All pitches have a centre-line marked with a white line. Where the centre-line meets the side-lines is well defined and these points will be referred to as “Near Centre” and “Far Centre”.
- All 6 of the above points are at the same height – i.e. the pitch is flat and horizontal.
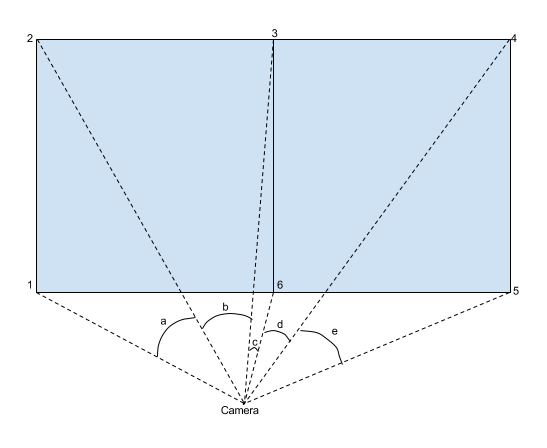
Because football/rugby pitches all have these common features we can use the 6 well defined points to calculate where the camera is in relation to those points. We call this procedure a 6-point GAP.
See illustration on next page.
By pointing the camera at the 6 known points in turn GAP can calculate angles a,b,c,d & e and then use those angles to calculate the most likely camera position.
The GAP Procedure
The first section “3.1 Quick Overview” describes the whole process in full but with zero detail.
Subsequent sections add in the detail with section “3.2 Prerequisites” adding a check-list of “must have” conditions, and section “3.3 The 6-point GAP Procedure” giving detailed operational instructions.
Quick Overview
The user selects the pitch/gap-types from a drop-down list, enters the actual pitch size – width & length in metres – and then presses Start to initiate the GAP procedure. The user is told where to point the camera and told to click Record when ready.
After all 6 points have been recorded GAP will calculate the camera position and ask for a user confirmation that the calculated position should be used. The user then “Saves” the VR settings.
And that is it – providing all the Prerequisites have been satisfied GAP will have calculated the correct camera position and entered the correct setting into the Tog VR Settings menu. The settings will persist across Tog/PC restarts.
If GAP should fail the user is prompted to repeat the process. Make sure that the pitch dimensions have been entered correctly and the points are recorded in the correct order. It should be noted that, from experience, a GAP failure is extremely likely to be an operator error, only medium-likely to be an equipment/comms failure and almost never a problem with GAP itself.
Prerequisites
- The broadcast camera has been setup correctly:
- Camera head mount is solid and free from wobble
- Known calibrated lens fitted to the camera
- The camera has been correctly balanced
- Vinten/MoSYS electronics are genlocked to the same genlock source as the camera
- Vinten/MoSYS electronics have been initiated correctly
- The camera “Optical Offsets” have been measured and recorded for later entry into Tog
- Tog has been correctly configured
- Is receiving clean video from the camera at the correct video standard
- Is genlocked to the same genlock source as the camera
- Tog is outputting clean video at the correct video standard.
- The video-out can be down-stream switched to feed back to the camera on its reverse feed
- Is receiving tracking data smoothly with no Missed Messages
- Tracking data shows all axes, pan, tilt, zoom and focus are being received
- VR has been set to use the correct lens .zfc file
- The camera/lens “Optical Offsets” have been correctly entered into Tog
- The lens has been “End-Stopped”
- The “CCD Offsets” have been adjusted correctly
- Communication & return feed
- The Tog user needs to be able to talk with the camera operator
- The camera operator must be able to see the return video feed from Tog
The 6-point GAP Procedure
- Ensure all of the “prerequisites” have been checked
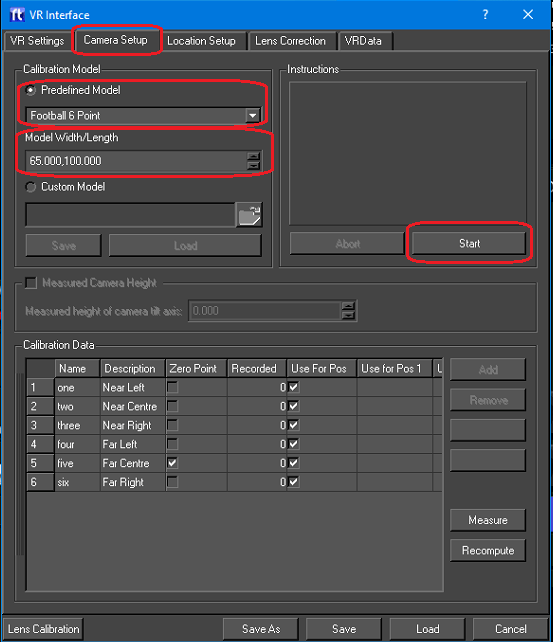
- From the “VR Setup” menu select the TAB labelled “Camera Setup”
- From the “Predefined Model” drop down select “Football 6 point”
- Enter the pitch width and length (both measurements in metres and separated by a comma, i.e. 64.5 , 108.7). REMEMBER to hit <RETURN> after entering these figures.
- Click on “Start”
- Follow the instructions in the big window pane just above the “Start” button.
When pointing the camera is is important that the lens be on full-zoom to get the best accuracy and the cameraman should use the “cyan” crosshair generated by tog which should be on the camera reverse feed.
