Repository Installation, Configuration and User Guide 2.2
Repository is an application that interfaces with a subversion repository to store and retrieve tOG projects and changes or updates to tOG Projects. This documentation refers to release 4.6.4_r24966 and later.
|
DATE |
25/06/2021 |
|
PRINCIPAL AUTHOR |
Sean Kirwan |
|
OTHER AMENDS |
Jerry Clark, Peter Eszlari |
|
VERSION |
2.2 |
1.0 Overview
Repository is an application that interfaces with a subversion repository to store and retrieve tOG projects and changes or updates to tOG Projects. This documentation refers to release 4.6.4_r24966 and later.
Repository is built around a Subversion server. Subversion is a widely used centralized version control system. A subversion repository is based on a versioning file system where only the changes to the base import (tOG project) are stored. Each change creates a new version along with a user description of the changes made and a list of the files changed.
Accordingly, it becomes possible to retrieve any version of the repository all the way back to the original import, offering users a flexible and safe means to deploy or rollback critical updates, at any point in time, whilst keeping the size on disc at a minimum.
2.0 Pre-Install Considerations
2.1 PC Functionality (Role) Types
Before running the Repository installer it is vital to decide what functionality is required on each PC – what role it plays in the Repository network. There are four possible PC roles each described below:
- SVN Server
- SVN Client
- SVN User
- SVN Distribution
Please note that it is entirely possible for a single machine to fulfill 2 or more of these roles and on smaller installations this is not uncommon. In larger installations it is more likely to have PCs dedicated to a particular role.
2.1.1 SVN Server
This PC runs the Subversion Server software and stores the Subversion repository. There is normally only a single SVN Server in a Repository deployment Typically it is an existing PC file server with redundant PSUs, RAID disks and possibly a backup strategy in place but it can actually be just about any PC that has sufficient disk space for the repository. Initially the repository will be very small but as projects are modified and additional projects added it can grow quite large. Please ensure that at least 500GB will be available for the Subversion repository and consider what plans should be in place to ensure data security in the event of a hardware failure.
2.1.2 SVN Client
This is a PC that just needs to have its tOG projects updated remotely and requires no other Repository functionality. Typically these are dedicated TX machines – i.e. a Grass Valley ICE or a tOG Render head.
2.1.3 SVN User
This is a PC that needs to update the Subversion repository. Typically these will be tOG Edit workstations used to modify and create tOG projects.
2.1.4 SVN Distribution
This is a PC that may require SVN User functionality but also needs to be able to distribute tOG projects to the SVN Client PCs. As tOG project distribution is updating PCs that may be “live” this PC is normally a Sys Ops or Supervisors machine.
2.2 Repository User Roles
2.2.1 Administrator
Responsible for administering the server, adding users and machines, doing backups etc… Typically will be using a machine of type SVN Server & SVN Distribution
2.2.2 Designer
Responsible for creating/modifying tOG project and graphics. Typically will be using a PC of type SVN User
2.2.3 System Operator
Responsible for updating the TX machines with the correct project version from the repository. Typically will be using a PC of type SVN Distribution
2.3 Network Considerations
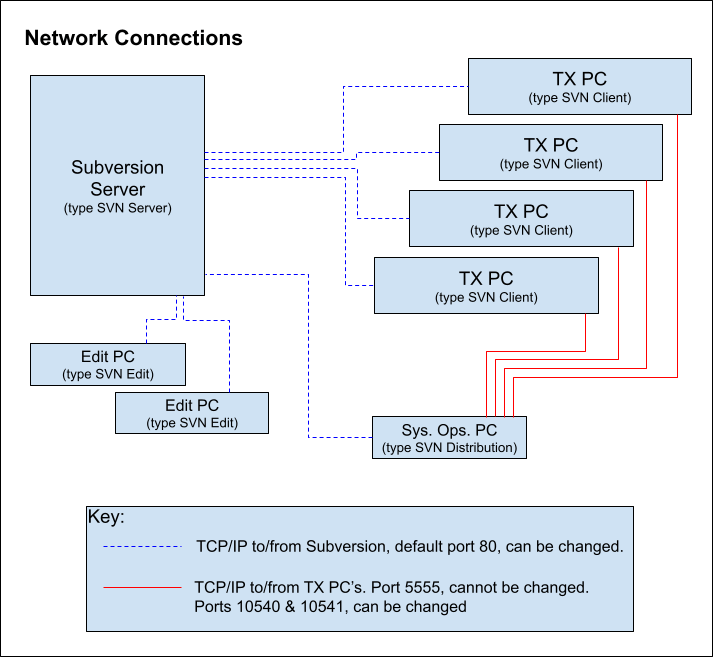
The PCs in a Repository deployment need to communicate with other PCs in the deployment. The communication requirements are:
- PCs designated as SVN Client and/or SVN User and/or SVN Distribution need to be able to initiate communication with the SVN Server. The communication is done over port 80 by default but can be configured to a different port number.
- The PCs designated as SVN Distribution need to be able to initiate communication with the PCs designated as SVN Client. The communication is done over port 5555.
- It is quite common in a broadcast environment for PCs to exist on 2 or more networks and it may be necessary to configure “tunnels” through various firewalls to allow the required communication to take place.
The diagram on the next page illustrates the communication required between PCs in a Repository deployment.
- Network connectivity problems may include:
- The TX PCs, those PCs directly responsible for producing the video/audio output, are usually on their own highly secure “broadcast” network fire-walled off from the corporate network. These are the SVN Client PCs. These PCs need to be able to receive commands from the SVN Distribution PCs and pull down tOG projects from the SVN Server PC.
- The Edit workstation PCs are likely to be on the corporate network with no access to the broadcast network. These are the SVN User PCs. These PCs need to push/pull tOG projects to/from the SVN Server PC.
- The “Sys Ops” PCs could be on either network but will probably have access to both the broadcast and corporate network. These are the SVN Distribution PCs. These PCs need to be able to query the SVN Server PC and send commands to the SVN Client PCs.
- The Subversion server PC is likely to be on the corporate network with no access to the broadcast network. This is the SVN Server PC. This PC needs to be able to serve/receive tOG projects to/from the SVN User PCs and serve tOG Projects to the SVN Distribution PCs and the SVN Client PCs.
3.0 Installation
3.1 Required Installers
- Ensure you have the appropriate installers available:
- CollabNetSubversionEdge-5.2.4_setup-x86_64.exe
- which can be downloaded from https://www.collab.net/downloads/subversion
- This installer can be freely downloaded. You need to upgrade an existing server if it is not SubversionEdge and is an earlier release.
- TortoiseSVN-1.7.9.23248-x64-svn-1.7.6.msi
- Which can be downloaded from https://tortoisesvn.net/downloads.html
- Optional software – not required
- TogRepository-r[latest]-windows-installer.exe
- Currently TogRepository-r24966-windows-installer.exe
3.2 SVN Server Installation
- Double-click the CollabNetSubversionEdge-5.2.4_setup_x86_64.exe
- Follow the default instructions
- See Chapter 4. for configuration details
3.3 SVN User & Distribution Installation
IMPORTANT – this install requires the SVN server to be available. Please ensure that the PC that acts as the SVN server has had SVN installed and configured prior to running this install.
- Double-click the TogRepository-r[latest]-windows-installer.exe
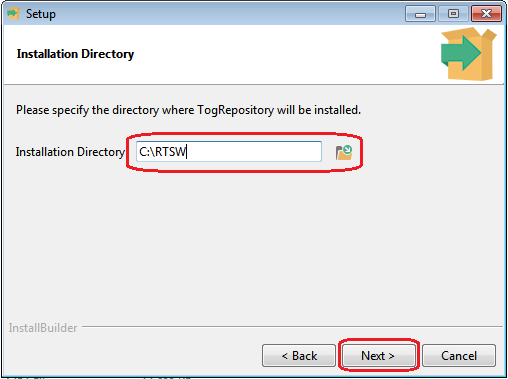
NOTE: on running the installer the first prompt is to specify the installation directory. The default location is the RTSW folder located on the users Desktop which is normally: C:Users<username>DesktopRTSW.
The RTSW folder will be created if it does not exist.
The installation directory can be changed, as shown in the example below.
RTSW can be named differently, however, it is recommended to leave it unchanged to ease future maintenance.
NOTE that for each project in the SVN server that TOGRepository will distribute will have to be a copy in this location. Make sure that there will be enough space here for future project checkouts.
- Select an installation directory

- Select the options required, click Next:
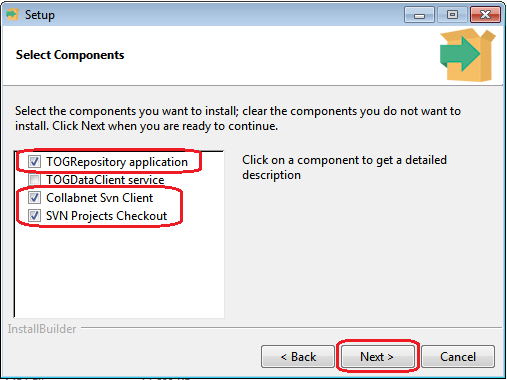
These option will install the following:
TOGRepository:
- A rootfolder, default is RTSW, it will be merged if it exists.
- binTOGRepository with executables
- conf with a TOGRepository.conf file (see section 6.3)
(and a TOGRepository_sample.conf file to have a backup of a conf file structure)
- icons : for the app shortcut icon
- logs : a tr.log file will be updated here in runtime. This can be deleted from time to time to save space
- TOGRepository : it’s a workspace for the application to update some files dynamically.
- Uninstallers : holds the uninstaller executable that updates at each new component installation
Collabnet SVN Client: installs the Collabnet SVN client , currently CollabNetSubversion-client-1.11.0-1-x64.exe. This will provide command line SVN features.
- Fill in the fields, click Next
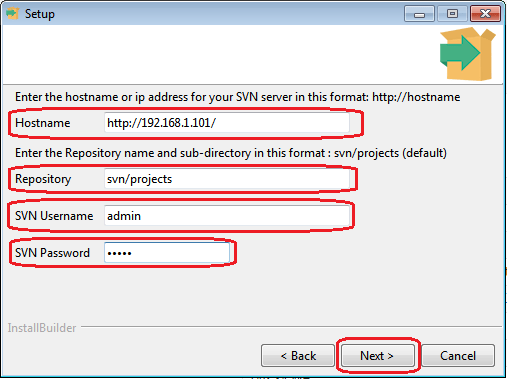
- Hostname: The host name or IP address of your SVN server. Should be obtained from the steps in chapter 4.1.2
- Repository: the default is svn/projects. The svnpart must not be changed.
projects is the name that was given to the repository in the server. Changing this will not change the name of the projects folder in the install directory, only the address of the svn target.
- SVN Username: default is admin
- SVN Password: default is admin
NOTE: This password and a set of users can be configured in the Collabnet SVN Server setup. The user and password details in the installer only refer to the projects folder checkout at the installation stage. TOGRepository will use the details that can be found and edited in the .conf file.
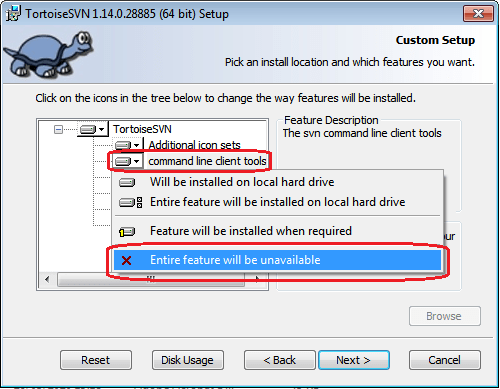
3.3.1 TortoiseSVN Installation (optional)
Subversion is normally driven via the command line. TortoiseSVN is an application that allows Subversion to be driven via a user-friendly GUI. It is not actually necessary as Repository provides everything necessary but some Designers/Operators may want to use some more advanced features of Subversion.
When installing TortoiseSVN it is important to ensure that the command line tools are NOT installed as they are supplied by Repository.
3.4 SVN Client Installation
IMPORTANT – this install requires the SVN server to be available. Please ensure that the PC that acts as the SVN server has had SVN installed and configured prior to running this install.
- Double-click the TogRepository-r[latest]-windows-installer.exe
Select an installation directory
- This is where the TOGDataClient service application and the local copy (checkout) of the projects repository will be located.
- Select the options required, click Next:
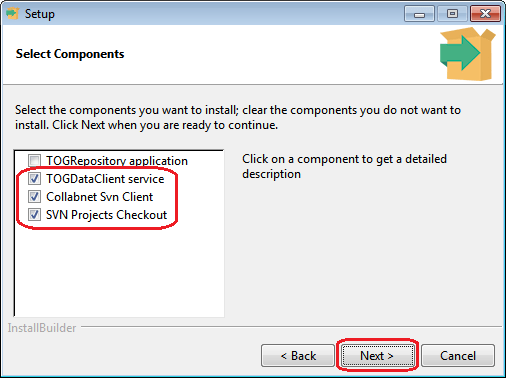
NOTE: in some Windows systems TOGDataClient and Collabnet SVN Client cannot install clean in a sequence and an error message is returned. In this case uninstall with the uninstaller and run the installer separately for these two features.
These option will install the following:
TOGDataClient service:
- A rootfolder, default is RTSW, it will be merged if it exists.
- binTOGDataClientwith executables and 3 batch scripts that can be used to control the Windows service that has been installed and running. They must be run as administrator. Right click on the file and select Run As Administrator from the menu.
togDataClient_DELETE.bat, togDataClient_STOP.bat, togDataClient_START.bat
Another script, togDataClientService.bat was used by the installer to install the service.
- Uninstallers : holds the uninstaller executable that updates at each new component installation
Collabnet SVN Client : installs the Collabnet SVN client , currently CollabNetSubversion-client-1.11.0-1-x64.exe. This will provide command line SVN features.
SVN Project Checkout : creates a /projects folder where an empty checkout of the server repository will be initialised. The repository address will have to be specified on the next page.
The following page is only needed if SVN Project Checkout is selected, for which the Collabnet Svn Client is needed.
If so, fill in the fields and click Next:
- Hostname: The host name or IP address of your SVN server. Should be obtained from the steps in chapter 4.1.2
- Repository: the default is svn/projects. The svnpart must not be changed.
projects is the name that was given to the repository in the server. Changing this will not change the name of the projects folder in the install directory, only the address of the svn target.
- SVN Username: default is admin
- SVN Password: default is admin
NOTE: This password and a set of users can be configured in the Collabnet SVN Server setup. The user and password details in the installer only refer to the projects folder checkout at the installation stage. TOGRepository will use the details that can be found and edited in the .conf file.
4.0 Subversion Server Administration
4.1 Setting up a windows Subversion server
The subversion server would be installed on a central machine with fast network links and disks but otherwise no special hardware. See: http://www.collab.net/products/subversion
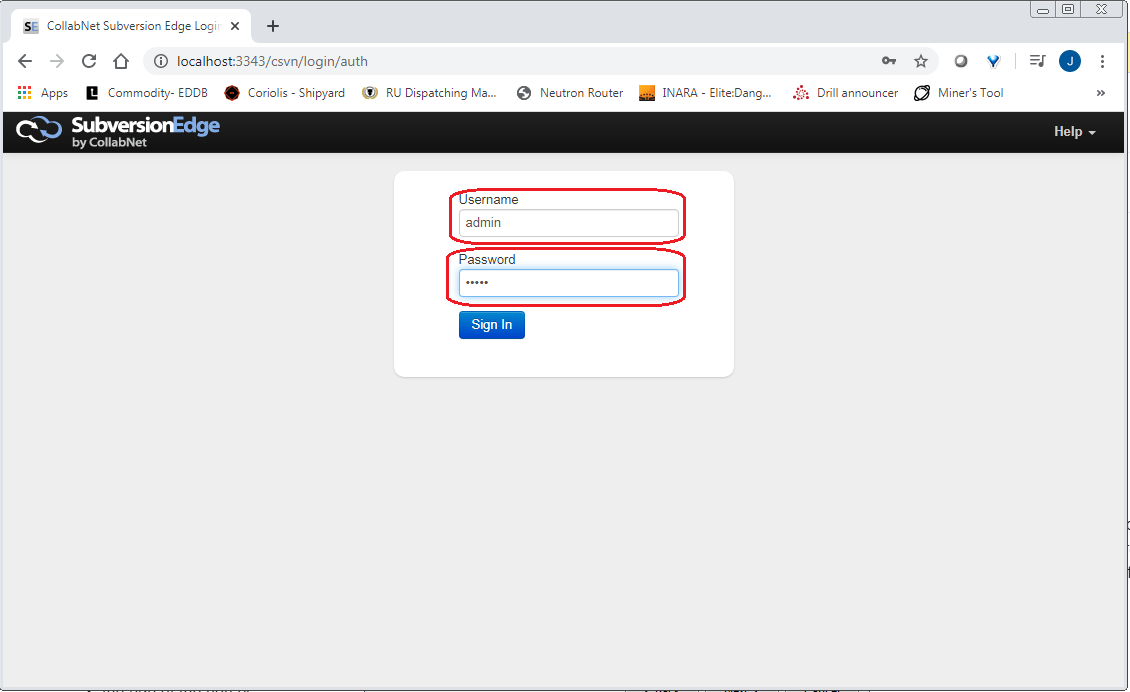
Subversion runs as a service which is managed using a website server by the server itself – just direct a browser to http://localhost:3343/csvn and you will be presented with a login page.
4.1.1 Logging in
The login details can be reset but it is recommended to use the default:
Username: admin
Password: admin
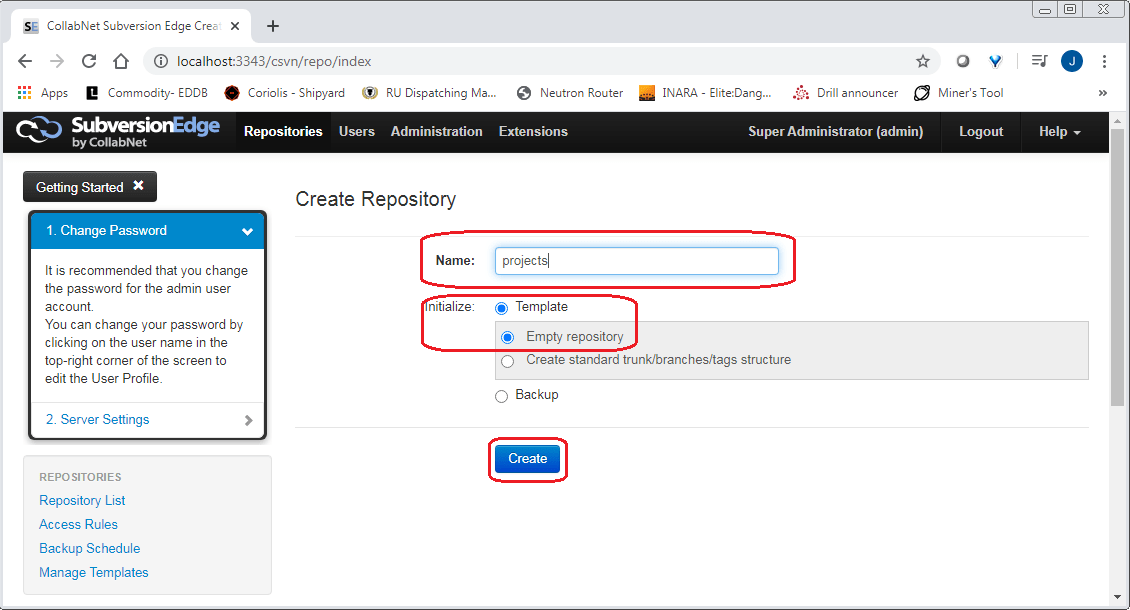
4.1.2 Creating a *repository* for tOG
Repositories can be created, deleted and dumped. Only one repository is recognised by tOG and that must be called *projects*.
- Click on the Repositories menu button
- Click Create
- Name your repository projects
Note: Only use this name, all lower case. See below:
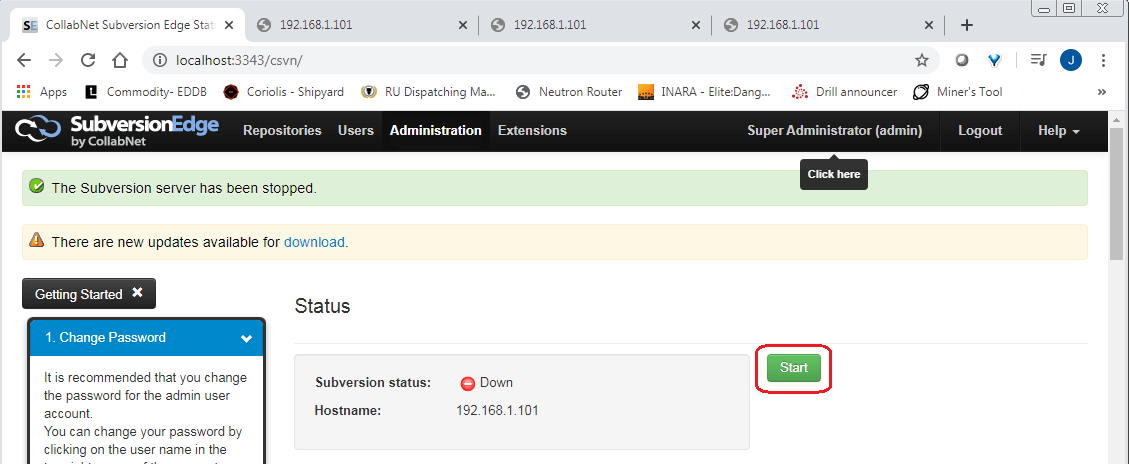
- Click on Start to start the SVN server:
- Click on the Repositories menu button again – the exact url of the project is displayed:
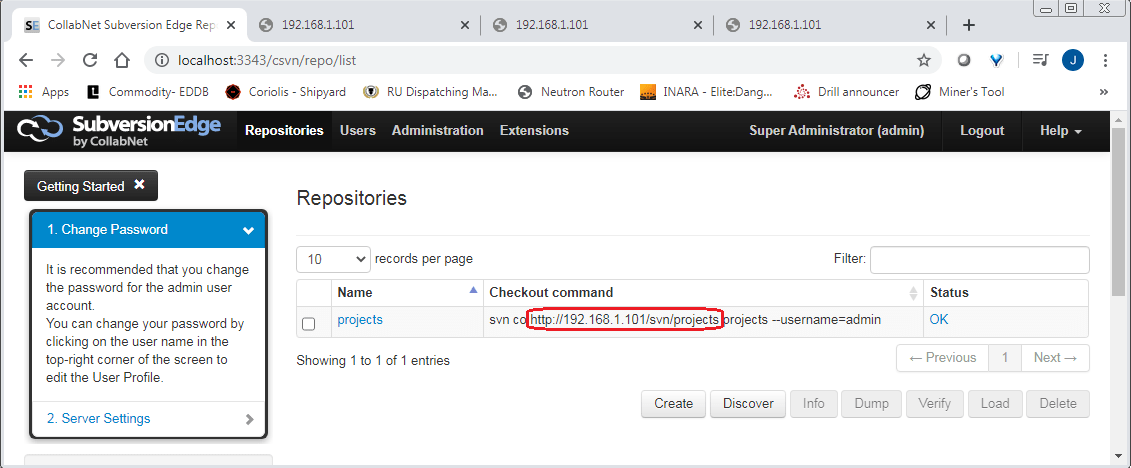
- This action is only done once in any installation.
- The exact url of the project is displayed on this page
- This is one of the essential configuration parameters for Repository.
To see the result of creating the *projects* repository, click on the new blue projects button. It will be empty at this point.
4.1.3 Administration
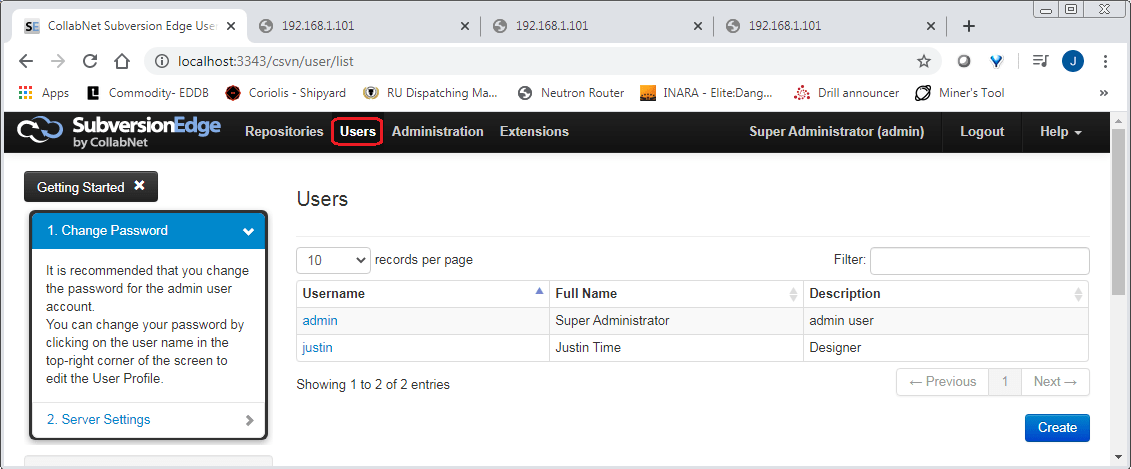
4.1.3.1 Creating users
The administrator can create and delete users on this page. The access permissions can also be set here. These can be quite detailed – giving users read or write access to the whole or parts of a project. This is only for advanced users.
For example, a junior designer might have write access to the GMScripts folder of a project but not the GMData folder – meaning the designer could make up new graphics but not change the look of existing graphics. See below:
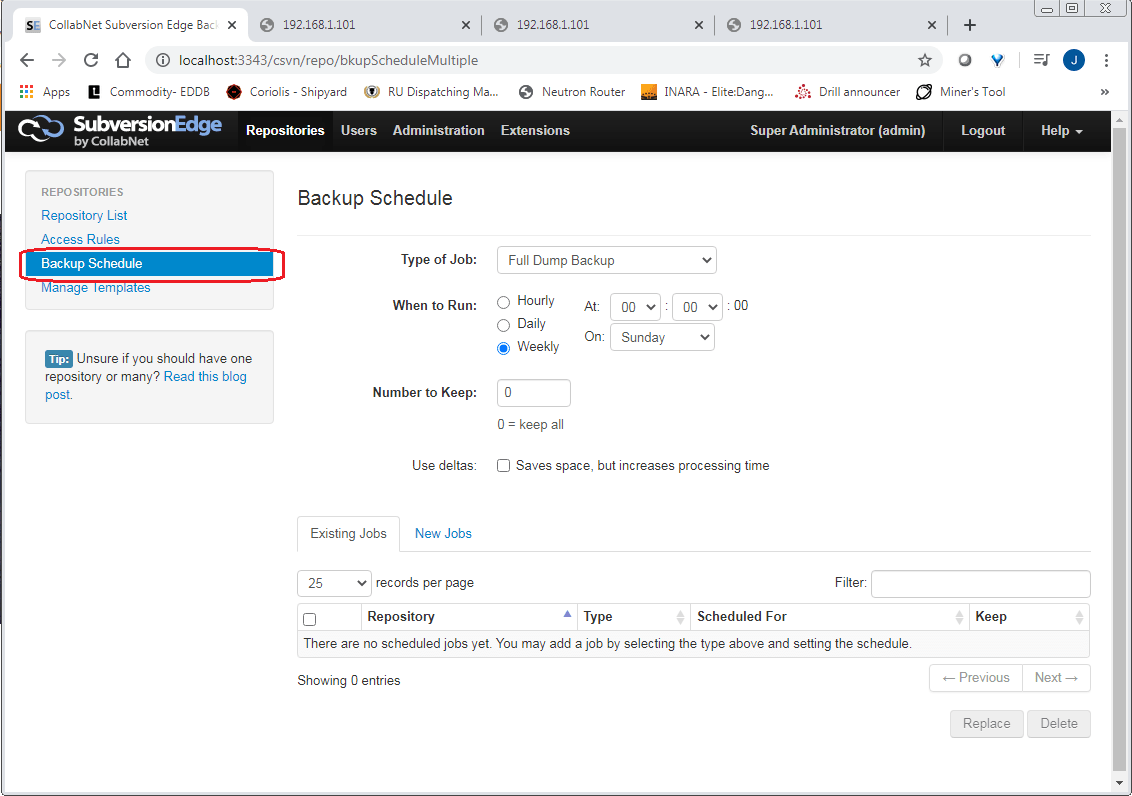
4.1.3.2 Scheduling backups
The administrator can schedule backups where the subversion server automatically dumps a repository to disk at regular intervals. Collab subversion now provides backup to the cloud – this is also configurable here. See below:
4.2 Repository Users
There are three users involved:
- Administrator – the administrator uses the CollabNetSubversion web-based management tool to create and administer the central repository (add new users and set their access rights, schedule backups etc.),
- Designer – the designer creates advanced graphics projects using tOG Edit or tOG 2d and stores these in the central repository using Repository.
- Operator – the operator uses Repository to distribute graphics projects from the central repository to renderers when necessary.
4.2.1 Repository workflow example
- Designer checks-out subversion project from the repository
- Designer modifies project
- Designer checks-in the modified project into the repository
- Operator distributes the modified project to the relevant TX PCs
- Operator synchronizes the TX PCs
4.3 Repository Workflow principles

5.0 Using Repository
The TOGRepository application can only be run via a Windows shortcut that is created by the installer and placed in the installation directory chosen in Chapter 3.3. It can be dragged to a more convenient location if desired.
- To create a shortcut manually read section 6.3.
- Double-click on on TOGRepository_r24966 to start.
5.1 Creating a Local Repository
When Repository is first run up, if the local repository does not exist the user is prompted to create the local repository. This will initialise an empty checkout of the server repository that was set during installation. This is only if SVN Projects Checkout was not selected in the installer.
See below:
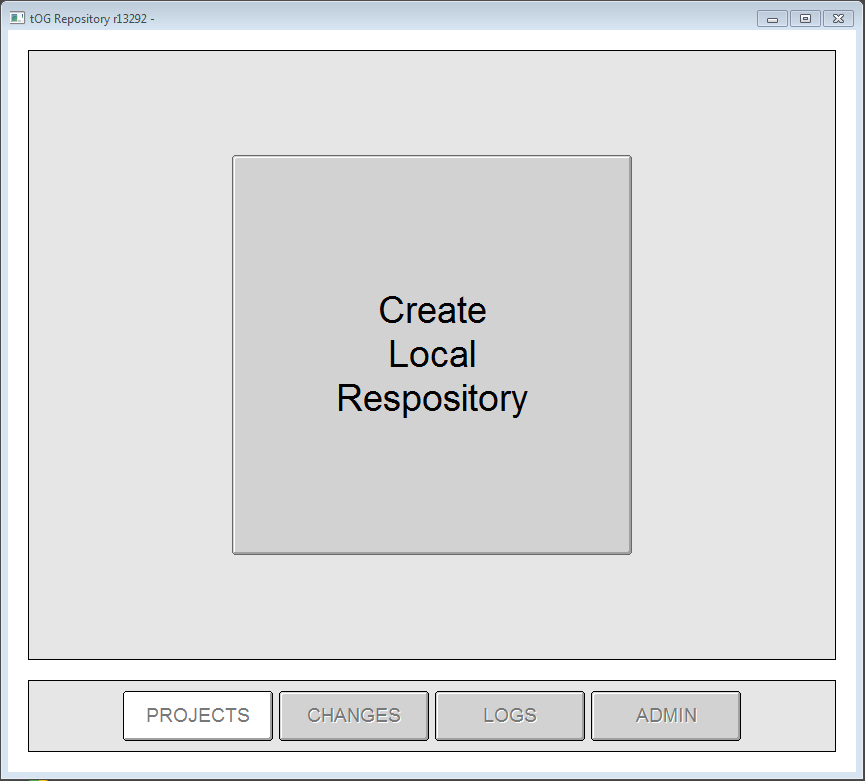
- Click the button to create this directory.
This in effect retrieves the projects folder from the central repository and creates a folder corresponding to it on the local disk in the installation directory, e.g: …/RTSW/projects
- It is initially empty
5.2 Registering Users
Every Repository user should be added as a User. The list of users is also stored on the SVN Server so it is available to all instances of Repository.
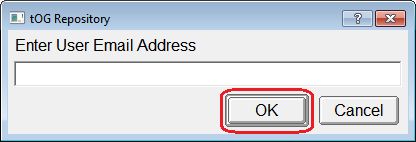
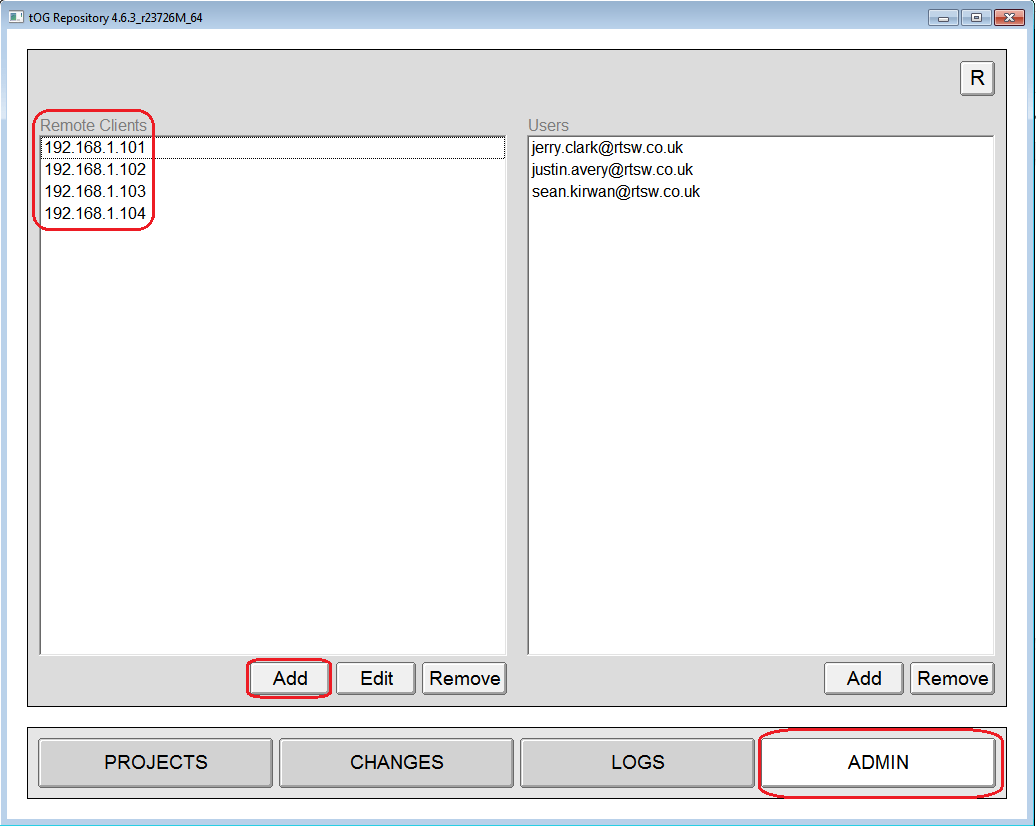
To add a user click on the “ADMIN” button and then on “Add” under the User list:
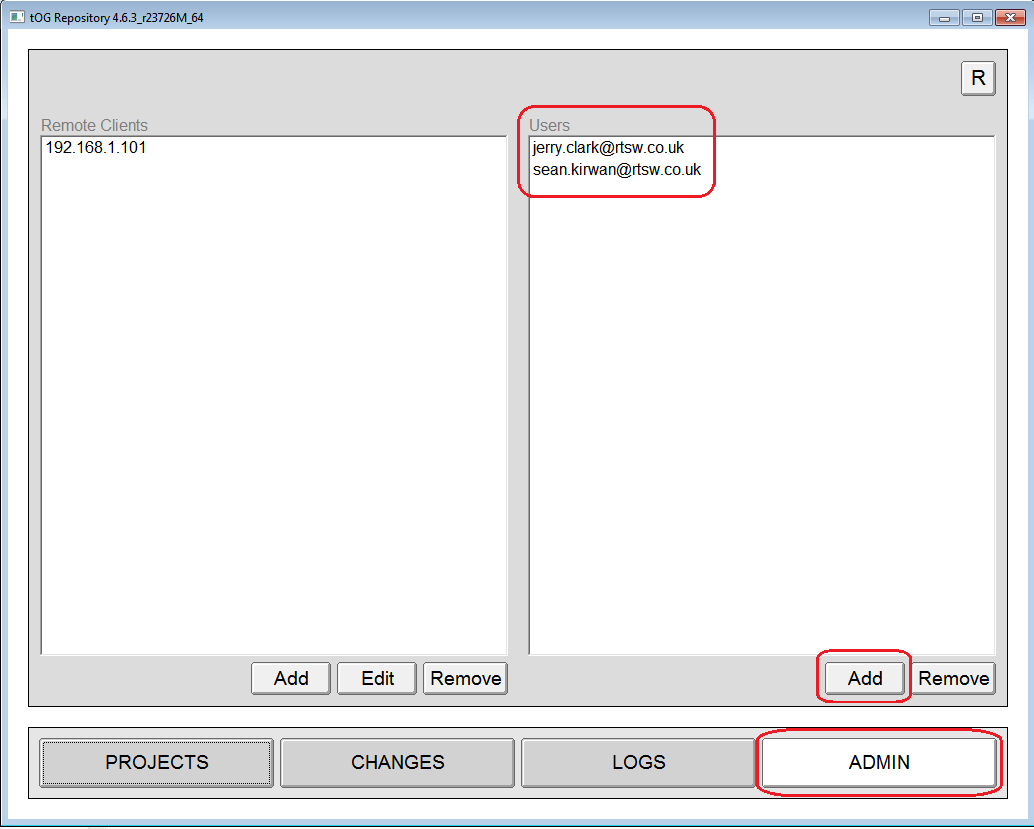
Enter the users’ email address and click “OK”:
5.3 Registering Clients
Each SVN Client (the TX machines) should be entered as a Remote Client. The list of remote clients is also stored on the SVN Server so it is available to all instances of Repository.
To add a remote client click on the “ADMIN” button and then on “Add” under the Remote Client list:
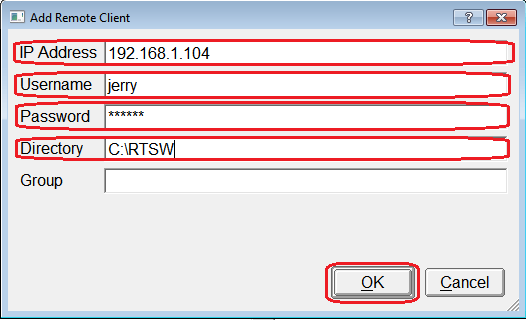
Enter the remote client details and click “OK”:
- IP Address: the IP address of the remote client (must be unique)
- Username: unused
- Password: unused
- Directory: the Installation Directory that was specified when Repository was installed on this remote client (see Chapter 3.4)
- Group: A group name for this remote client – used to filter client names when distributing a project – defaults to “main” (must NOT contain a space)
5.4 Checking-In Projects
5.4.1 Initial Check In
This is required when:
- Repository has just been installed and the SVN Server contained no project
- A new project has been created and it is not yet on the SVN Server
A Designer will create a project with graphics templates using RT editors. To Check-In the project:
- Copy the project folder to the local repository *projects* folder
- Click the Projects button
- Click the Local Tab
- Clicking the refresh button R (refresh) See below:
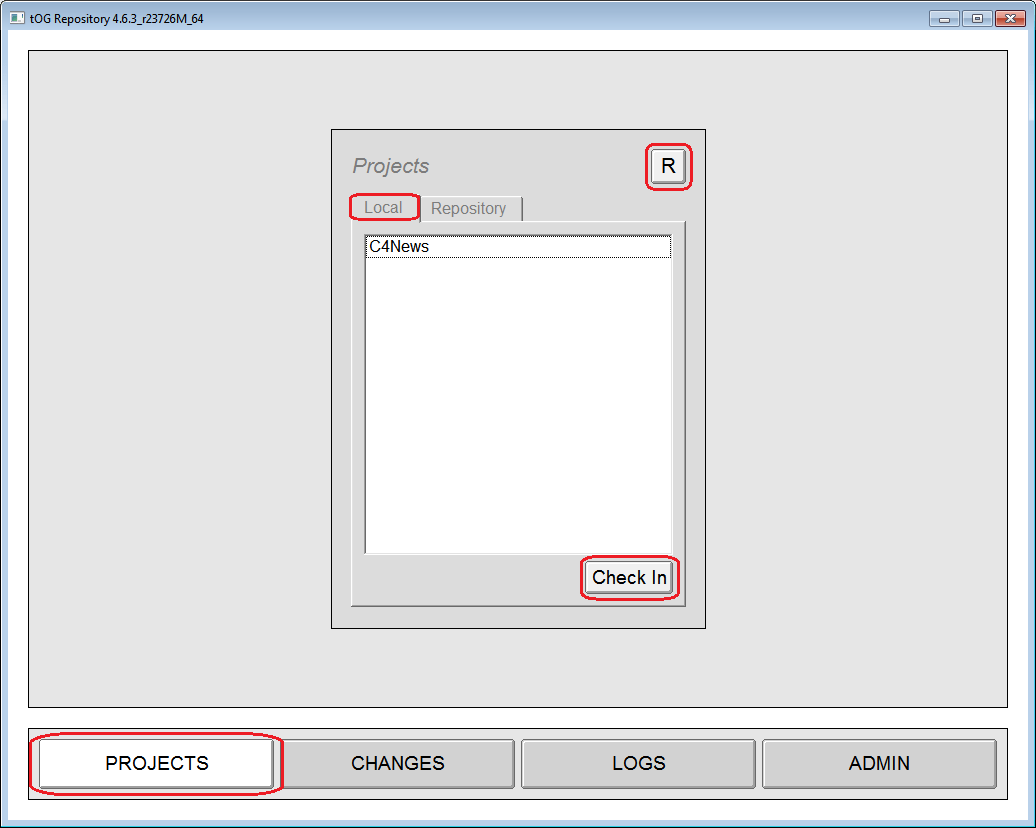
This list shows projects that are in the local repository folder but not yet in the central repository.
- Select it in the list
- Click on the Check In button
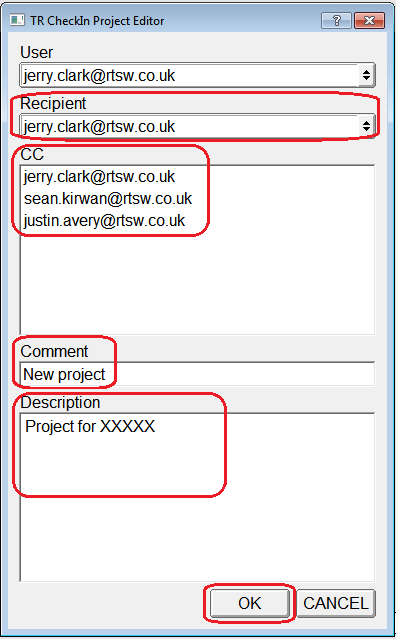
After accepting the check-in the following menu/form is displayed.
Fill in the fields and click on “OK”
- Recipient: the person to be emailed on completion of this check in (not yet implemented)
- CC: person(s) copied into the above email (not yet implemented)
- Comment: A brief comment about the project (mandatory)
- Description: A description of the project (optional)
5.4.2 Check In of Modified Projects
If a local project has been modified it should then be checked into the SVN Server
- Click the Changes button
- Click the Local Tab
- Click on the project in the project list
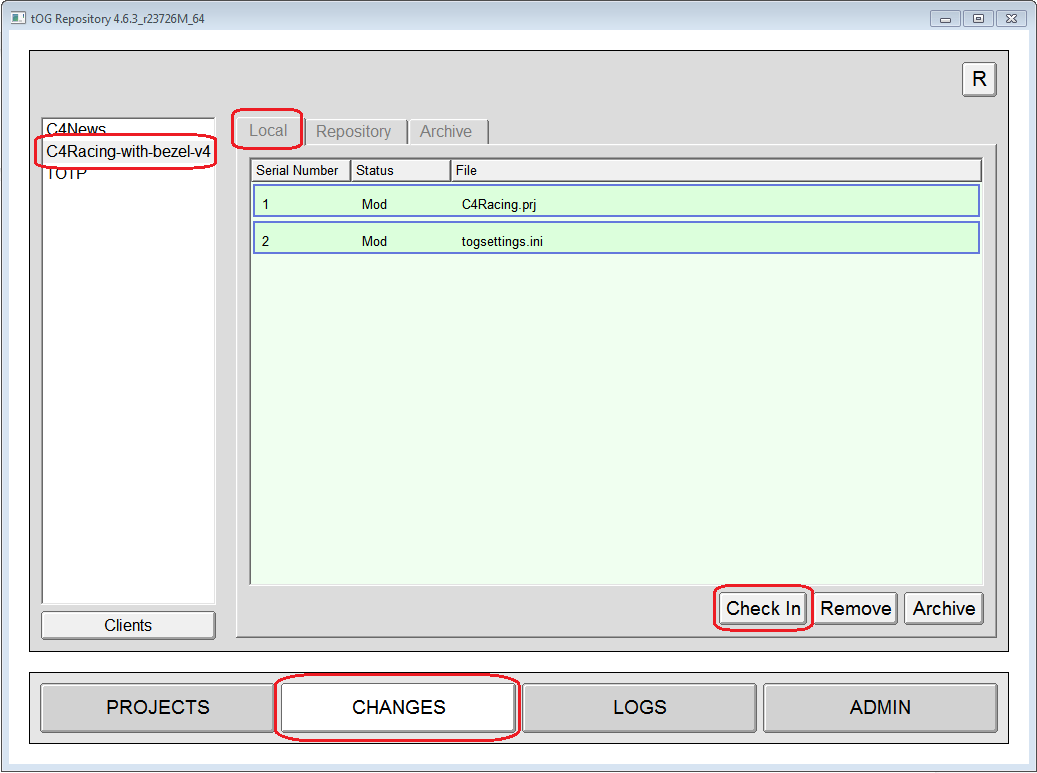
The local changes are now shown in the green area of the menu.
- To Check-In these changes click on the “Check In” button.
- After accepting the check in the same form is presented as above in 5.3.1
- Fill in the form and click on OK.
Following a successful check-in the following menu will be displayed:
This menu gives the option of distributing the project to the TX machines that will be detailed in section 5.6.
Clicking on “OK” will leave this menu and NOT distribute the project.
5.5 Checking-Out Projects
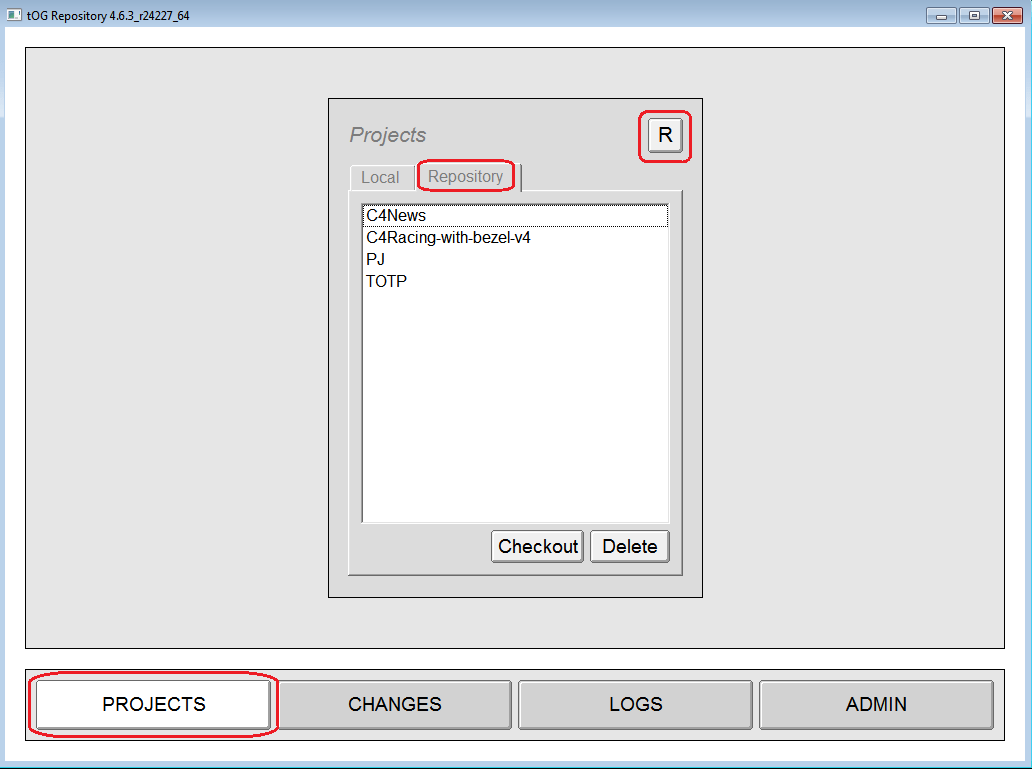
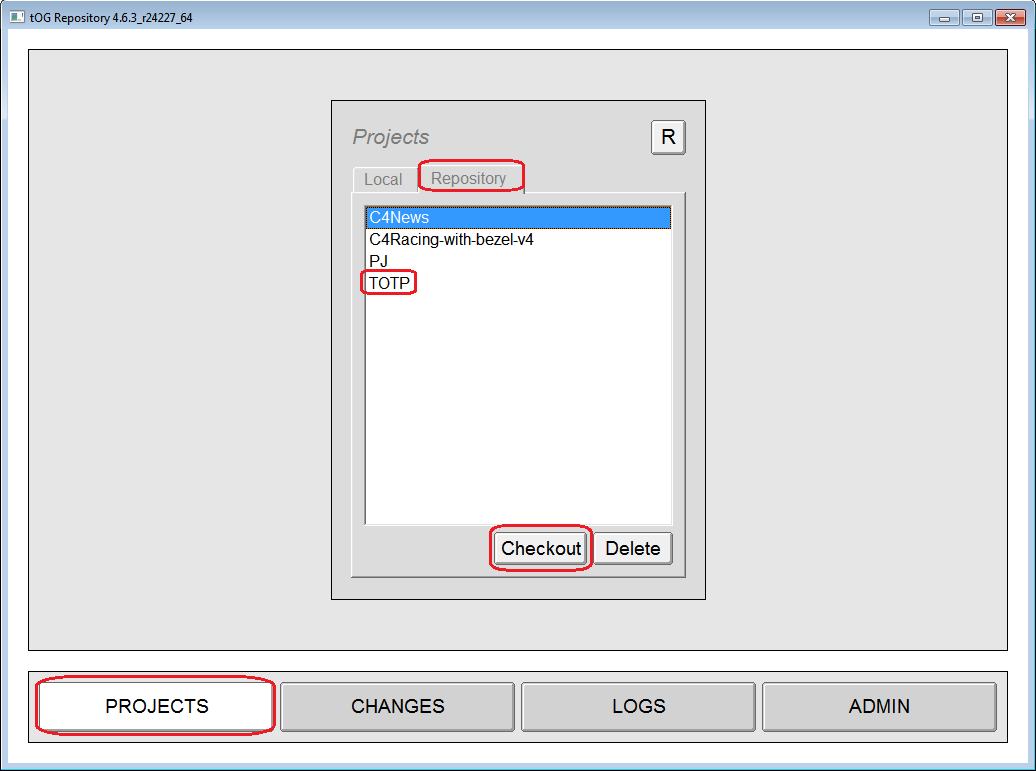
5.5.1 Viewing projects in the central repository
- Launch Repository
- Click on PROJECTS
- Click the Repository tab
Users can now see any projects in the central repository. See below:
5.5.2 Viewing projects already checked out
- Launch Repository
- Click on CHANGES
Projects already checked out are shown in a list:
5.5.3 Checkout a project not already checked out
If a project is shown as in section 5.5.1 but not shown as in section 5.5.2 then it needs to be checked out to the local repository.
Select the project from the list and click on Checkout:
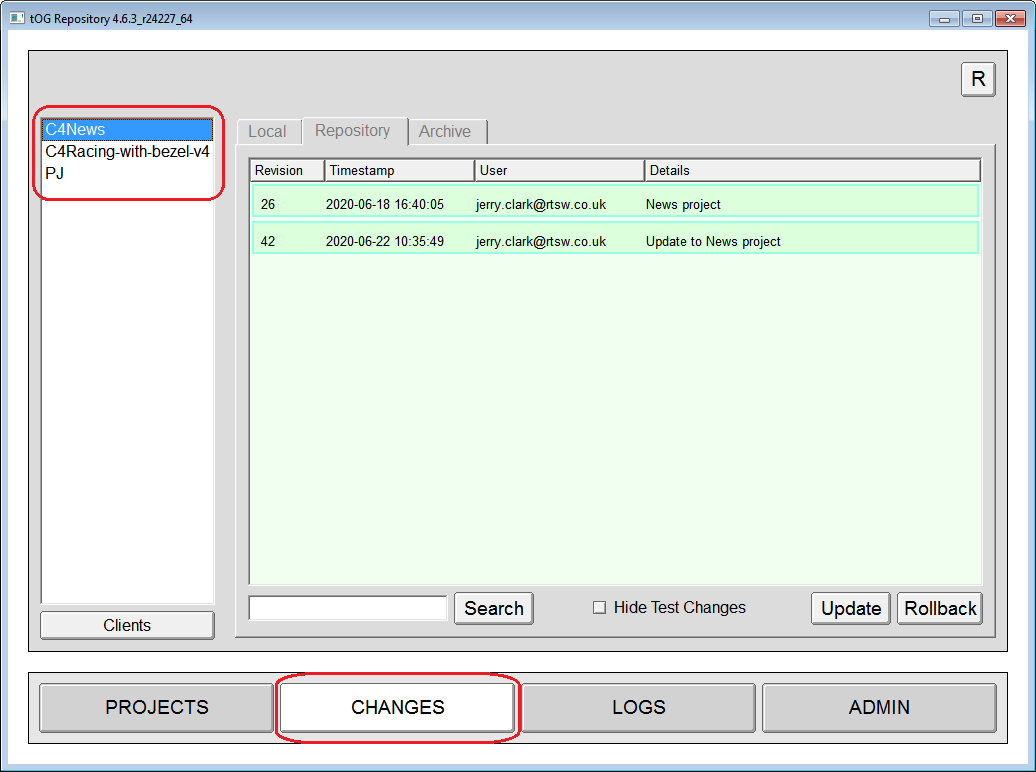
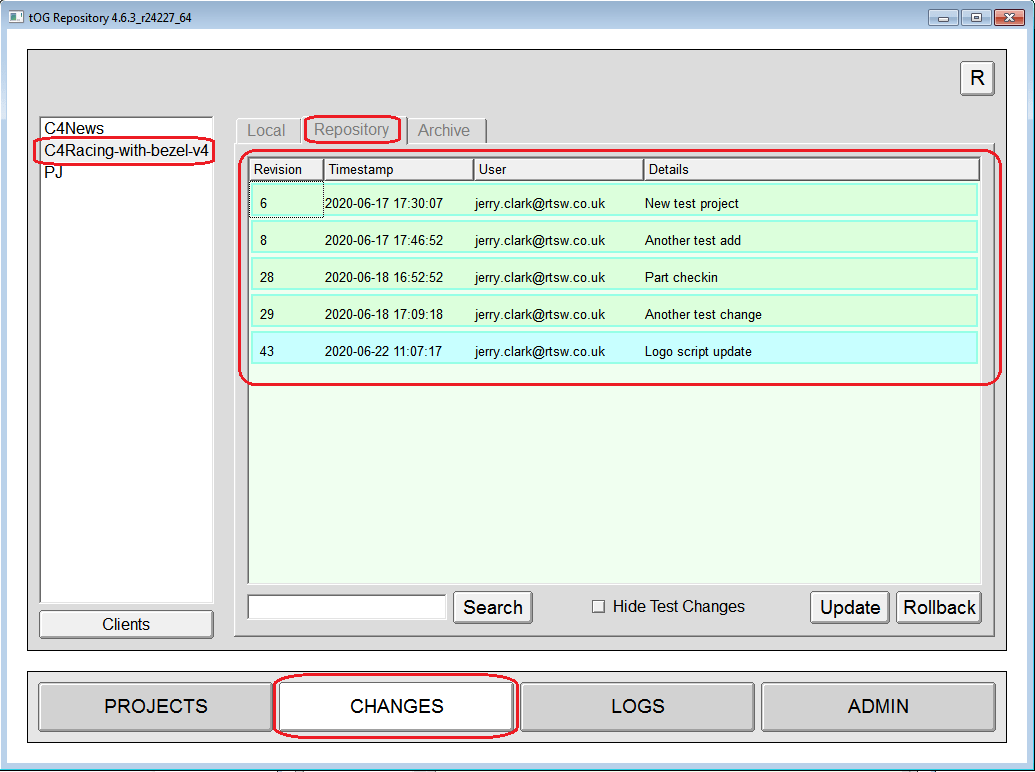
5.5.4 Update a project already checked out
To see the evolution of the project, and the changes made to it:
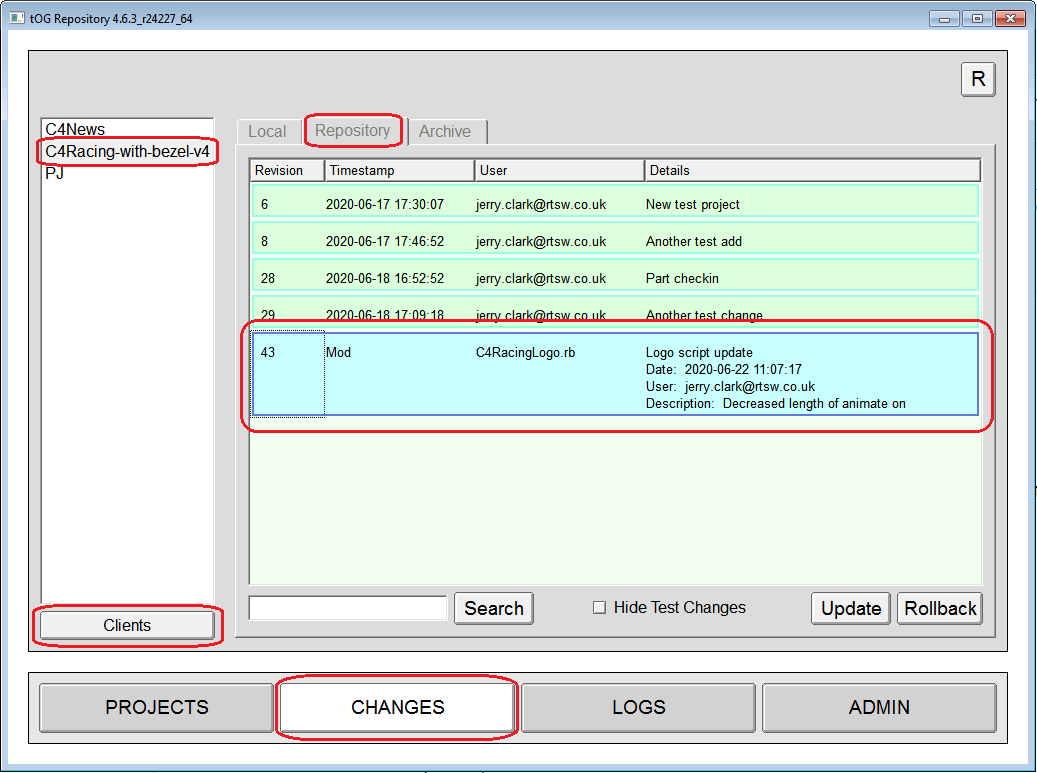
- Click the Changes button
- Click the Repository button.
- The project selected on the left will then display all changes on the right as a checked out project. Any changes that have occurred to the project, but are not held locally, will appear in cyan, see below:
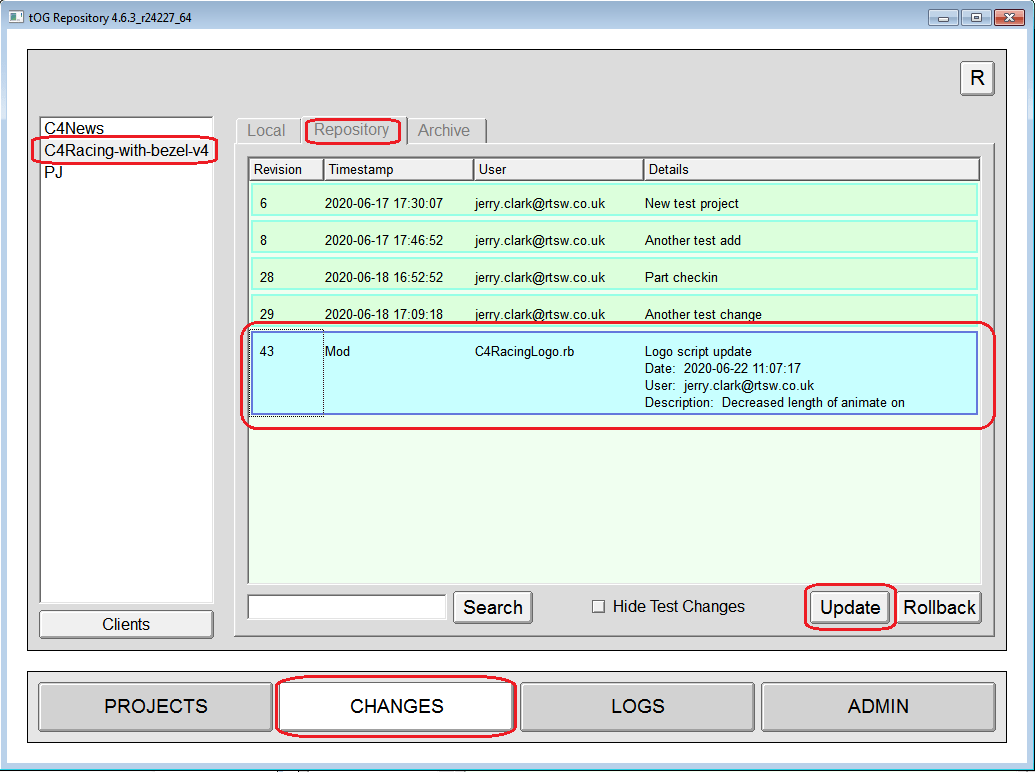
The details of each change can be seen by clicking on a particular revision:
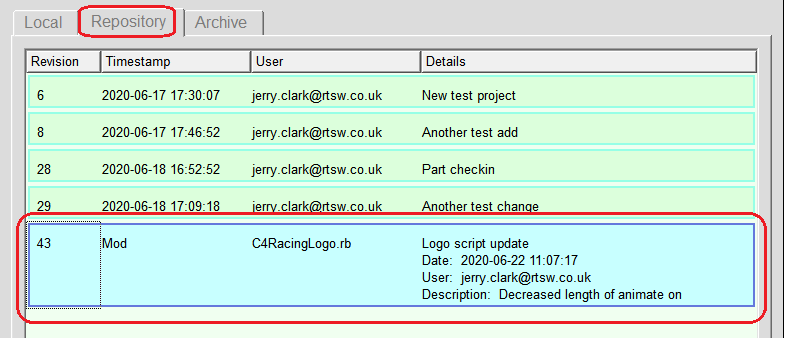
To update the local project to a particular revision from the repository select the desired revision and click on Update:
5.6 Pushing changes to remote clients
This is the process by which the remote clients – usually the TX machines – are updated to a given revision from the central repository. This operation is normally done by an Operator as it can have a disruptive effect on the TX machines.
The operation is done in 2 phases:
- Update the remote machines – the new/modified files are downloaded onto the remote PCs
- Sync the remote machines – the instance of tOG running on the remote machine is told that new files are available and it should re-read its assets files
5.6.1 Update the remote PCs
To be able to update a remote machine the Operator must have the project checked out to their local machine. See section 5.5 for details.
To push a change to 1 or more remote clients:
- Launch Repository
- Click on CHANGES
- Click on Repository
- Click on the relevant project from the list of the left
- Click on the revision to be pushed to the remote clients
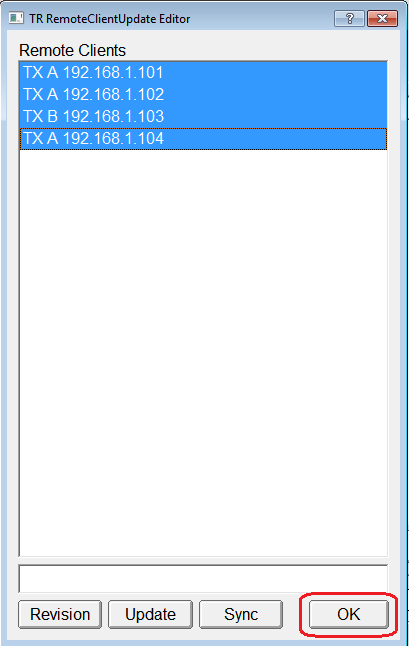
- Click on the Clients button
On the popup menu select the clients that the new changes will be uploaded to. In this example I only choose one machine to update.
- Putting an entry in the Filter box will filter the clients using their group name – the first field in the list of clients.
- Clicking on Revision will show the current revision in the form rXX::YY where XX is the current remote revision and YY is the current local revision.
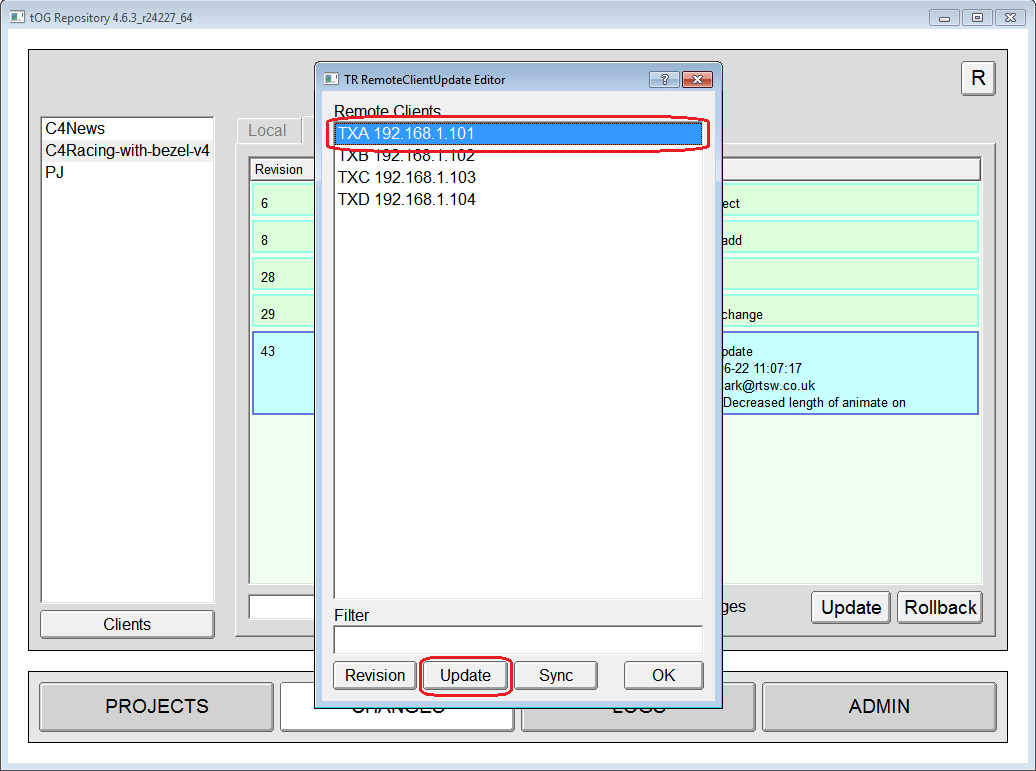
Clicking on Update will push the selected project/revision to the selected clients.
The way this works is that every client is told to update itself from the central repository so strictly speaking the changes are not “pushed” to the client – the client is just instructed to update itself.
5.6.2 Synchronize the remote PCs
This is the same process as above but click on Sync instead of Update. The instance of tOG running on each remote client is notified that new assets are available and to re-read its assets.
This should be done at an appropriate time – i.e. when the render PCs are not using the graphic(s) to be updated.
5.6.2.1 Configuring the Remote PCs to Synchronize
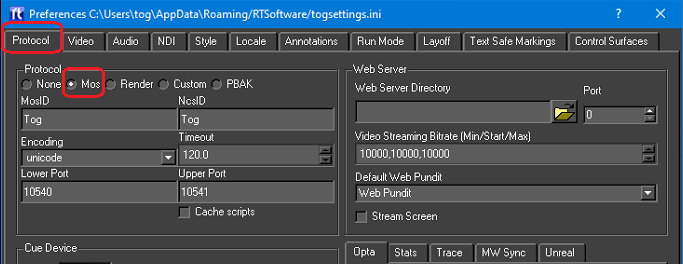
The synchronization command is sent via MOS and instances of Tog running on the remote PCs must be configured to accept MOS commands.
The parameters should be set to:
MosID: Tog
NcsID: Tog
Encoding: unicode
Timeout: 120.0
Lower Port: 10540
Upper Port: 10541
This is normally done from the Preferences Menu:
5.7 Using Subversion commands directly
This requires TortoiseSVN to have been installed and should only be used by experienced SVN users.
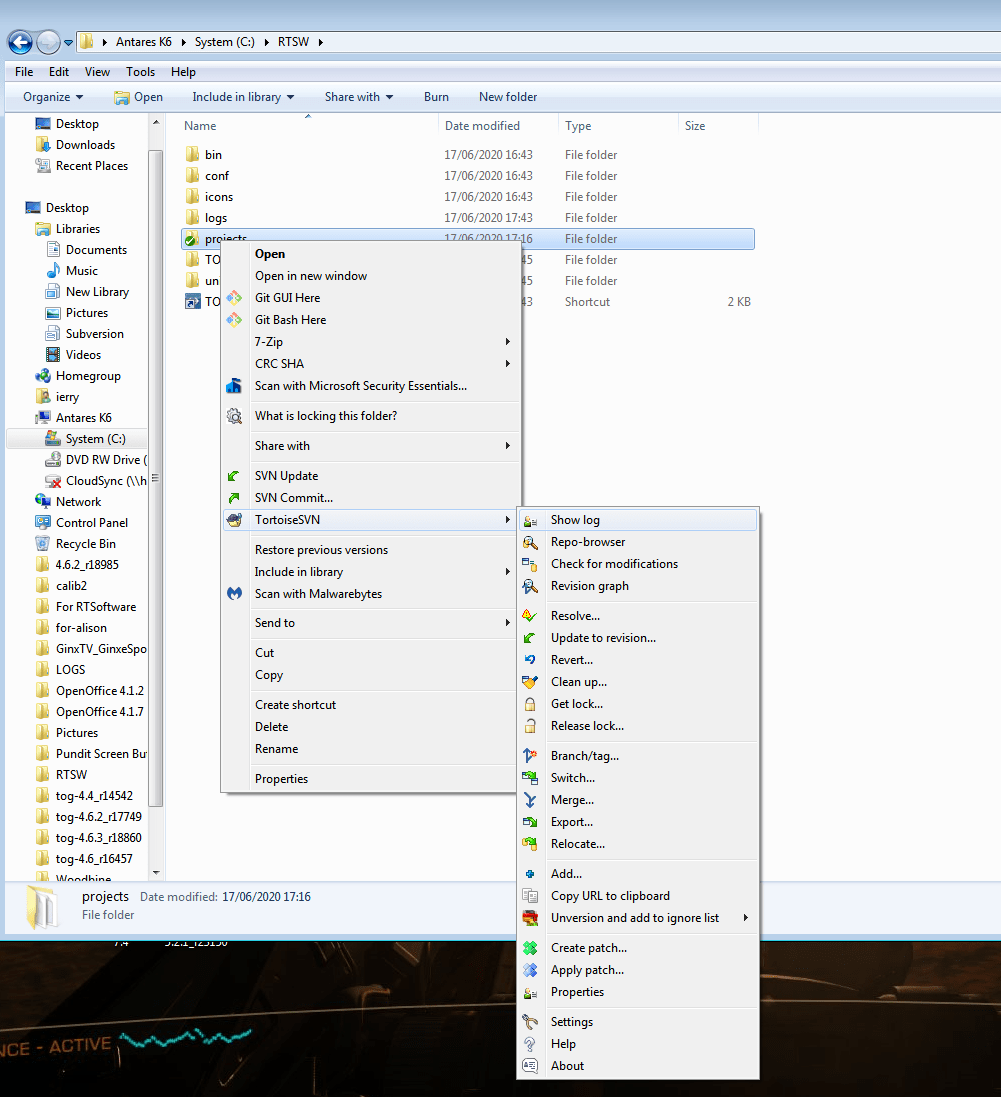
You may at this point use subversion commands directly.
- Right click on any folder
- A popup menu with the subversion tools will be listed.
These can be used to directly do all that Repository does and more besides. However, using Repository wraps them up in a safe and usable manner for the non-expert. See below:
5.8 Conflicts
It is possible for local file and files stored centrally to conflict. This will not happen in the simple model outlined above where one user writes to the repository and one (or more) read from the repository. However, it can happen when more than one user writes to the repository from the same version.
- Conflicting changes will be coloured red in the Repository tab.
If a template author makes a change to a graphic without first checking out changes relevant to that graphic, subsequent attempts to commit changes may result in conflicts.
5.8.1 Avoiding conflicts
It is possible to resolve these changes by archiving and unarchiving local changes but it is best to avoid them completely:
- Coordinating changes to projects so no two authors are changing the same files at the same time.
Alternatively – there are tools available within SVN to interactively resolve conflicts.
5.9 Archiving Changes
Usually it is possible to directly access the machine hosting the central repository over the internet. For those times when it is not possible the user can Archive local changes to disk as a package.
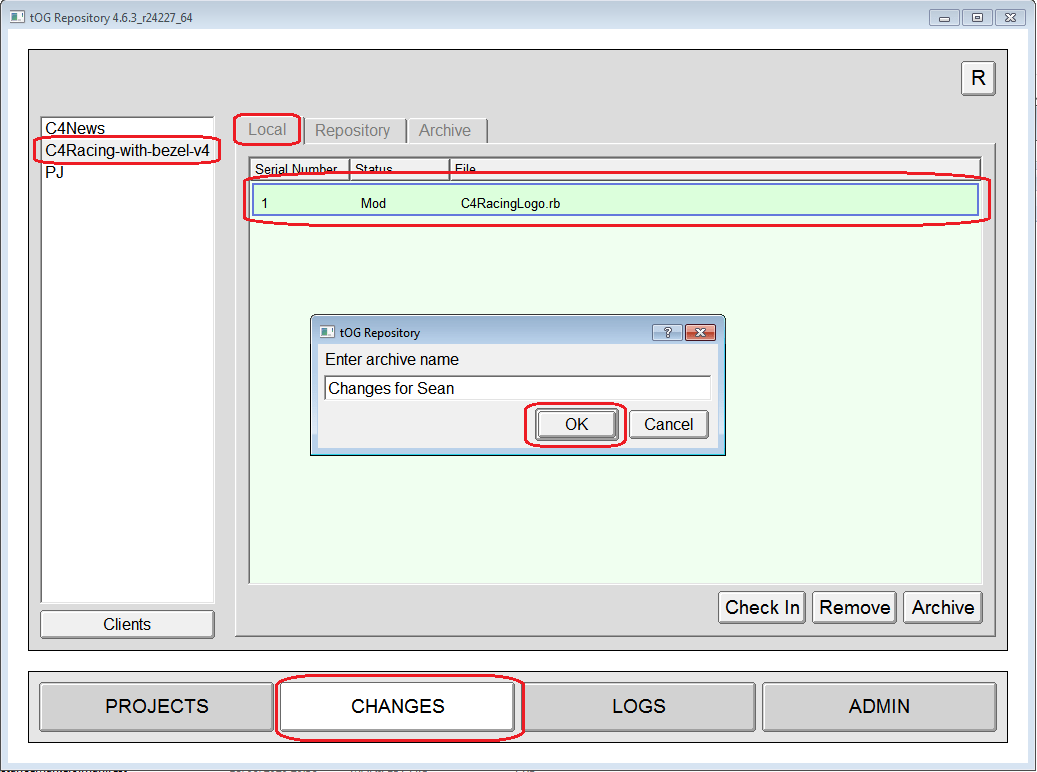
5.9.1 Using Archive
- Click on the change required
- At the prompt, name your Archive
These resulting archive is saved into a folder on disk (which can be zipped) and emailed to a remote user.
The remote user can then copy the zip file to the archive folder and unzip it. This will then appear as an archive in the ARCHIVES tab.
5.9.2 Using UnArchive
To unarchive the file:
- Click the Archive tab
- Select the archive
- Click the Unarchive button
These changes will then be listed under the LOCAL changes tab – these will be changes to the actual project on disk.
Note: Archiving or removing changes is a very convenient way to clean up a project.
5.10 Searching for Changes
It is possible to *search* for changes made in projects that are stored in the central repository.
- Click the Repository tab
- Type the search term to locate the item(s)
- Click Search. See below:
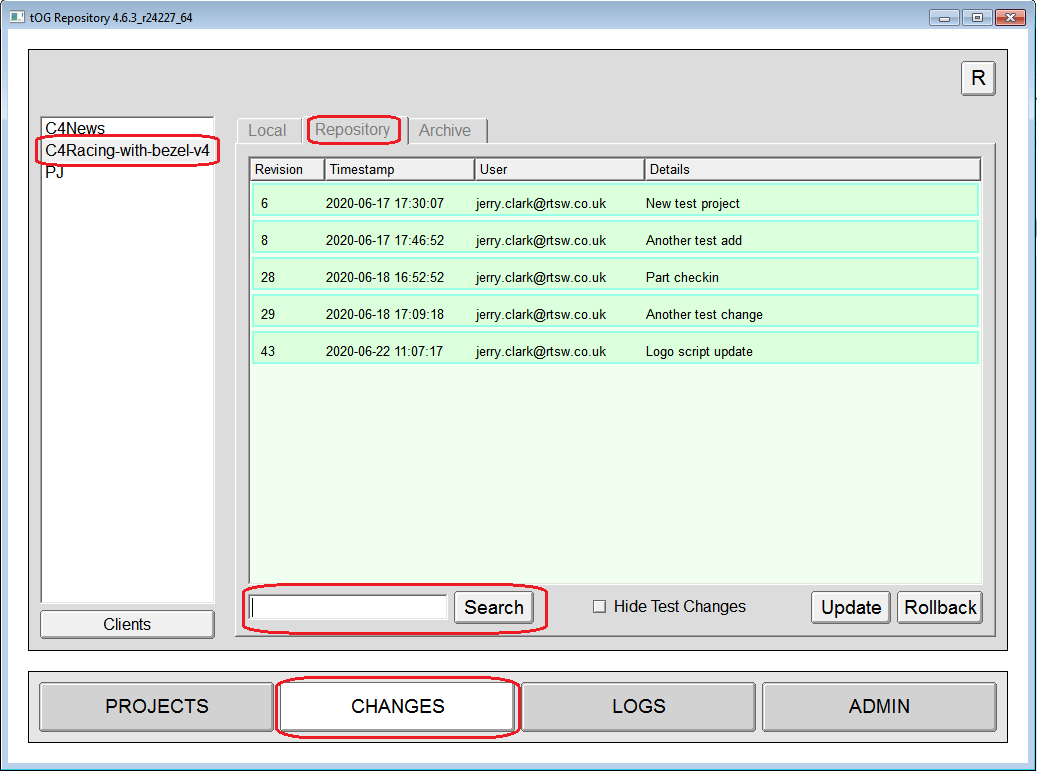
The text is matched against each change and if it forms part of any field in the change (user, comment, date etc.)
- If the text box is empty, and Search is clicked, all changes are listed.
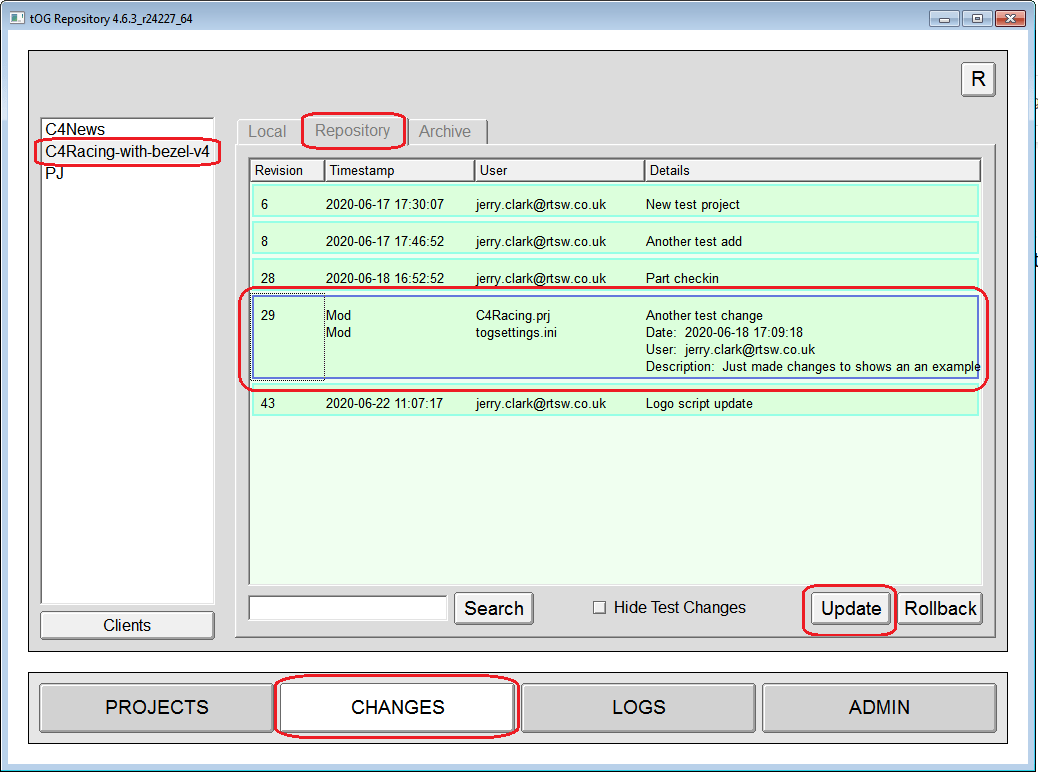
5.11 Update and Rollback Changes
If a user regrets a change, or if a user needs to work with a previous graphic template or style, they can update their local repository folder from a previous version.
5.11.1 Using Update to revert
- Click the Changes button
- Click the Repository tab
- Select the desired version to revert to by selecting the corresponding change
- Click the Update button.
This will change the local project so it matches that version – adding, deleting and modifying files as appropriate. This will result in all the changes which come after this revision changing colour to cyan. This is a temporary solution. See below:
Note: To completely remove changes from a repository is not possible.
However, there is an option to reverse all the changes up to a previous revision and then commit these changes as a single change:
- Rollback.
5.11.2 Using Rollback to revert
- Click the Changes button
- Click the Repository tab
- Select the desired version to revert to by selecting the corresponding change
- Click the Rollback button
This action appears to remove these changes from the Repository and Update the Local version. The user will then be prompted to select remote clients to be updated.
Note: This does not remove the changes from the repository but overrides them.
These changes are not listed on the Repository tab Change List as they are hidden from the user.
6.0 Logs and Troubleshooting
The results of successful and unsuccessful commands are shown on the LOGS tab. The actual commands are saved to the log file here:
- C:userstogDesktopRTSWlogstr.log.
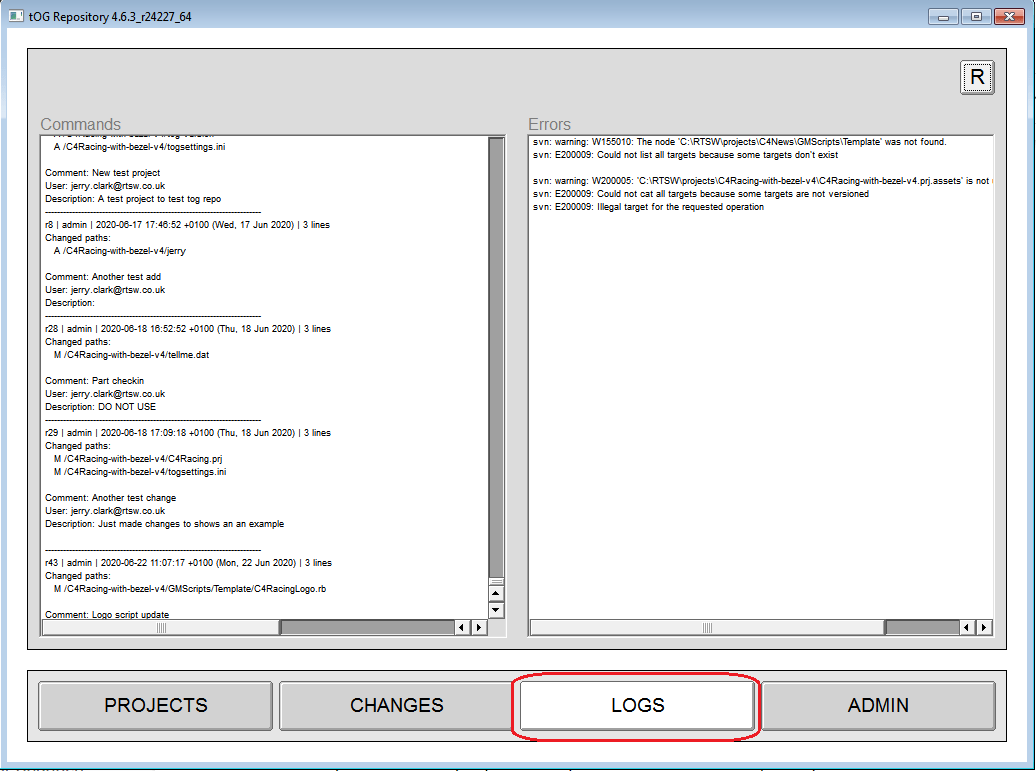
The two main problems encountered are:
- Failure to connect to the subversion server – This will present itself as a fast failure on all commands and an error dialog informing the user to check the error log. The subversion server is very stable and this kind of failure is either due to a network problem or to the server being in a Stop state. Ping the server machine – if the ping fails there is a network problem. If the ping succeeds, then it will be necessary to logon to the server administration web page to check its status.
- Failure for a command to complete – This will present itself as a never-ending wait cursor. Some commands can take a while especially checking in a project. But if the delay is unreasonable, it will almost certainly be due to permission failure for subversion or for update commands. The updates for remote servers are done using the plink.exe application. This requires that at least one attempt has been made on the command line with each of the remote clients. This establishes the remote client as an authenticated client.
6.1 TOGDataClient
TOGDataClient logs are found at:
C:/tOGLogs/tdc.log
Best to make sure that the directory exists as this is where the installer copies its log file too.
6.2 Installation log
The installer has a log that details its process. It is named accordingly: bitrock_installer_10080.log
If C:/togLogs folder exists it will be copied in there. Otherwise it can be also found in:
C:Users<username>AppDataLocalTemp
NOTE that in some Windows systems TOGDataClient and Collabnet SVN Client cannot install clean in a sequence and an error message is returned. This will also be reflected in the installation log as:
“The service did not respond to the start or control request in a timely fashion.”
In this case uninstall with the uninstaller and run the installer separately for these two features.
6.3 Configuration file
The TOGRepository application can be configured with a configuration file in a simple text form. The file is placed in the root directory under /conf and named TOGRepository.conf.
Some of the details are filled in by the installer but can be edited later.
Example:
localDirectory=C:UserstogDesktopRTSW : installation directory
host=http://192.168.100.52/svn/projects : server repository address
commandProtocol=webService : client communication protocol. Only webService is supported
servicePort=5555 : TOGDataCLient com port 5555, cannot be changed and has to be available on the client machine.
emailServer= optional and used for email notifications. E.g: smtp.gmail.com
emailPort= optional and used for email notifications.e.g: 587
emailUsername= optional and used for email notifications.e.g: sean.kirwan@rtsw.co.uk
emailPassword= optional and used for email notifications. email password
username=admin : SVN Server user name. Default is admin. Has to be updated manually if a different user needed
password=admin : SVN Server password. Default is admin. Has to be updated manually if needed
pcUsername=tog : unused
pcPassword=tog : unused
emailAdminSender= : optional and used for email notifications. sender email address
emailAdminRecipient= : optional and used for email notifications. recipient email address
emailAdminCCList= : optional and used for email notifications. cc email address
6.4 TOGRepository launch shortcut
The application can only be run via a Windows shortcut that is created by the installer and placed in the installation directory It is named : TOGRepository_r24966
or can be created manually:
- In <installdir>/bin/TOGRepository right click on TogRepository_r24966.exe.
- Select Create shortcut
- Right click on the shortcut and select Properties
- Edit the Target line:
<installdir>binTOGRepositoryTogRepository_r24966.exe –conf “<installdir>/conf/TOGRepository.conf”
Example:
C:UserstogDesktopRTSWbinTOGRepositoryTogRepository_r24966.exe –conf “C:UserstogDesktopRTSW/conf/TOGRepository.conf”
